Blog

A Quick Custom White Balance Tip Using iPhone

001_DerekClarkPhoto-Custom-WB.jpg

You know that damn slogan that we're all sick of hearing? You know the one “The best camera is the one you have with you”. Quite often that camera is an iPhone, or at least that's the way the slogan started out. Well, I've put a new slant on that by saying “The best white balance card is the one you have with you”. Yup, just as annoying.

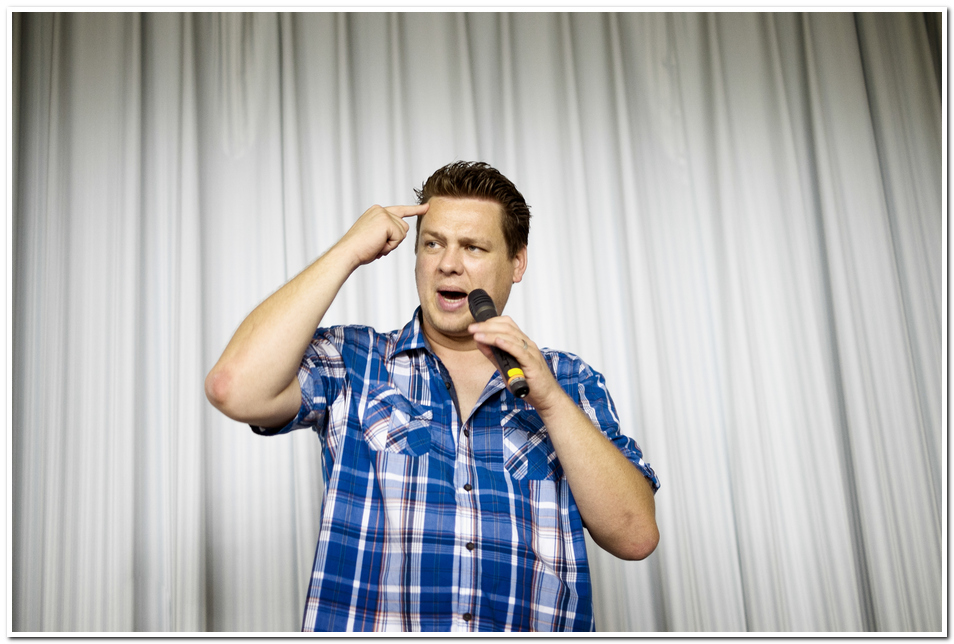
But if you happen to have a white iPhone (or possibly any phone with a silver back), then you have a white balance card that's always with you. I'm a big fan of ExpoDisc's or Colour Checker Passport and I use them often, but sometimes I'm out and about without one of those or they’re in my camera bag at the other side of a theatre and I'm at the front of the stage as a show is about to begin. That's when I pull out my iPhone and set a custom white balance from the back surface. I have a clear bumper case on my phone so that I don’t have to remove the phone to do this. I'm a Fuji shooter but although setting a custom white balance on your camera might be a little different, it won’t be that far away from what I do.

Here's what I do.
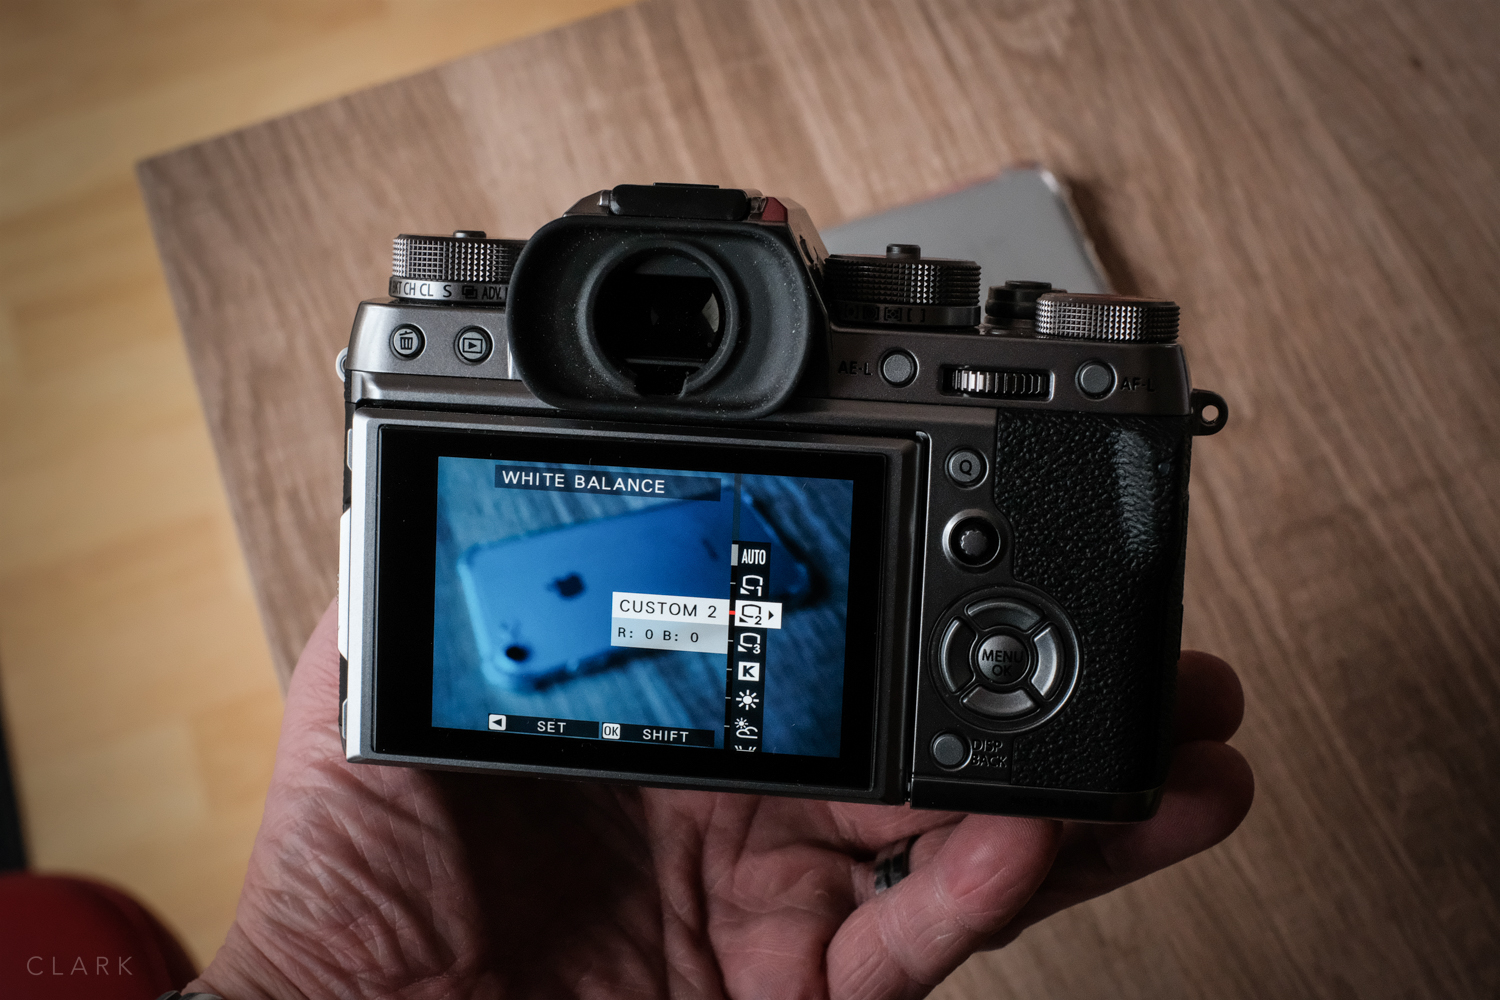
1. Go to Custom White balance (I have al my white balance settings on the right D-Pad on all my cameras.
2. Activate the custom white balance patch.
3. Take a shot of the back of my phone making sure my exposure is as near as possible and all of the white balance patch is filled with the silver grey of the phone. Make sure that the light you are trying to balance is hitting the back of the phone.
4. Press OK to accept the new custom white balance and then take a shot to see how it looks.

Now your white balance is locked in and this is the number one method to speed up your workflow. If you want to change white balance in Lightroom (or the editing program of your choice), all you need to do is select all photos and make sure Auto-Sync is on. Adjust white balance on a single photo and all the rest will have the same adjustment applied too.

Workaround For Fuji X-T2 Video Problem

001_DerekClarkPhoto-XT-2post.jpg

Even with the release of the huge hog beast they call the X-H1, The X-T2 is still a great camera for video. But locking in your settings is a problem, especially if you shoot at 24 or 25 FPS. 

THE PROBLEM
For decent video, we need to lock in our three exposure controls (Aperture, shutter speed and ISO). Aperture is mostly ok because we set it on the lens, but the aperture rings on some Fuji lenses have little resistance and are easy to move without realizing. ISO is pretty good as we can set it on the top dial and press the lock button. Or we can assign ISO to the front command dial and press said dial to lock it (this is the quickest way). But shutter speed is a real problem if you like to shoot at 24 or 25 FPS. We can choose 1/60th of a sec on the shutter speed dial on the top plate, but to get it down to the required 1/50th of a second we need to use the rear command dial. So far so good, but the rear command dial doesn't lock and they tend to be as loose as a loose thing. I've had this move on me multiple times and it drives me nuts. I don't know why we can’t press the dial in to lock it the same way the ISO dial works.

THE SOLUTION
But there is a solution to this problem that allows us to lock in any of the exposure triangle settings or lock all of them at the same time. Here's how to do it. You will find all of these settings in the menu under Settings - Button/Dial Settings

1. Make sure the rear command dial (or the front command dial if you have them reversed) is set to adjust shutter speed by 3rd stops. You will find this on page 1 of the above-mentioned menu, SS Operation.
2. Next, you will need to change one of your Fn buttons on the X-T2  to 'Lock Settings'. This is on page 4 of the Button/Dial Settings menu. I use the AF/L button because I have back button focus assigned to the rear command dial.
3. Now, with the camera back in normal shooting mode, press the Fn button that you assigned to Lock.
4. Choose 'Function Selection'' and then tick the boxes you wish to lock. I have Shutter Speed ticked, but you might also want to lock Aperture, ISO or both. 
5. Now when you want to lock in your setting you just click that Fn button and choose Lock Settings - 'Selected Function' and your Settings will be locked and can’t be moved by accident. This will also lock your shutter speed dial on the top plate, so remember to turn the lock off when you want to change the settings.

That’s it. Any questions just leave them in the comments below and I'll answer them as best I can as soon as I can.

Bastards

Photo by Kevin Mullins

Photo by Kevin Mullins

My Kage Collective buddy Bert Stephani, who a lot of you will know as a Fujifilm X-Photographer, excellent photographer and all round nice guy, has had his camera gear stolen.

Bert is based in Belgium and while he was out doing a talk at a local camera club, thieves were breaking into his house and stealing most of his camera gear. He is a professional photographer, so he depends on his equipment to be able to make a living. Not only was Bert doing the talk for free, but he often works on a project to help refugees. Nice guys don't just finnish last, they get humped!

Here is a list of his stolen gear, plus serial numbers. It was stolen in Belgium, but it could easily pop up anywhere in Europe and could be available internationally through Ebay.

Fuji GFX50S SN:71005024 (Fuji strap was attached, contained 2 Lexard cards, probably without battery charger or any of the other supplies accessories)
Fuji GF63mm SN: 75A02439
Fuji GF110mm SN: 76A01409

Fuji X-T2 It has one of the special customized serial numbers: BERT S1 (There was a green strap attached, probably without a battery charger, flash or any other accessory, there were 2 SanDisk cards in there.)
Fuji XF16-55mm SN:56A23230 (probably without lens cap, was attached to the X-T2)
Fuji XF50-140mm can't find the serial number, it didn't have the tripod collar attached
Fuji XF100-400mm SN65A07297

These items will probably be offered without box, lens cloths, or any of the accessories they should come with. If you see anything that might be Bert's, please contact him at bert@bertstephani.com

Digital Workflow, Drobo And Hard Drive Fails

006_DerekClarkPhoto-Digital-Workflow.jpg

New Year Resolutions
My Drobo really filled up in 2017, due largely to my Fujifilm cameras being updated from 16-megapixel sensors to 24 megapixels and also video footage from the DJI Spark. The front row of blue LED's that displays the amount of data used had all but one lit up. It's a five-bay Drobo, but I only had three hard drives inserted (two 4 TB drives and one 2 TB). So as soon as the new year was over, I ordered a new Seagate 4 TB drive from Amazon UK and while I was at it, I made another stab at sourcing an mSATA drive for the Drobo's accelerator bay on the bottom side. The mSATA is an SSD and used to access the most used files and speed up access times. But finding a compatible mSATA is not the easiest thing to do. I had already tried and failed a while back and had to return the drive to Amazon because the Drobo wouldn’t even boot up. This time I ordered a Transcend MSA370 64GB mSATA III from Amazon UK which cost 50 UK pounds including postage. If, like me, you've been finding it hard to source an mSATA for your Drobo, read on to find out if this one works out (I haven't inserted it at the point of writing this paragraph).

A Backup For My Backup
Drobo is a really nice system and everything is backed up as soon as you put a file in there. The one thing that makes me a little uneasy is that Drobo is also a locked-in system. If the Drobo enclosure fails, you can’t just pull the drives out and stick them in a USB caddy to gain access. You would have to repair or buy a new Drobo for your drives before you could access any of your files. So I decided to buy a desktop drive to backup my Drobo. Off I went to a brick and mortar store to purchase an 8 TB Seagate Backup Plus External drive (180 UK Pounds), which has two handy USB charging ports on the front panel.

004_DerekClarkPhoto-Digital-Workflow.jpg

Back at my iMac, I unpacked the new desktop drive and was surprised at how slim it was. Then I looked at my wallet and realized that it was so much slimmer. I attached the Seagate to my Mac and attempted the usual format to OS Journaled in Disk Utility, which is usually a simple process. But disaster struck and I was unable to format the drive in either my iMac or MacBook Pro. I'll make this long story a short one and just say that in the latest version of Mac OS, Apple have added a view mode in Disk Utility, but the default mode is to only show the volumes of a hard disk, but not the disk itself. This meant I was trying to format the volume, rather than the actual drive. It seems so simple looking back, but...why Apple...why?

When I finally got the 8 TB drive formatted, I decided to use an app called SuperDuper by Shirt Pocket. It's a really nice piece of software that allows you to clone, copy or mirror hard drives in a number of really useful ways. I opted to use the Smart Update option, which looks at the source disk and mirrors the content. So after the first stage of copying all the data from Drobo to Seagate (4 and a half TB), which took around 30 hours (Drobo connected via Thunderbolt and the Seagate via USB 3), each update will take only the amount of time it takes to add or delete any files that have changed on the source drive.

003_DerekClarkPhoto-Digital-Workflow.jpg

So I set up the data backup from the Drobo to the 8 TB Seagate using SuperDuper and hit Copy. All looked great and I went out to pick up my wife from work. But when I returned, I was greeted with a red light on the Drobo, which signals a drive has failed (remember that Drobo is where drives go to die). Lucky it was the 2 TB drive, but with only two 4 TB drives left working in the Drobo, but 4.5 TB of data, it meant that all my data was there, but if another drive failed, I would lose data. The backup to the Seagate drive was underway, but I could see that it would take more than 24 hours before it would be complete and my data would be safe. So I jumped in my car and headed to a couple of 24-hour supermarkets, but they only stocked drives in enclosures. I almost bought one of those with the intention of bursting the case open to get to the drive, but I decided against it because I had a couple of 1 TB drives in enclosures at home that I could burst open. But when I got home, I thought that these older drives might not even be SATA.

The next morning I was standing at the door of a tech store waiting for them to open. I bought a 4 TB Western Digital Red drive and went straight home. I pulled it out of the packaging and swapped it with the failed drive. Drobo did it’s thing and started to backup my data to the new drive, which took a good few hours. But then I would know my data was safe. I woke up on the couch at 2 am the next morning and all backups were complete.

002_DerekClarkPhoto-Digital-Workflow.jpg

While all this was going on, the new Seagate drive and the mSATA arrived from Amazon UK. After everything had settled down and all my data was backed up and even more secure than before, I decided to insert the mSATA into the Accelerator Bay on the Drobo. Having had previous disappointment in this department, I was ready to accept failure once more and give up hope of using this feature in the Drobo. I turned the Drobo over and opened the cover on the base. I inserted the mSATA very easily and closed up the bay, then powered up the Drobo and waited for the result. Hey presto! It worked. I moved through a selection of photos in Lightroom, checking to see how quickly they loaded. Then I went back and moved through them again to see the difference. I’m sure it’s the combination of more hard drive headroom and the mSATA, but my iMac has never been so slick. Lightroom previews open quickly and I can move rapidly from picture to picture.

001_DerekClarkPhoto-Digital-Workflow-3.jpg

Cloud Storage for Offsite Backup
Now that all this hard drive stuff has been solved and I'm really happy with the performance, I can get on with what my plan for the new year was in the first place. I have a spare 4 TB Western Digital My Book Studio desktop hard drive that I want to use to hold copies of all my exported/edited pictures in full resolution. This drive will then be backed up to a cloud service. I'm not sure which one yet, but I'm leaning toward Backblaze right now. This will be my offsite backup in case of fire or theft. I would rather lose my original RAW files than the finished JPEG's because I would never go back and re-edit 186,000 pictures. My finished JPEG's are my Digital negatives.

My Digital Workflow

DCP-DigitalWorkflow.jpg

**my Digital Workflow**
Finally. I thought it would be a good idea to show my digital workflow. It's not shown in the diagram above, but I use a Lexar Professional Hub to import my files into Lightroom.

Summerlee Heritage Museum (Scotland) Filmed With The DJI Spark

An early flight with the DJI Spark on a sunny morning at Summerlee Heritage Museum. Summerlee is a free industrial museum in Coatbridge, North Lanarkshire (Central Scotland). It features a working tram, a mine, trains, a canal (with boat) and houses from past decades (1960's 1970's...).

002_DerekClarkPhoto-Summerlee.jpg

Fujifilm New Product Releases (7th Sept 2017)

It’s a big day for Fujifilm today with the release of several new products and some significant announcements. You'll find full details on Fujifilm's own site, but I wanted to do a brief roundup for those of you who are as lazy as I am when going through the news.

1. The new Fujinon XF80mm f2.8 R LM WR Macro will be another stunning lens and I have it on good authority that it might even top the 90mm f2. I've seen some great sample pictures from this lens and they were absolutely stunning.
Take a look at the latest X-Series lens roadmap HERE.

Fujifilm_80mm_f2.8_Macro.png

3. The long awaited X-E3 camera body is finally here. Like the X-E2 and X-E2s that came before it, the X-E3 is amazing value for the money (£849 in the U.K.) when you consider how close the specs are to the flagship X-Pro2. If you can live without an optical viewfinder, this might be an option for you. It would also make a great second camera or backup to the X-Pro2. Here's a list of some features

Screen Shot 2017-09-06 at 21.20.51.png
  • First X-Series camera to feature Bluetooth for transferring photos to smartphones and tablets.
  • Touch screen (not tilting) with smartphone usability.
  • 24.3 megapixel sensor with latest X-Processor Pro.
  • 4K Video.
  • Brand new auto focus algorithm that is 50% faster at tracking than the current models.
  • Focus joystick as found on the X-Pro2 and X-T2.
  • Extreamly handy auto switch from the X-70.

2. The Fujinon GF45mm f2.8 R WR is the 6th lens in the GF System. If you are interested in the medium format Fujifilm GFX, then this new 45mm f2.8 will be a beast of a lens. What a system the GFX is turning into!
Take a look at the latest GFX lens roadmap HERE.

Fujifilm_GFX_45mm_f2.8.jpg
Screen Shot 2017-09-06 at 21.21.44.png

4. New Firmware for the X-Pro2, X-T2, X-T20 and X100F is also announced today, but won't be available until November and December this year.

X-T2_GraphiteSilver.jpg

X-T2 Firmware v3.00

1. New AF tracking algorithm for moving subject

Thanks to the newly developed image recognition algorithm, the update enhances AF-C to track moving subjects twice as fast as previous firmware. In addition, the update also enhances tracking to be able to capture up to 50% smaller moving subjects than before.

2. Support “FUJIFILM X RAW STUDIO”

Once connecting a camera to a computer via USB cable, the “FUJIFILM X RAW STUDIO” enables users to convert RAW files with X Processor Pro. The fast batch processing will also be available. The “FUJIFILM X RAW STUDIO” can be downloaded from the FUJIFILM website for free.

3. Improve radio flash controller usability

The upgrade allows users to shoot with compatible third party studio flash in high speed sync. or TTL mode via their radio controllers.

4. Support for backup/restore of camera settings via FUJIFILM X Acquire

Once connecting a camera to a computer via USB cable, the “FUJIFILM X Acquire” allows users to backup/restore camera settings to/from a file. Copying all camera settings from one camera to another is available.


X100F Firmware v.2.00

1. Support for backup/restore of camera settings via FUJIFILM X Acquire

Once connecting a camera to a computer via USB cable, the “FUJIFILM X Acquire” allows users to backup/restore camera settings to/from a file. Copying all camera settings from one camera to another is available.

2. Supports “FUJIFILM X RAW STUDIO”

Once connecting a camera to a computer via USB cable, the “FUJIFILM X RAW STUDIO” enables users to convert RAW files with X Processor Pro. The first batch processing is also available. The “FUJIFILM X RAW STUDIO” can be downloaded from the FUJIFILM website for free.

3. Improve radio flash controller usability

The upgrade allows users to shoot with compatible third party studio flash in high speed sync. or TTL mode via their radio controllers.


5. A Fujifilm/Magnum Photo Collaboration

15 Magnum Photographers will explore the theme of “HOME” for the project. Known for their wide range of approaches, Magnum Photos members produce documentary photography that encompasses art and photojournalism. Sharing the agency’s legacy for humanistic photography, associated with its founding in 1947, Magnum’s contemporary practitioners are united by a curiosity about the world. This project invites them to explore a universal subject familiar to us all

“Home” is not only defined as a space for physical living. It holds various other associations that are emotional, biological, cultural and societal. These 15 photographers have been given an open brief to explore the subject through their own individual practices, the resulting work reflecting their personal take on a subject that we all record photographically.

X-Pro2 Firmware v4.00

1. Addition of 4k video mode

The update adds 4k video using the X Series famous Film Simulation modes.  You can input audio from an external microphone (Excluding HDMI output for recording).

2. Support for tether shooting via USB or Wi-Fi

After connecting a camera to a computer, the compatible software (*1) will enable users to transfer images taken with the camera to the computer and save them in a specified folder, or to control the camera from the computer. 

3. New AF tracking algorithm for moving subject

 Thanks to the newly developed image recognition algorithm, the update enhances AF-C to track moving subjects twice as fast as previous firmware(*2). In addition, the update also enhances tracking to be able to capture up to 50% smaller moving subjects than before.

4. Support “FUJIFILM X RAW STUDIO”

Once connecting a camera to a computer via USB cable, the “FUJIFILM X RAW STUDIO” enables users to convert RAW files with X Processor Pro. The first batch processing will also be available. The “FUJIFILM X RAW STUDIO” can be downloaded from the FUJIFILM website for free.

5. Improve radio flash controller usability

The upgrade allows users to shoot with compatible third party studio flash in high speed sync. or TTL mode via their radio controllers.

6. Support for backup/restore of camera settings via FUJIFILM X Acquire

Once connecting a camera to a computer via USB cable, the “FUJIFILM X Acquire” allows users to backup/restore camera settings to/from a file. Copying all camera settings from one camera to another is available.


X-T20 Firmware v.1.10

1. Touch panel operation when using the EVF

The firmware update will make it possible to use the touch panel while looking into the viewfinder. According to the operation method, it's possible to set the effective range of the touch panel to the full screen, right half, left half, or OFF.


Participating Magnum photographers

  •  Antoine d’Agata (France)
  •  Jonas Bendiksen (Norway)
  •  Chien-Chi Chang (USA)
  •  Thomas Dworzak (Georgia/Iran/Germany)
  •  Elliot Erwitt (USA)
  •  David Alan Harvey (USA)
  •  Hiroji Kubota (Japan)
  •  Alex Majoli (Italy)
  •  Trent Parke (Australia)
  •  Gueorgui Phikhassov (Russia)
  •  Mark Power (UK)
  •  Moises Saman (Spain/Peru)
  •  Alessandra Sanguinetti (USA)
  •  Alec Soth (USA)
  •  Alex Webb (USA)
  •  

Photo Exhibition

  •  New York
  •  London
  •  Paris

6. Fujifilm X Raw Studio

FUJIFILM X RAW STUDIO enables users to quickly and easily convert RAW files with outstanding image quality, once a camera is connected to a Mac or PC via USB cable.   

Exceptional image quality is retained, as the X RAW STUDIO system utilizes the X Processor Pro in the camera instead of the CPU in the computer, 

Due to the increasing size of RAW files, users have found batch conversion to be an issue, as it takes more and more time as a result. However, using the high performance “X Processor Pro” processor, this batch conversion is handled far more efficiently as a result.

This new software is due to be available from late November 2017.

Key Features:

  • -    Convert RAW images on the computer (Single / Batch Process)
  • -    Preview converting images
  • -    Save, load, or copy conversion profiles
  •  
  • *Specifications, window images subject to change without notice.
  • *RAW conversion is compatible with a RAW file taken by the same model as the connected camera.  


  • Availability:


  • Application Software FUJIFILM X RAW STUDIO will be available:
  • for Mac:    Late November 2017 
  • for Windows: Late January 2018 
  • FUJIFILM X RAW STUDIO system compatible camera firmware will be available:


  • FUJIFILM GFX 50S:    Late November 2017 (Ver.2.00)
  • FUJIFILM X-T2:    Late November 2017 (Ver.3.00)
  • FUJIFILM X-Pro2:    Late December 2017 (Ver.4.00)
  • FUJIFILM X100F:    Late December 2017 (Ver.2.00)

X-T2 Firmware Update Needed For Shooting Video

I love the X-T2, it's such a great all round camera and very capable of handling pretty much anything you through at it. Video wasn't really something I expected to be doing with it, but it happens now and again. I had a video shoot at the weekend with the X-T2 and I ran into a potentially disastrous problem. Thankfully it's something that could be easily fixed in the next firmware update.

WHAT'S THE PROBLEM?

With the latest firmware update (v2.10) for the X-T2, we got the ability to set one of the front or rear command dials to control ISO. Fantastic! Here's how to:

Go to Setup Menu (the spanner) - Button/Dial Settings - ISO Dial Setting (A) The options are Auto and Command. Choose Command. Set the top plate ISO dial on the X-T2 to A. Now ISO can be adjusted by either the front or rear command dials. The Command Dial Settings Function in the same menu allows you to choose front of rear dial.

Shutter Speed (front) F. (rear)

With this configuration, the back command dial does nothing (unless you have a lens attached that doesn't have an aperture ring, like the 27mm). Both ISO and Shutter Speed are assigned to the front command dial and you toggle between which one is active by pressing the dial. The problem is that one of them is always live and can be knocked off easily.

F. (front) Shutter Speed (rear)

With this configuration, shutter speed is changed by the rear command dial and ISO by the front. The upside is that the ISO can be changed using the front dial  and then locked by pressing the command dial. Unfortunately the shutter speed is always live and so easily knocked by a third stop or two, causing rolling vertical lines that cannot be fixed in post. Video footage is useless if this happens. I must have knocked my shutter speed of at least 6 times at the weekend and will be taping the rear dial down from now on.

THE FIX

F. (front) Shutter Speed (rear) is the ideal choice in my opinion. When shooting video, I like to chose my aperture on the lens and select my shutter speed on the top plate SS dial, then make minor adjustments using the rear command dial (for instance: Set the top plate SS dial to 1/60th and then adjusting the SS to 1/50th using the rear command dial when shooting at 25 fps).

update the firmware to allow the rear command dial to be locked by pressing it (just like the front dial for ISO), we could lock both ISO (front dial) and shutter speed (rear dial).

No more moving dials by mistake!


Kage Collective : The Wind Of Change

After an unintentional break this year, we have returned to the monthly magazine format at Kage Collective. I think by the end of last year and having produced each month to a deadline, we just wanted to go at it differently. But the last few months of not producing much has proved to us that deadlines work, like or loath them.

We've also had a change in lineup to. Flemming and Charlene have both moved on to do other things and we wish them both well on their global travels. But we are super happy to introduce our new member Ronas Rask. Jonas is not only an official Fujifilm X-Photographer, but he actually does all those amazing product shots for the brand. Kage will be an ideal place to show of his documentary side. So now we are 7. Patrick La Roque (Canada), Robert Catto (Australia), Bert Stephani (Belgium), Vincent Baldensberger (France), Kevin Mullins (UK), Jonas Rask (Denmark) and myself have new essays on our latest issue (13).

It took me a while to get back into that deadline mentality, but I finally decided to shoot the second part of my elements with a Lensbaby series. I shot this essay on the X-Pro2 with the Lensbaby Composer Pro and Edge 80 optic. The pictures and the text took a darker turn though when the news of the Manchester terrorist attack surfaced the morning of the shoot, which game me the title of The Gentle Breeze Of The Blast .

As it's the centennial of JFK's birth, I decided to write a review of My Kennedy Years - A Memoir by JFK's photographer Jacques Lowe. A terrific book if you're a fan of the long term documentary project, which this was the mother of them all.

Great New Firmware From Fujifilm, But The X-Pro2 Ain't Feelin' The Love

Fujifilm has released new firmware for the X-T2, X-Pro2, GFX and even (unexpectedly) the X100F. Unfortunately the X-Pro2 got a little short changed this time around and it ain't feeling the love! But hopefully the great peeps at Fuji will put this right soon. You can find the latest firmware and a full list of what's new from HERE. But here are a few of my favourites.

FRONT COMMAND DIAL ISO:

One great feature that's been added to the X-T2 is the ability to control ISO from the front dial. This one appeared first on the X100F and is really handy when you want to lock in aperture and shutter speed and use the ISO to make adjustments to exposure. I do a lot of jazz concert photography and I tend to have to shoot wide open and with the shutter speed at 1/125th (my preferred minimum SS). The ISO dial on the top of the X-T2 is great, but it means taking my left hand of the camera to make adjustments. The front command dial is easy to access and let's me keep both hands on the camera. This feature was not added to the X-Pro2.

REAR COMMAND DIAL BACK BUTTON FOCUS:

Another great one from the X100F that's been added to the X-T2 is the ability to press the rear command dial for back button focus. You can actually assign a variety of functions to the rear command dial switch. I find the AF/L button on the X-T2 a bit too far to the right, but I can't switch it with the AE/L button because I poke my thumb into my eye with that one (I'm a left eye shooter). So pressing the rear command dial to back button focus is a great option. Sadly though, this feature was not added to the X-Pro2.

OPTION OF 'ALL' ADDED TO AF MODE

This one was unexpected and a really welcome feature. By selecting 'All' in the AF Mode you can use any of the command dials to choose any of the AF Modes. We do this in the exact same way as we change the size of the focus point. Press the Focus Selector Lever (the joystick) to turn the focus point green. Now rotate either the front or rear command dial to increase the size of the focus point, which cycles like this:

  • 6 different sizes of single point
  • 3 different sizes of Zone
  • Wide Tracking (it then loops back to the smallest single point)

I have my AF Mode assigned to the bottom button of the D-Pad, but by using this new method, I could leave it AF Mode set to 'All' and free up that Fn button for something else. It's unexpected gems like this that make Fujifil so great, but guess what - this feature is not on the latest firmware for the X-Pro2.

CONCLUSION 

As far as I know, no other camera manufactures virtually give away new cameras through frequent firmware updates. That might seem like an exaggeration, but quite often it really does feel like a new camera. I'm looking forward to the X-Pro2 firmware engineer getting back from his holiday at Skegness and bringing all the latest features to the other flagship X-Series camera - the X-Pro2. 

One firmware request I do have for another camera in the lineup (even though it might be discontinued), is to fix a bug in the X70 firmware. When using the WCL, the manual focus scale disappears from the LCD, which is a problem when zone focusing.

Fujifilm X100F Review : Beauty And A Beast

002_DerekClarkPhoto-Fuji_X100F.jpg

Based On A Pre-Production FUJI X100F

This review is based on a pre-production camera after two months of using it, but the production model probably won't be much different. I'm an official Fujifilm X-Photographer and I have owned each version of the X100, plus almost all of the other X-Series cameras. I shoot exclusively with the X-Series cameras and haven't used a DSLR is years. This review is based on that. The pictures of the camera on this post were shot by me (they are not the official promo shots). I used my X-Pro2 with the brilliant 35mm f2 lens and a single overhead umbrella. For the close shots, I used the smallest of the Fuji Macro Tubes (11).

DESIGN AND LAYOUT

Your opinion may differ from mine, but I think the X100F is the most beautiful camera I have seen in my entire life! It keeps the look of the original X100, but the lines are cleaner, sharper and the top plate now slopes from the upper to the lower level. This, more than any other camera, has that thing where you just want to pick it up and hold it in your hands.

The X100F now has a front command dial, A front fn button (on the OVF/EVF selector lever) and the focus assist light has been moved up to sit alongside the flash on the front of the top plate. My first thought when I unboxed it back in November was that it felt a little chunkier in my hands than my X100T, which is a good thing in my book.

The rear of the X100F has a similar button layout to the X-Pro2 so it's been so easy to shoot with both these cameras together without having to think too much. I do wish Fuji had put three buttons next to the viewfinder instead of two (the X-Pro2 has three). It would also be nice to use the Delete key as an Fn button while in playback mode (like on the X70) and even be able to use the Q button as an Fn button and have Q assignable to any of the Fn buttons. The best new feature on the back of the the F is the joystick. I'm so used to this now that I find it awkward when I use any of my older X-Series cameras. It's also great that this frees the D Pad up to be used as 4 fn buttons now (Drive + 3 more).

NEW FUNCTIONS

The X100F has been brought up to spec with the two flagship Fuji cameras, the X-Pro2 and the X-T2, which is pretty impressive in this much smaller camera. It has the same 24 megapixel sensor and processor, which seems to be the new standard in X-Series cameras and one I hope will find its way into the next version of the X70.

THE ISO DIAL

The ISO dial has been brough over from the X-Pro2, which some will like and some won't. I like it, but it could have benefited from having a shutter speed lock button (like on the X-Pro2) because it is easy to move the shutter speed dial by accident if you don't pull the dial up far enough. I didn't find this to be too much of a problem though. But thanks to the next feature, you don't even need to use the ISO Dial if you don't want to.

ISO COMMAND MODE

This is a big one that has been brought over from the X-T10. You can still use Auto ISO in the usual way, but if set to Command in the Buttons & Dials setup menu and the ISO Dial on the top plate is set to A, the front command dial becomes the ISO dial. This is ideal if you want to lock your aperture and shutter speed and have ISO as the only variable. We Need this feature in the X-Pro2 and X-T2. It would be nice to be able to lock this by pressing the front Command Dial switch.

C = 5 STOPS OF EV COMPENSATION

Like on the X-Pro2 and X-T2, the X100F has the letter C on the Exposure Compensation Dial which extends EV Comp to 5 stops. Simply select C and then use the front Command Dial to scroll through 5 stops in either direction.

So what happens if both ISO and EV Comp are set to be controlled by the front command dial? In this instance the front command dial switch is used to toggle between ISO and EV Comp.

DIGITAL ZOOM AND CONVERSION LENSES

Both of the currently available conversion lenses, the WCL-100 (28mm) and the TCL-X100 (50mm) work with the X100F, but at the time of writing this review there is a second version of both lenses on the horizon. I have no idea how they differ from the ones I have, because both of the original conversion lenses perform brilliantly.

These lenses have apertures of f2 wide open (just like the fixed lens) and there's no loss of light like you would get with a teleconverter. But if you don't want to carry extra lenses (having a single fixed lens is after all the beauty of this camera), the X100F inherits the Digital Zoom function from the X70. By twisting the focus ring (in auto focus mode) you have the option of 50mm, 70mm and the cameras standard 35mm field of view. This is not an optical zoom, but there is some sort of magical upscaling going on that keeps the quality high. I'd still rather use one of the conversion lenses, but the Digital Zoom can be really handy sometimes. The viewfinder displays either 50 or 70 in a small box at the upper side, which changes when you have the camera set to Tele Converter Lens (72mm & 100mm using the digital zoom) or Wide Converter Lens (41mm & 58mm).

It's worth mentioning here that the Digital Zoom feature won't work in RAW, so you have to set the camera to JPEG only or the focus ring does nothing. Another point would be that when the camera is set to Manual Focus Mode, the focus ring obviously won't be used for Digital Zoom. The feature will still work, but you will need to with to AF adjust Digital Zoom with the focus ring and then switch back to MF.

There are 4 Control Ring Settings (focus ring). STD or Standard (changes the default option according to the shooting mode), White Balance, Film Simulation and Digital Zoom. Standard and Digital Zoom pretty much do the latter, but it would be nice to have a fifth option of OFF. A workaround for this is obviously to shoot in RAW+JPEG so that the control ring does nothing.

BATTERY

The NP-95 battery from the previous three X100 models has been replaced by the same NP-W126 that the X-Pro, X-T and X-E series uses, which is a great thing if, like me, you tend to cary more than one X-Series camera with you. I haven't noticed much difference in the amount of shots I get out of a single battery, but I have been using the F on high performance. Check Fuji's specs for more info on battery life.

CONCLUSION

I hate to state the obvious, but the X100F is the best X100 camera so far. The X100F,  X-Pro2 and X-T2 have jumped so far ahead of all the other X-Series cameras that I'm now in the process of selling both my X-T1's and probably my X-E2, in favour of the X100F, X-Pro2 and X-T2. I'm not sure what the fate of my X100T will be yet.

If you own any of the X100 cameras, from the original to the S and the T, it is a no brainier. Buy the X100F (if you can afford to) and you will not be disappointed. F is for Fourth, but it could just as well be for Fast or even another F word :o)

I think the X100F is of close to perfection. Obviously we all have our own preferences to how we setup our cameras and Fuji have made their cameras super customisable, from the Q Menu to My Menu and lots of Fn Buttons. But if Fuji are reading this post, I would be doing them a miss service if I didn't mention a few firmware updates for the future that would make this camera out of this world.

MY WISH LIST FOR FUTURE FIRMWARE

  • Q Button as an assignable Fn button.
  • Delete button as an Fn button in shooting mode (like the X70).
  • Pressing the front command dial to lock ISO in Command Mode.
  • Ability to toggle ISO Auto & Command Mode on any of the Fn buttons (not just in the menu).
  • Ability to put ISO Auto & Command Mode in My Menu
  • The ability to disengage the Control Ring function.
  • Be able t use the front Fn button to toggle between digital zoom settings with each press 50 -70 -35 -50...
  • More options for assigning things to the front command dial (on all Fuji cameras).
  • Swap the functions of pressing the rear command dial and the joystick (i.e. put Focus Check on the joystick).

LAST WORD FROM ME

The X-Pro2 and the X-T2 are the dual flagship models, but I personally see the X100F as a 3rd flagship. The flagship of the compacts.

LINKS TO OTHER X100F POSTS