
35MM STREET IS THE STREET PHOTOGRAPHY BLOG BY AWARD WINNING PHOTOGRAPHER DEREK CLARK. IT FEATURES TUTORIALS, TIPS AND TRICKS AND LOTS OF PICTURES FROM AN EXPERIENCED STREET PHOTOGRAPHER.
How To Zone Focus For Street Photography

There are a few ways to shoot street photography, but probably one of the most interesting is shooting from the hip. We are so used to seeing everything from the viewpoint of our own two eyes that simply dropping the camera a foot or two can dramatically change our pictures and make them more interesting. Combine that with getting in closer and using a wider lens and the results can be quite dramatic. But shooting from the hip is not the easiest thing to do. The two main reasons for this is framing and focusing without looking through your viewfinder. The options when it comes to how you frame the shot are basically, guess where you think the lens should point, or use the LCD. The former takes a lot of practice and you really need to know your lens well. The latter can be difficult unless you have a camera with a tilting LCD screen. I use the Fuji X70 when shooting from the hip, which does have a tilting screen. Even just pulling the LCD out a little bit can make all the difference when framing a shot.

Zone focusing can be a great way to get in close to people on the street, but although it's best to use a really wide lens (for reasons that I'll go into later in this post), it's often easier to fill the frame with a person using a wide lens and shooting from the hip, than it is to use a narrower lens and shooting through the viewfinder.
WHAT IS ZONE FOCUSING?
Zone focusing is basically setting your camera to manual focus mode, adjusting your focus to the desired distance and then guessing when the subject is that distance from your lens and then shoot the picture. Obviously shooting at f1.4 wouldn't work for this because it would be impossible to be accurate enough at guessing the exact distance. So a smaller aperture is best for this

CAMERA SETTINGS
I prefer to set my Aperture and shutter speed manually, set my ISO to Auto. One of the reasons I like this setup is that the ISO is the only part of the exposure triangle that I want to be variable and it's easier to turn the Exposure Compensation Dial than it is to go into the menu. First off, here are my settings on the Fuji X70.
- Shutter Speed: 1/500th Sec
- Aperture: f8 or f11
- ISO: Auto
- Focus: Set to 6'

SHUTTER SPEED
I like my shutter speed to be 1/500 of a second to freeze the action if my subject is moving. This speed also let's me get away with not being completely still too. If the light is really poor I will drop this to anything between 1/500th and 1/250th. At a push I will go to 1/125th, but then I'm looking for still subjects.

APERTURE
Aperture should be set to f8 or above for zone focusing to work well. A lower f stop will result in a shallower depth of field and the chances of the subject being within that narrow slice of focus are slim, especially when you will be guessing the distance they are from your camera.

ISO
My Auto ISO settings are listed below. This is based on the way Fuji work Auto ISO, with most of the X-Series cameras having three custom ISO presets. Like I said, ISO is the variable one of my cameras three exposure settings (for the reasons listed above). Todays cameras are easily capable of producing great looking images at higher ISO's like 1600, 3200 and even 6400.
- Base ISO: 200
- Maximum ISO: 3200
- Minimum Shutter Speed: 500th

LENSES
Zone focusing is best done with a wide lens. I'm speaking in full frame terms when I say that a 35mm lens is the largest focal length I would tend to use for zone focusing, but I would expect a lot of out of focus shots. 28mm and wider are ideal lenses for street! Using the manual focus distance scale on my X100T and switching between Normal (35mm) TCL (50mm) and WCL (28mm), I'll demonstrate the difference in the amount of depth of field available.


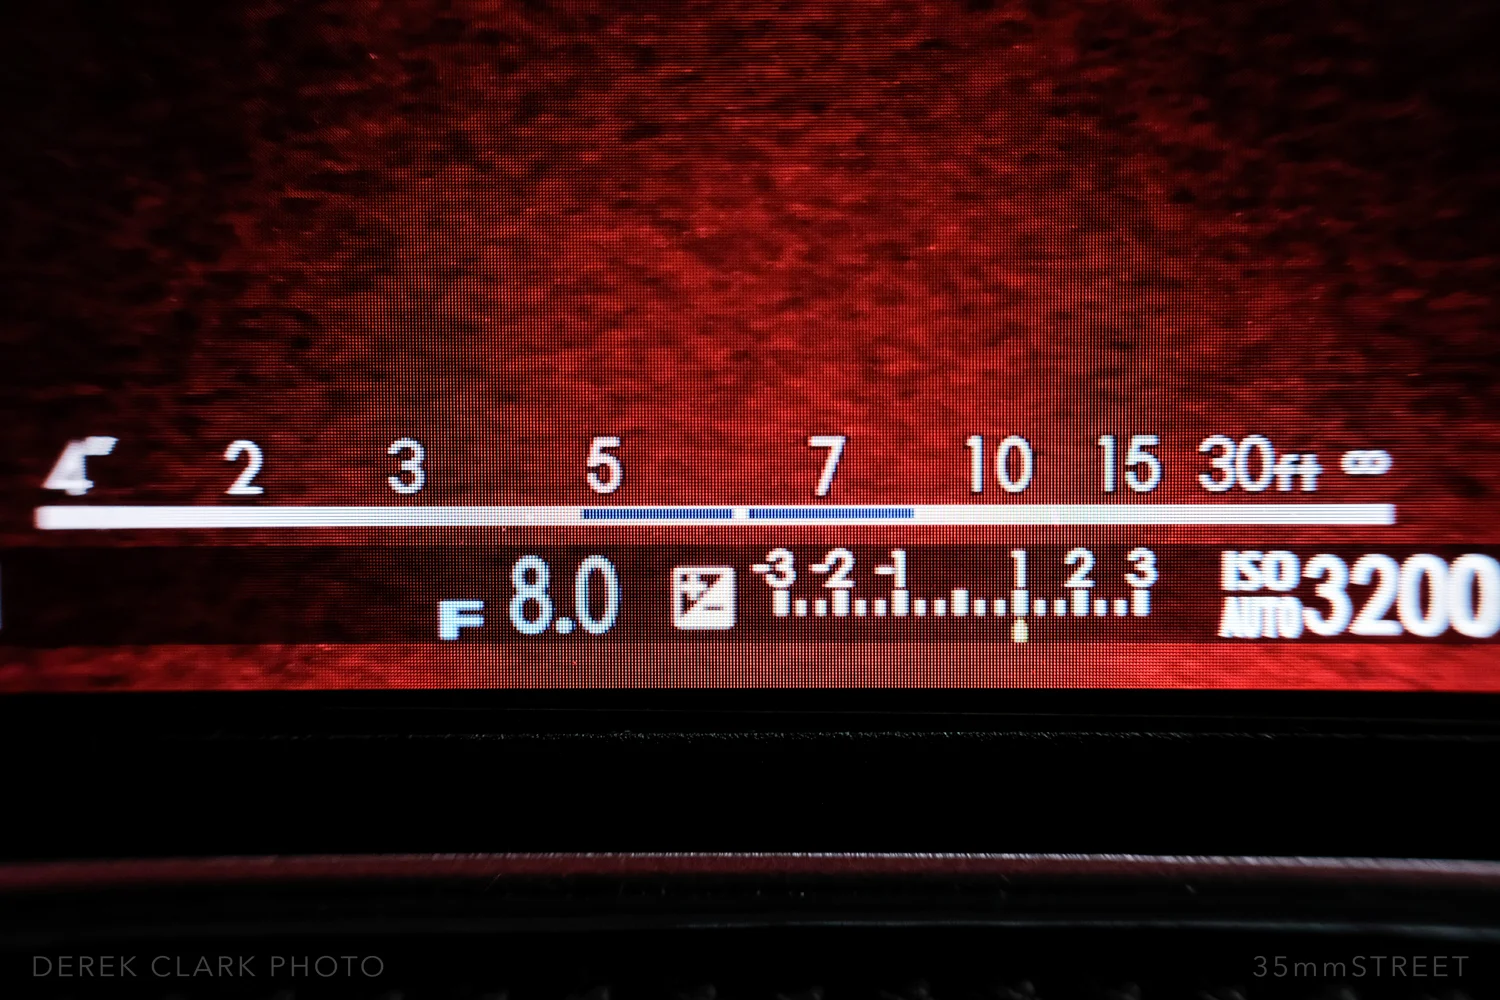
The blue line shows how much will be in focus. The dot in the middle of the blue line is the distance the focus is set (6' in all three cases here). I've chosen f8 here because it's a good average and shouldn't raise the ISO too much. If you move the aperture to f11 or f16, the blue line will widen, and if you open the aperture to f56 or f4, the blue line will shorten and there will be less depth of field. So in the same way that shutter speed, aperture and ISO move in relation to each other, Aperture, Focal length and distance work together to determine the depth of field. Similarly. If you focus in closer from 6' to 4' the blue line will start to shorten too.
So what is this blue line telling us? Well in the case of the 50mm lens at these settings, everything between five and a half feet and six and a half feet will be in focus (1 foot of DOF). But with a 35mm lens, everything between five feet and seven feet will be in focus (2 feet of DOF). And with the 28mm that depth of field rises to three and a half feet. So the wider the lens used, the more depth of field available and the better our chances of the subject being in focus when we guess the distance they are to our camera.

CONCLUSION
To give us a fighting chance of getting a street shot that is in focus, we are looking to have a fast shutter speed to freeze the action, an aperture between f8 and f16 and a lens at least as wide as a 35mm (full frame). That is zone focusing (nothing to do with Fuji's Zone Focus Mode, which is an autofocus tracking mode). It can take a bit of practice to get it all coming together in a single frame, but when it clicks it really is the best method and actually takes a lot of the technical aspect away from shooting on the street and allow you to get into the (mental) zone and concentrate on pressing the shutter button at just the right time.
I hope this helps. Please share if it does.