
BLOG
What's In A Music Photographers Bag
I sort of fell into the genre of music and over the last seven years, I’ve shot more than 300 artists and taken more than 50,000 pictures as a music photographer. I shoot all types of music, but mostly jazz. I am currently the official photographer for the Scottish National Jazz Orchestra (SNJO) and my pictures have been featured on album covers, tour posters and magazine publications. At the time of writing this post, I am putting the finishing touches on a book featuring the last 7 years with the SNJO.
THAT WAS THEN
There was a time when I shot Nikon alongside my Fuji’s, but with the release of the Fujifilm XF50-140mm f2.8 my D800 (amazing camera) ended up staying at home, and after six months or so of no use my full Nikon kit was sold. I also used a Lowepro backpack for a long time, but as I often have to pull my camera back out of the bag just as I am about to leave a venue, a shoulder bag is the way I go these days (mostly).
THIS IS NOW
These days I am using a Domke F2 (black canvas) bag. It’s not a massive bag, but it’s not small either. What I can fit inside the F2 is about as much weight as I want to carry and as it is packed full, I have to take out a lens if I want to include a different one. This works well for me as I would end up carrying way to much gear otherwise. If I know I’ll be shooting a lot of backstage pictures I might wear my belt-pack to the gig and put an X-Pro2 body in one of the side pockets as I prefer a rangefinder-style body for that sort of shooting.


SIDE POCKETS
Starting at the F2’s side pockets. I have a BlackRapid Yeti double harness strap, a Manfrotto Pixie mini tripod and a Spider Holster in one pocket, and a small pouch that attaches to my belt in the other pocket.
BLACK RAPID YETI
The BlackRapid strap takes up a lot of room and I have thought of getting rid of it and using regular straps many times, but this harness works well and is easy to adjust quickly for one camera or two.
SPIDER HOLSTER
The Spider Holster is rarely used but can be handy when using a third camera. I keep the spall spanner/wrench in my belt pouch for attaching the little stud to the bottom of the camera.


BELT POUCH
These tactical pouches are available on Amazon for very little money and are essential for what I do. I put this on my belt as soon as I arrive at the venue and it saves me from having to get to my bag (which can be at the side of the stage) for essentials. I keep a notebook, pens, spare batteries, SD cards, business cards and a lens cleaner in this. It also has a section on the outside for my iPhone, which I insert upside down, face inward (and muted) so that it doesn’t light up on its own.
LOWEPRO PADDED WRAP
I have had this green Lowepro padded wrap, that came with another bag, for years. It is folded like an envelope and mostly just lies on top of my gear as the F2 doesn’t have any padding. I keep an iPad mini in the zippered pocket on the lid of the F2, which protects the screen on the back of my camera, but the wrap is just added protection. It can also come in handy for kneeling on or a number of other uses.
INSIDE THE BAG
FUJIFILM X-T2 AND XF 16-55mm F2.8 WR
The Fujifilm XF 16-55 f2.8 lens is attached to my X-T2 most of the time and this the camera and lens combo that I keep handy at the top of my bag so that I can pull it out or put it back in the F2 easily. It sits in the bag with the lens facing down. This comes in handy when leaving a venue as I often have to pull a camera out for a few shots, or if I keep it out it means I can slip it back in at the venue door without needing to remove the bag from my shoulder. Something the backpacks are not functional for.
THE FUJIFILM X-T3
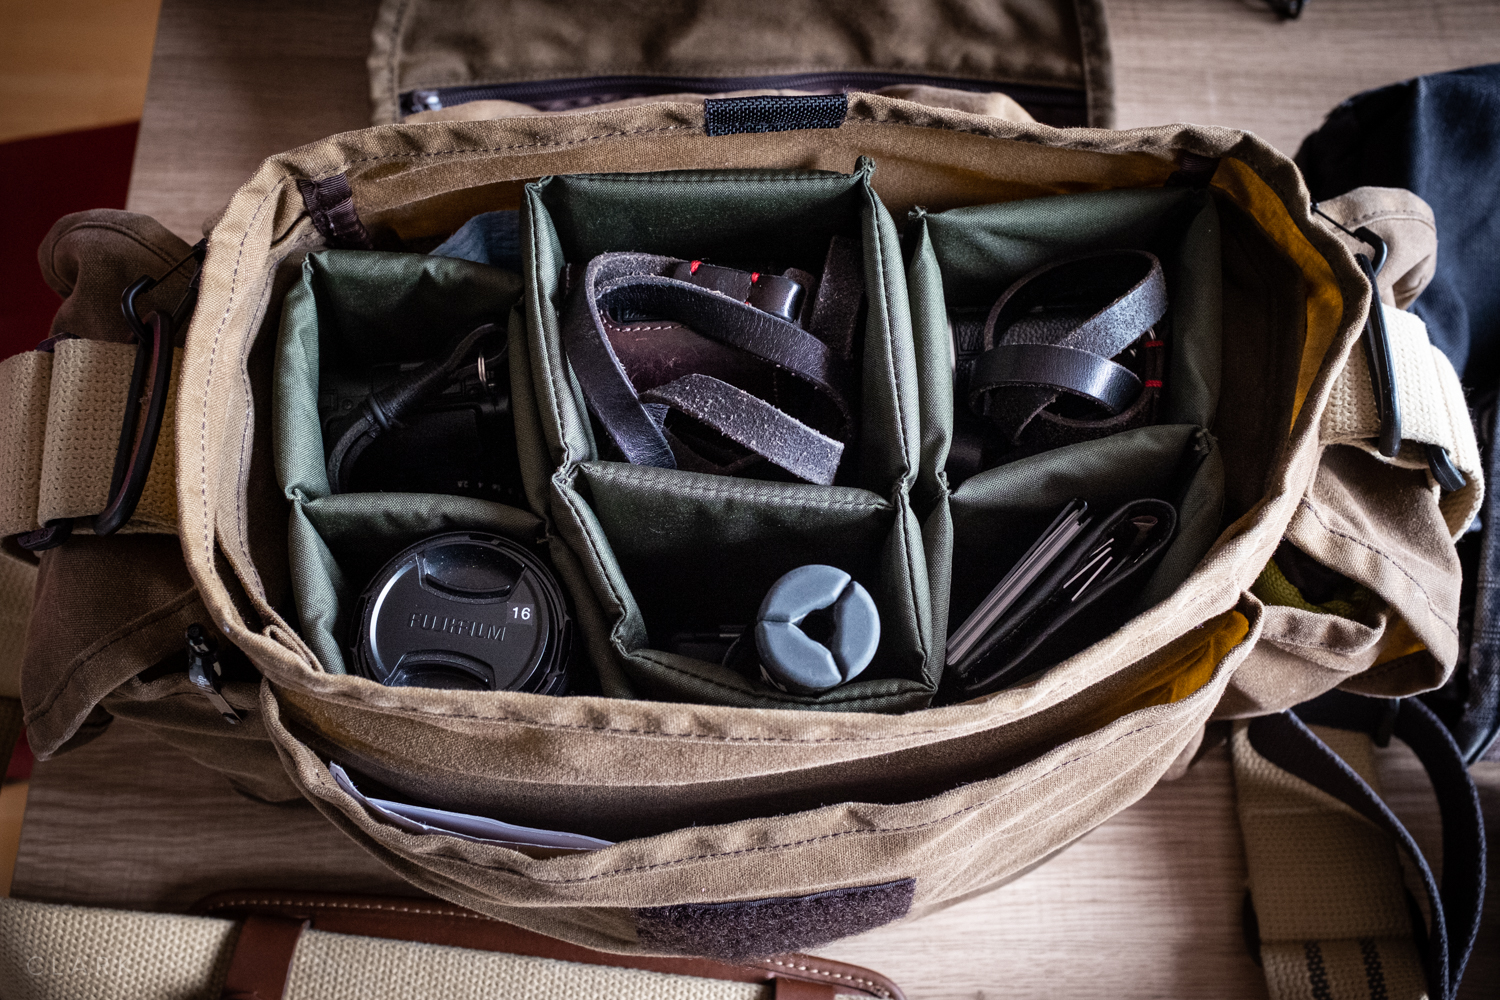
The amazing 50-140 f2.8 lens is my concert workhorse. It can’t fit in the Domke attached to my X-T3, so the camera body fits inside the F2 square insert. These inserts are divided into 4 sections for lenses, but unlike the older versions that were sewn, the newer ones have Velcro so the section can be adjusted to take the X-T3 with the battery grip attached. This also creates a space for my Zoom H1 audio recorder (more on that later). I attached a spare Billingham Velcro insert above the X-T3 that acts as a hinge and folds over to protect the X-T3 and X-T2 from bumping into each other.


SWITCHABLE LENS
Still on that square Domke insert (this one is included with the F2). I have the 23mm f1.4 lens in the photo above, but this is where I keep my switchable lens. By switchable, I mean that if I need to bring another lens, it will go in here and the 23mm will stay at home. This stops me from carrying too much equipment and weight (more on these extra lenses later).
Front pocket contain audio equipment (left) and white balance tools & business cards (right)


LENSES
I have a 16mm f1.4 and a 56mm f1.2 stacked in a tall square Domke insert I bought on Ebay. I use the JJC square metal lens hood on both these lenses (and the 23/1.4), so they can be stacked safely as they have flat plastic caps. I highly recommend these lens hoods. They are equal in quality to the Fuji optional ones, but less expensive.
The 50-140mm f2.8 workhorse lens sits inside a Domke insert that comes with an F-4AF bag. This insert is a bit wider and has the space required to include the tripod mount on the lens. I attach the BlackRapid strap to the tripod mount instead of the camera as the weight of this heavy lens would put too much strain on the camera’s lens mount.
NISSIN i40 FLASH
I rarely use flash for music photography (never ever for shooting during a concert), but sometimes I might need to use it for a backstage portrait if the light is really bad. The Nissin i40 is small and slips in the F2 between the sidewall of the bag and the smaller of the lens inserts. It sits in there and I forget about it until I need to remember. The i40 runs on 4 AA batteries and has enough power for anything I need on a music shoot. If I am required to shoot promotional portraits or promo shots, I will take a bag full of Yongnuo YN560 IV’s, stands and modifiers. But that’s another story.


AUDIO EQUIPMENT
After being asked to shoot some after-show video clips and interviews without any notice, then having to cobble a less than ideal setup to get by with, I now always keep a small audio kit with me. You have already seen where I keep the Zoom H1 inside the main compartment of the F2, and the Manfrotto Pixie that can be used as a tabletop tripod for shooting video. I use one of the front pockets to store a Rode lav microphone and extension cable (including an adaptor to allow it to fit the X-T3 or my iPhone). I also have a set of Apple earbuds for monitoring sound and a spare 3.5mm to 3.5mm cable that can be used to attach the Zoom H1 to the X-T3’s headphone socket. So I can record audio in camera, lav mic to Zoom H1 or both at the same time.
WHITE BALANCE
The other front pocket of the F2 is used for business cards and white balance tools. I have a Color Checker Passport, ExpoDisc and a set of white balance cards on a lanyard. Overkill? Perhaps. I also use this bag for portrait shoots so the Color Checker is invaluable.


OPTIONAL LENSES
The three lenses that I often swap out when needed are the 12mm f2.8 Samyang, the Fuji 10-24mm f4, and the awesome Fuji 90mm f2. These lenses all have their use, but it can often depend on the venue or the job. For instance, The 12mm Samyang is useful if I can get on stage behind a band or orchestra and shoot toward the audience.
CARDS AND CLEANING
I also take a JJC SD card holder (stored in with the white balance tools) and both the RocketBlower (F2 side pocket) and a Lens Pen. I also have a lens cloth in my belt pouch. I don’t use lens caps so like to clean my lenses before a show.
iPAD
It’s not shown in the photos, but I also keep an iPad Mini inside the zipped pocket in the top lid. I often send a couple of pictures during the interval from a camera to the iPad using the built-in wifi feature. I edit these using Snapseed and then send them to the client so they can be used on Facebook to promote the following night’s performance. It saves me having to do it when I get home.
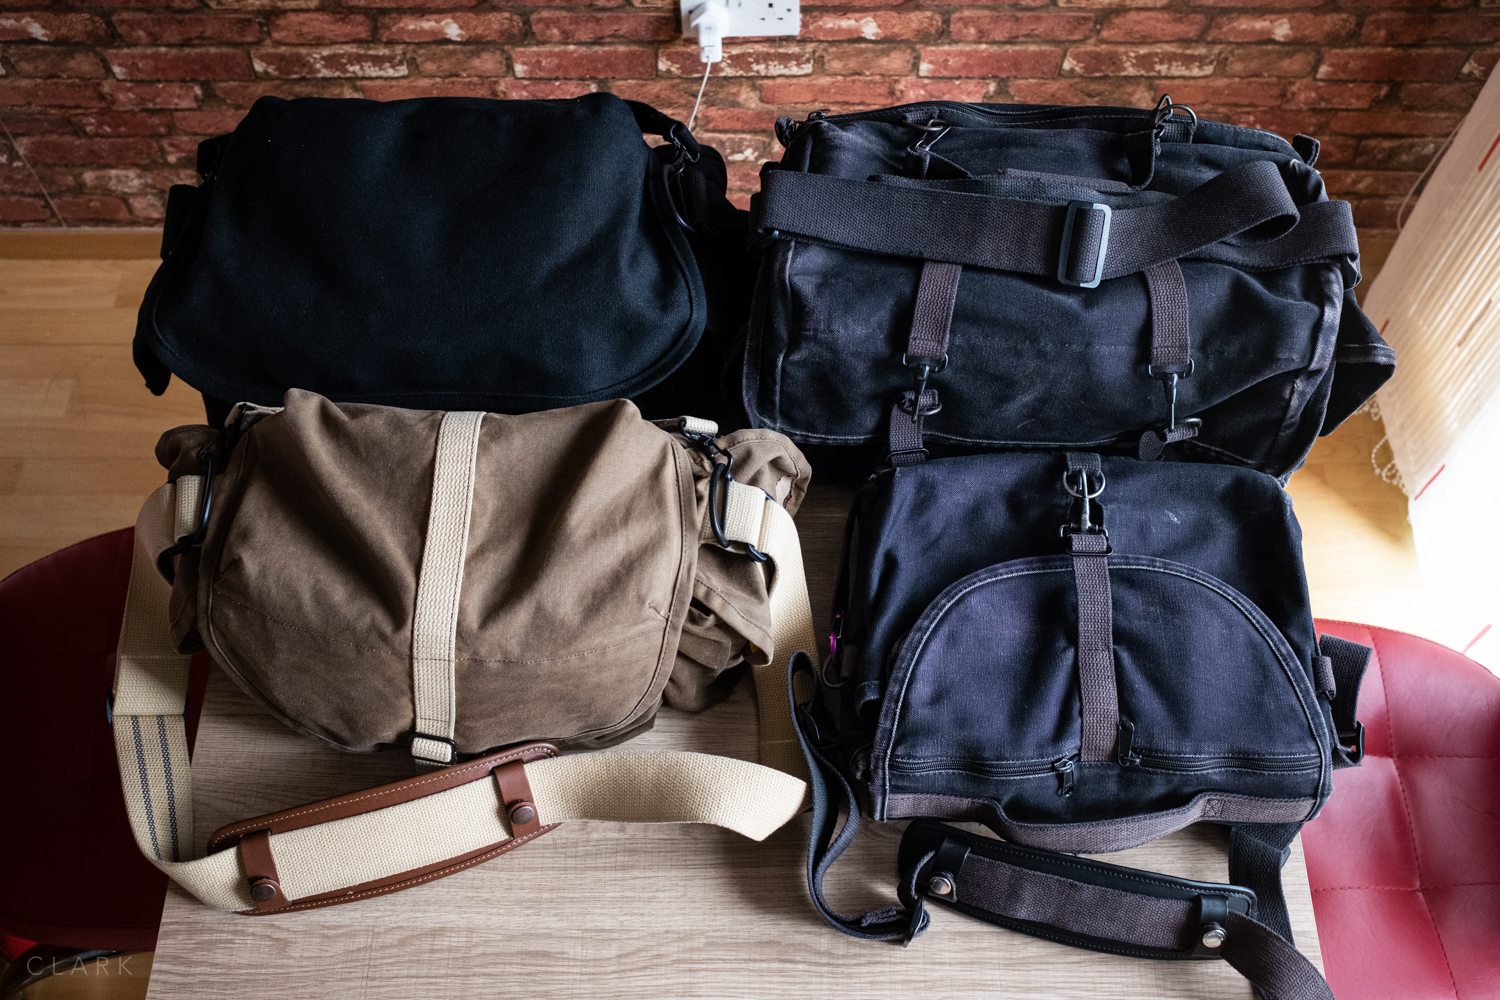
Lowepro CompuTrekker 350 backpack, Domke F2 and the Domke F-1x
OPTIONAL BAGS
If I really must take extra gear I can use the larger F-1x (bottom right in the picture above) which can hold a massive amount of gear but can get too heavy. Or I might opt for the LowePro Computrekker 350 backpack if I’m travelling by train and have a long walk to the venue.
A FEW LAST TIPS
Always have more than one camera.
Always have at least one camera with a lens attached in your bag.
Always keep spare batteries and cards on your body.
Use a belt bag or pouch to carry your spares and phone.
Make sure you get a photo pass from the venue or the client.
Lock in your white balance, it will save you hours of editing time later.
Shoot completely manual. I tend to shoot at f2.8, /125th of a second and adjust my ISO using the front command wheel.
Clean lenses before a show.
Sync camera clocks before the show (see below if you forget).
Make sure you have enough space on SD cards for the full show.
SYNCHRONISING CAMERA CLOCKS AFTER THE SHOOT
It is crucial to synchronise the clocks on all cameras used on a shoot. It’s always better to do this before the gig, but it’s very easy to forget. So here is a method I use when I get home. I use a world clock app called ClockZ which constantly updates the time and is extremely accurate.
Shoot a photo on each camera of your phone while it displays the world clock time.
Ingest all the pictures from your shoot into Lightroom.
Press G on your keyboard to enter Library Module Grid Mode.
Click on Metadata above your pictures.
In the camera section, choose one of your cameras.
Now go to the last picture you shot (which should be the one of your phone).
Click on that picture.
Hold down Command (Ctrl on Windows) and press A on your keyboard to select all.
Now ho to the Metadata menu at the top of your screen and choose Edit Capture Time.
Make sure ‘Adjust to a specific time and date’ is checked.
Input the time & date from the picture of your phone into the ‘Corrected Time’ section.
Click ‘Change’. It will warn that this can’t be undone but don’t worry about that.
Now repeat the process for your other cameras and all your pictures will be in sync.
If you have found this post helpful and you are thinking of buying any of the gear I use? You could help me out (at no cost to yourself) by buying from Amazon UK using the links below. Thanks.
The Domke F-3x One Year On
I wanted to do a follow-up to my review of the Domke F-3x that I wrote back in August 2018 called Domke Or An Ass. There’s so much more you pick up on a bag (or any product for that matter) after using it over a long period of time. Those things tend to be both good and bad. Probably the biggest thing I’ve realised about the F-3x (which would apply to a lot of Domke bags) is that it’s a blank canvas and should be adapted to the individual.
Top row (left to right) Fujifilm X70, X-Pro2 & X100F. Bottom row (left to right) Fujinon 50mm f2 & 16mm f2.8 lenses stacked, GoPro Hero 7, Fuji WCL-X100 lens & wallet.
BILLINGHAM SUPERFLEX INSERTS
I wasn’t keen on the setup of the F-3x main compartment as it had very little protection for my gear. Two very thin canvas loops (designed for lenses and a single piece of padding to keep two bodies apart is just not enough (for me at least). Smaller lenses can get under those bottomless canvas loops and go on a tour of the bag, visiting the rest of the gear inside with nasty results. So in my review, I used two different inserts. The Billingham Hadley Small is narrow, doesn’t really utilise the space of the F-3x that well, but is a good insert for the bag and provides a great amount of protection for the equipment inside. The Koolertron (seen in my review), although a great insert with good protection, didn’t really make use of the amount of space it took up, which was all of the main compartment. It also made the F-3x very boxy due to its tight fit and is the full height of the bag. Domke dividers didn’t give me the sizes I was looking for.
But then I came across the Billingham Superflex Partitions, a full range of fold-flat bottomless inserts that allow me to use the space in my F-3x more efficiently. The Superflex series are all 15cm in depth (back to front), which is almost perfect for the base of the F-3x (just overhanging slightly). The height and width of these dividers are in the names, with the last number always being the height. So a 9-15 is 9cm wide and 15cm tall (remember the depth is always 15cm across the range. A 10-18 is 10cm wide and 18cm tall. The F-3x can take the 18cm range comfortably, but I opted for the 15cm high ones as it provided a good depth for my cameras and lenses without having to dig down to reach my gear. It also leaves some room on the top for a scarf or a book if required, and lets the lid of the bag be a little more loose and floppy, which I like about the F-3x.

A view with the content pulled out slightly.
All of the Superflex inserts are divided into two compartments and there is a good amount of variation from size to size. The 9-15 is divided up into two sections of 9cm and 6cm, which is ideal for my X-Pro2 with a Gariz leather half case and either a 16/2.8, 18/2, or 35/2 lens attached in the 9x9cm part and then I can fit an X70 without a hood, or more small lenses. It’s worth pointing out that one compartment on each insert is always a square. So the first number of the name has that many centimetres square. 9-15 has a 9x9cm compartment, 12-21 has a 12x12cm compartment and so on (see diagram below).
My X100F sits nicely in the 8-15, which is divided up into 8cm and a 7cm compartments. So the X100F can fit in the 8cm space with lens hood attached and the X70 can fit in the 7cm space with lens hood attached too. My third and last Superflex divider is the 7-15, which like the 8-15 is divided up into 8cm and 7cm compartments. This one is ideal for lenses and accessories. Here is Billingham’s chart for the various sizes of Superflex inserts (the 9-21 to 12-21 won’t fit the F-3x, they are too tall). You can also find my review of the excellent Billingham Hadley Small Pro HERE.

These are the sizes available of the Billingham Superflex Inserts
THE WAX OF THE RUGGED WEAR BAGS
You can sit at a computer for days reading about all that has been written about the wax coating of these Rugged Wear Domke bags. In my opinion, they look good, but no-one wants to get wax on their hands that then gets transferred on to cameras and lenses. So I went through a phase at the beginning of leaving my F-3x outside in the sun and wiping the wax off with a towel as much as possible. Waterproofing is nice, but it’s not a massive deal for me, and if I really did get caught in a massive downpour I know that most of my kit is weather sealed. So one year in and the wax has been removed quite a bit by me and by natural use.

Domke Post Office Pad on the F2 Shooters Bag. The most comfortable shoulder pad I’ve used.
DOMKE POST OFFICE PAD
Domke’s Post Office Pad is an optional accessory that I bought at the same time as the F-3x. It can make a huge difference in the comfort of the shoulder strap when carrying a lot of heavy gear. I was very grateful for it on days when I had my Hasselblad system (500c/m, two lenses, two backs and a light meter) and the Fuji system together. But around the six-month mark I started to notice the glue that held the rubber padding to the plastic shoulder plate (that attached to the strap) was breaking down.
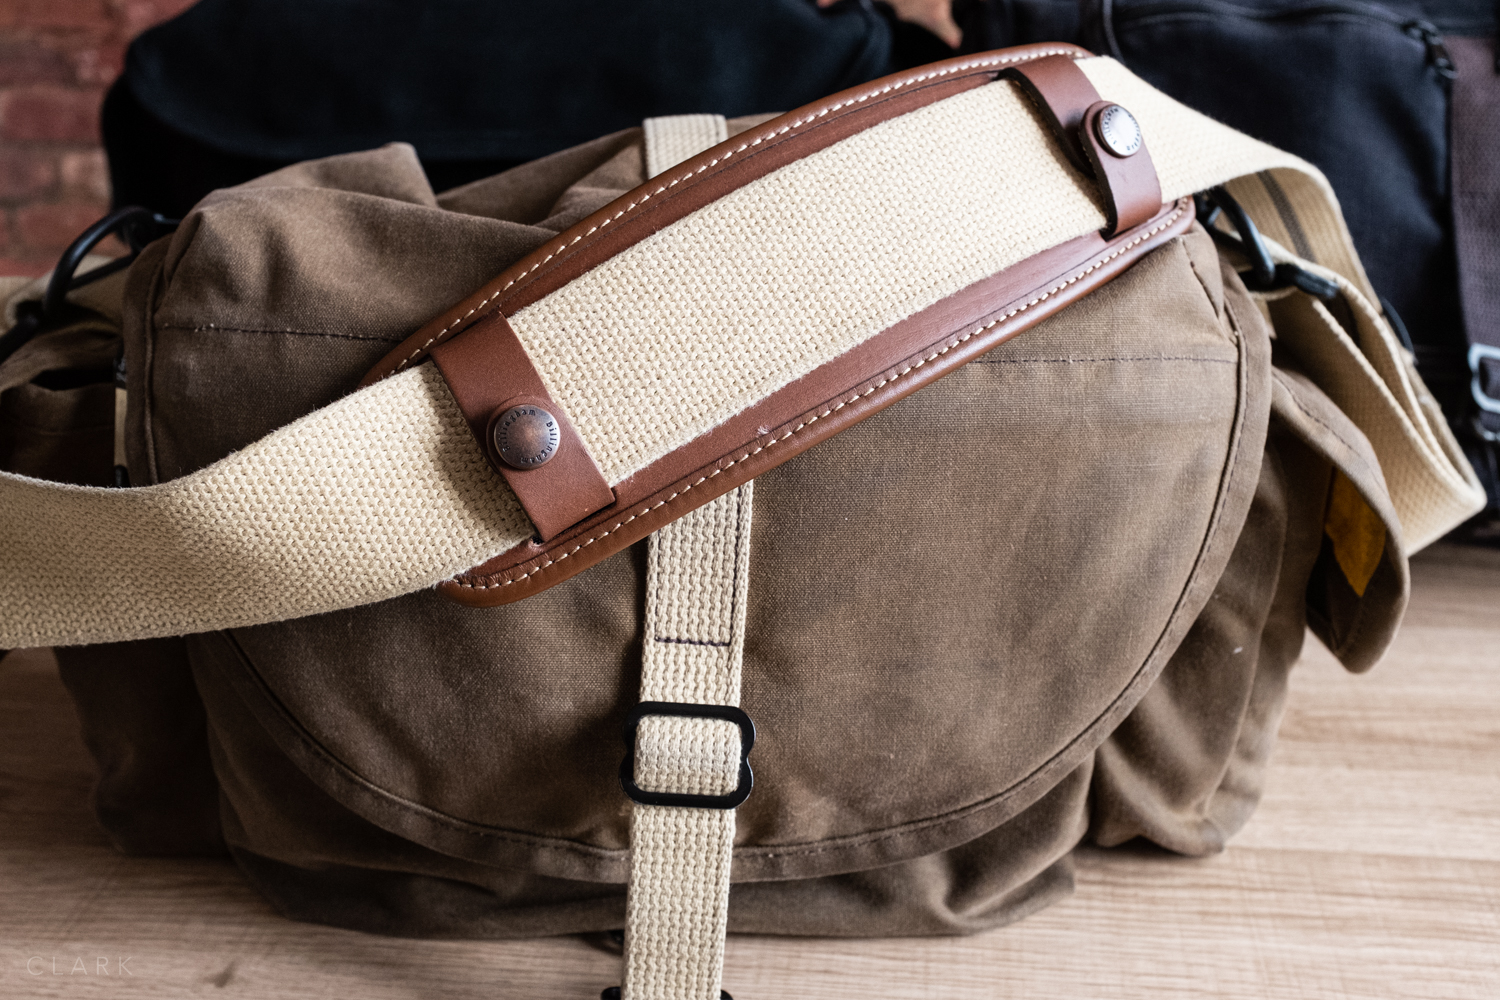

BILLINGHAM SP50 LEATHER SHOULDER PAD
Another option for a shoulder pad on Domke bags with a 2” strap is the Billingham SP50. These pads are well made and come in either Tan, Chocolate or Black leather. They have a decent amount of padding and look great, but the Domke Post Office Pad wins for comfort.
VELCRO ON THE MAIN FLAP
This is a negative point I’m afraid, but not a deal-breaker. The velcro on the main lid of the bag should have been twice the height that it is because unless the bag is stuffed full, the two pieces of velcro can miss each-other completely and be useless at holding the bag shut. This is a problem because Domke users tend to only fasten the metal clamps when in transit but rely on the velcro while working out of the bag.
One other slight annoyance is that the ring to attach the main clasp at the front of the bag seems to be under the bag rather than on the front. The clasps themselves tend to get a bad right-up, but I don’t find them to be a problem and I can easily undo the one on my F-3x one-handed while the bag is on my shoulder.
SLEEPING WITH THIEVES
After using the F-3x for a good length of time, I have found that they are pretty good for sleeping on while sitting in a chair at airports and hospital waiting rooms. I have my Shemagh scarf sitting on the top of my bag (between the cameras and the lid), so it’s quite comfortable to put both arms over the top of the bag and lay my head on my arms. This also ensures your bag will still be there when you wake-up. So I’ll admit it; I love my Domke so much I’ve slept with it :o)
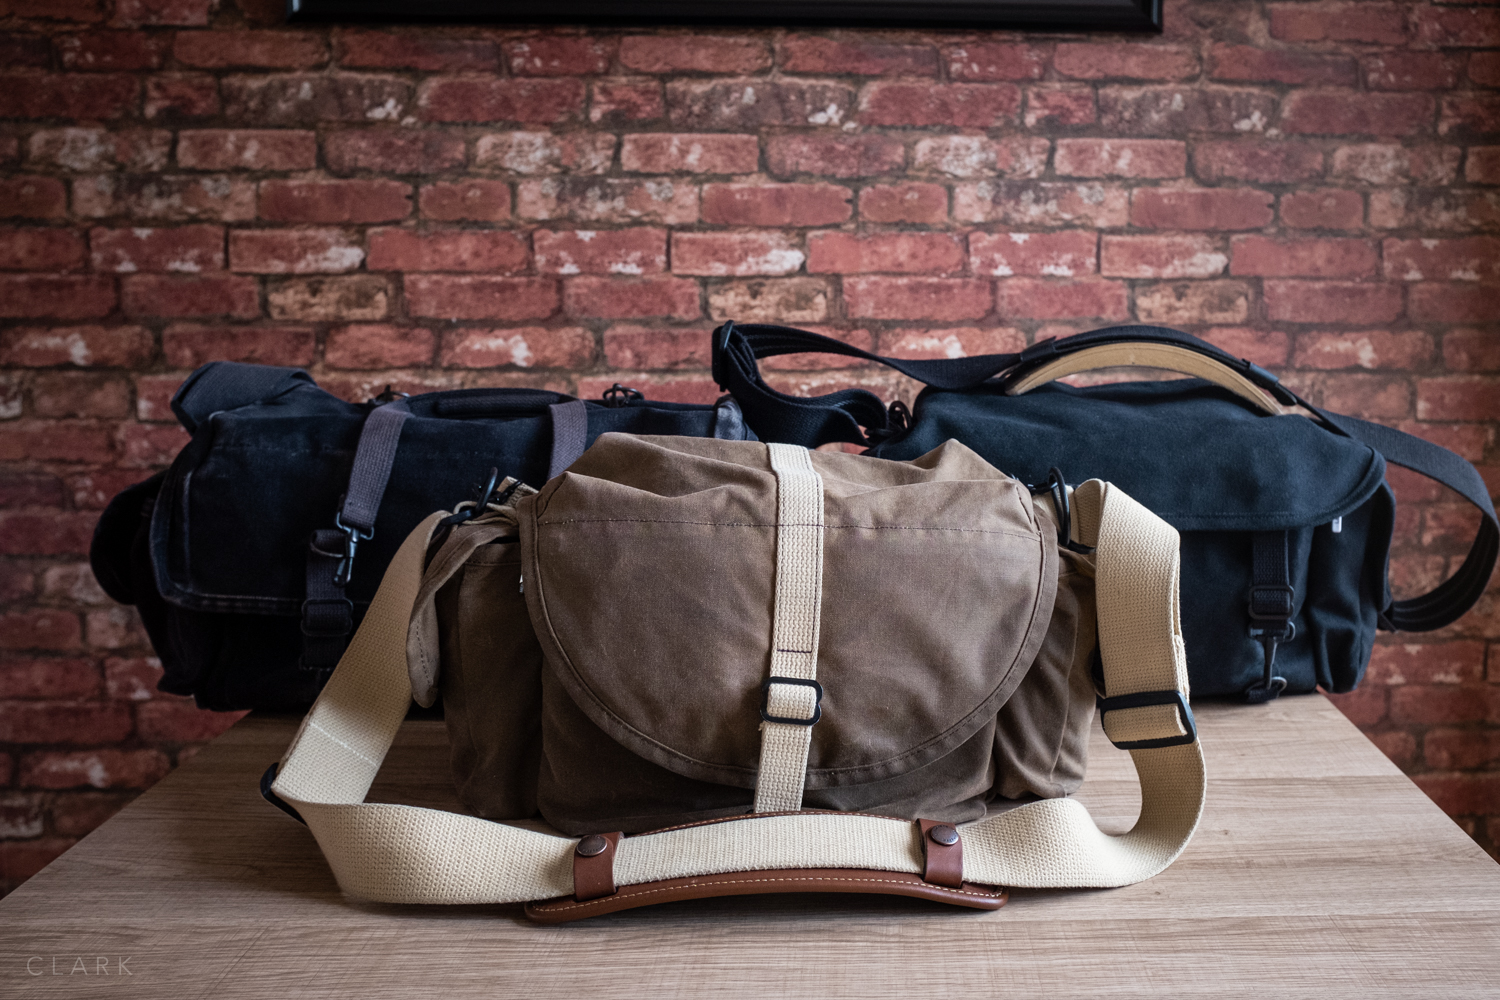
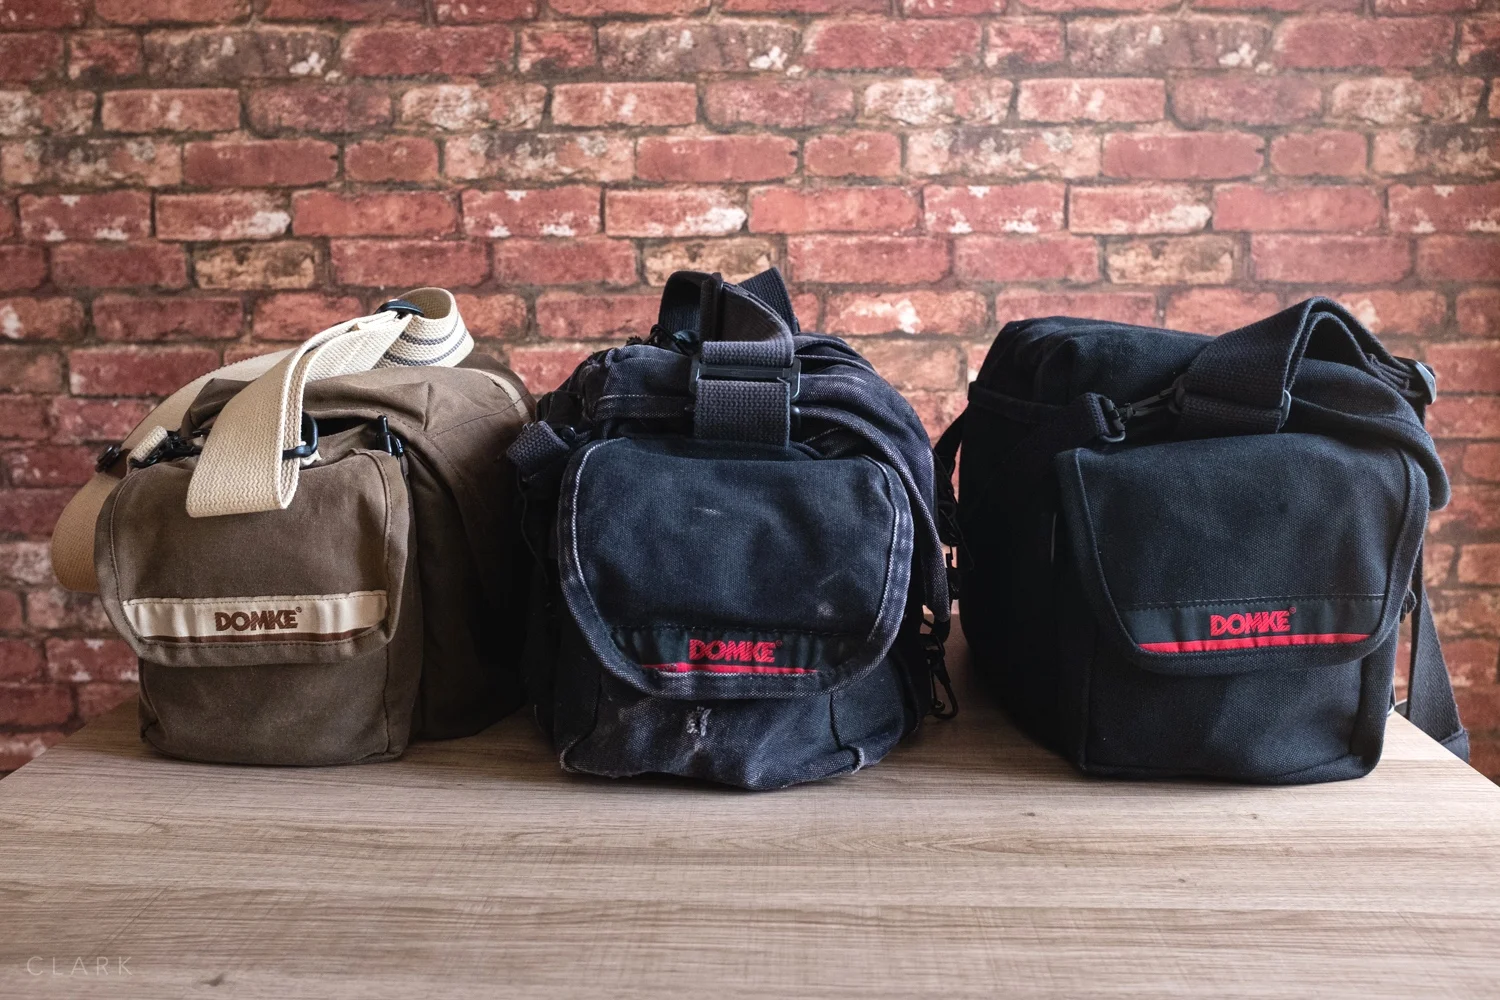
Domke F2 (top left), F-1x (top right), F-3x (bottom left and the F-803 (bottom right). All three black bags are canvas but the F2 is new.
DOMKE BAGS ARE MOREISH
Domke bags can get a little addictive once you have used one. It’s even worse in, like me, you have a natural affinity for really worn and even abused bags. Domke is sort of the Leica of camera bags. Just like an old M3 looks better with plenty of brass showing through the black paint, Domke bags look better the more scuffed and faded they become. I for one have spent far too many hours trolling Ebay for used and abused Domke’s.
Ruggerwear waxed canvas bags are sort new as they are made from a cloth material. The standard canvas bags are less pliable and take a while to break in but become soft like denin as time goes by.


SIZE COMPARISON
There can often be some confusion over the size of Domke bags, so hopefully, the pictures above will help if you are considering one of these camera bags. The F2 is my work bag and holds a lot of kit, but it has to be packed in a specific way to fit in everything needed for a music shoot with an X-T3 & X-T2 kit. I will get round to doing a post about the F2 soon. In the meantime, leave any questions in the comments below and I’ll try to hep if I can.
You can buy the F-3X at Amazon UK
I also have a review of the small Domke F-5xb