
BLOG
Digital Workflow, Drobo And Hard Drive Fails

New Year Resolutions
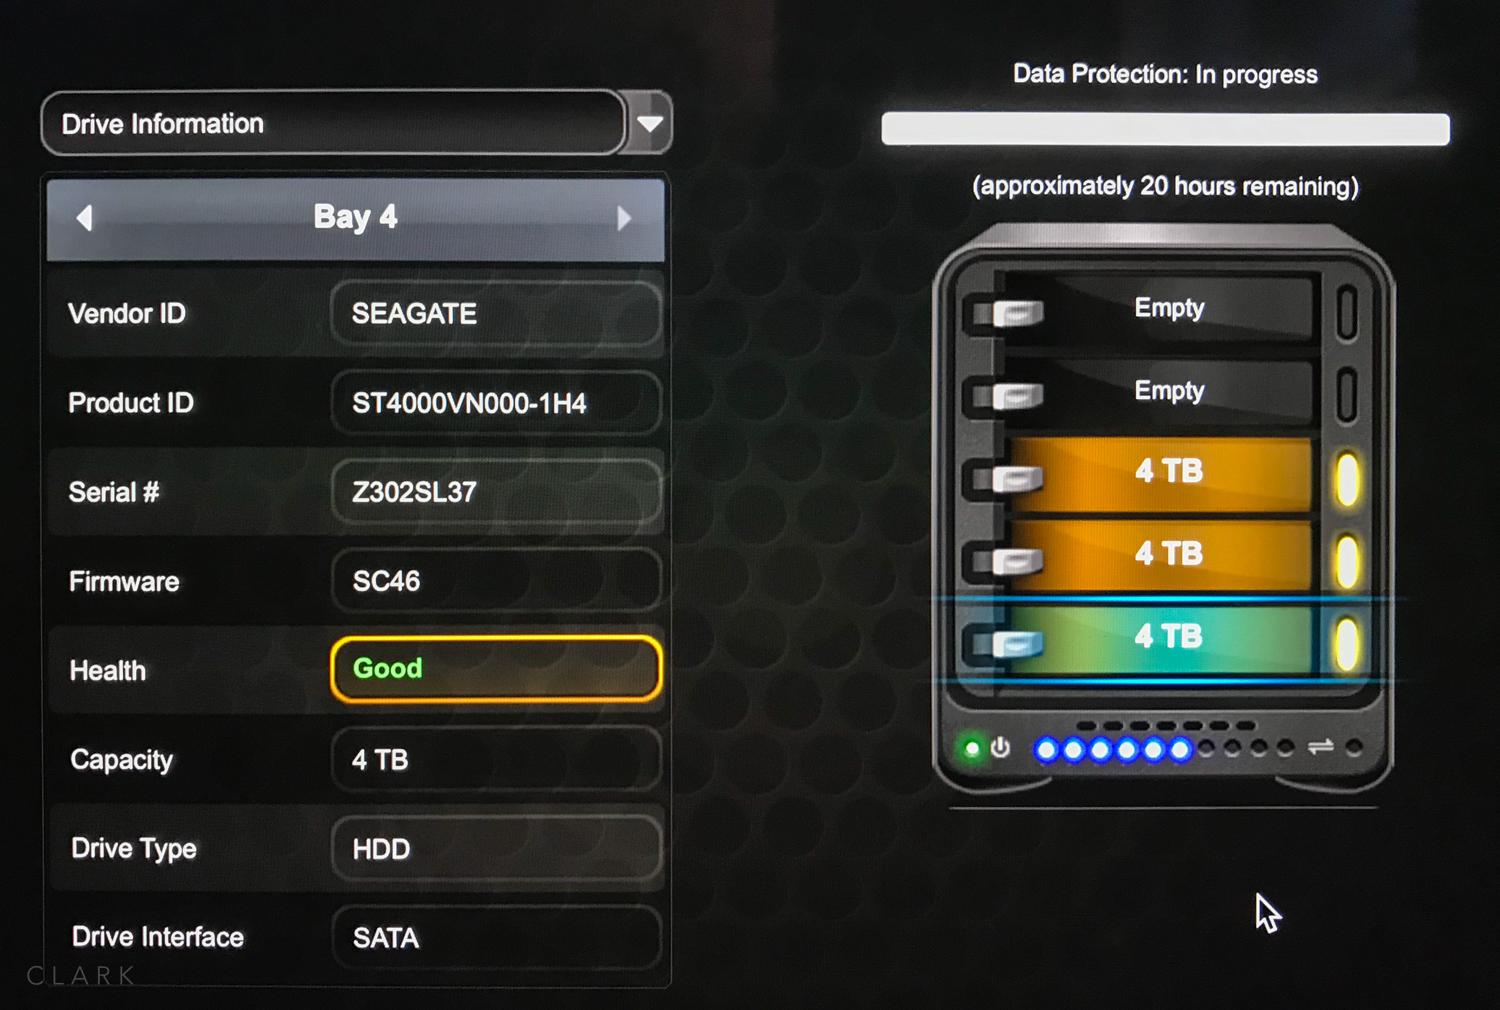
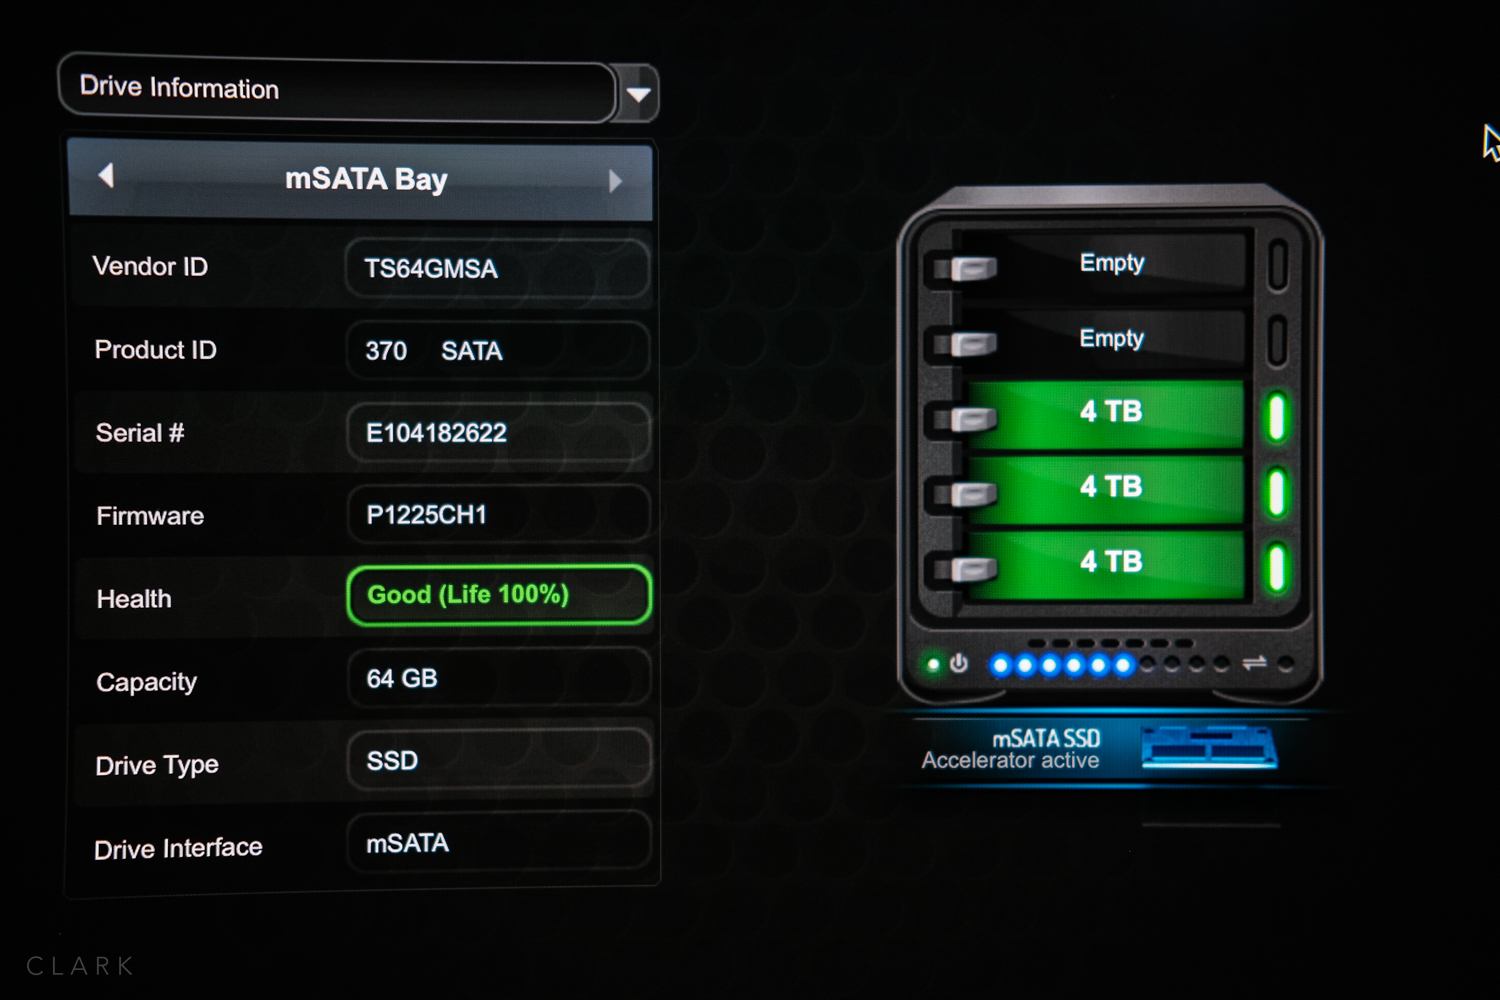
My Drobo really filled up in 2017, due largely to my Fujifilm cameras being updated from 16-megapixel sensors to 24 megapixels and also video footage from the DJI Spark. The front row of blue LED's that displays the amount of data used had all but one lit up. It's a five-bay Drobo, but I only had three hard drives inserted (two 4 TB drives and one 2 TB). So as soon as the new year was over, I ordered a new Seagate 4 TB drive from Amazon UK and while I was at it, I made another stab at sourcing an mSATA drive for the Drobo's accelerator bay on the bottom side. The mSATA is an SSD and used to access the most used files and speed up access times. But finding a compatible mSATA is not the easiest thing to do. I had already tried and failed a while back and had to return the drive to Amazon because the Drobo wouldn’t even boot up. This time I ordered a Transcend MSA370 64GB mSATA III from Amazon UK which cost 50 UK pounds including postage. If, like me, you've been finding it hard to source an mSATA for your Drobo, read on to find out if this one works out (I haven't inserted it at the point of writing this paragraph).
A Backup For My Backup
Drobo is a really nice system and everything is backed up as soon as you put a file in there. The one thing that makes me a little uneasy is that Drobo is also a locked-in system. If the Drobo enclosure fails, you can’t just pull the drives out and stick them in a USB caddy to gain access. You would have to repair or buy a new Drobo for your drives before you could access any of your files. So I decided to buy a desktop drive to backup my Drobo. Off I went to a brick and mortar store to purchase an 8 TB Seagate Backup Plus External drive (180 UK Pounds), which has two handy USB charging ports on the front panel.

Back at my iMac, I unpacked the new desktop drive and was surprised at how slim it was. Then I looked at my wallet and realized that it was so much slimmer. I attached the Seagate to my Mac and attempted the usual format to OS Journaled in Disk Utility, which is usually a simple process. But disaster struck and I was unable to format the drive in either my iMac or MacBook Pro. I'll make this long story a short one and just say that in the latest version of Mac OS, Apple have added a view mode in Disk Utility, but the default mode is to only show the volumes of a hard disk, but not the disk itself. This meant I was trying to format the volume, rather than the actual drive. It seems so simple looking back, but...why Apple...why?
When I finally got the 8 TB drive formatted, I decided to use an app called SuperDuper by Shirt Pocket. It's a really nice piece of software that allows you to clone, copy or mirror hard drives in a number of really useful ways. I opted to use the Smart Update option, which looks at the source disk and mirrors the content. So after the first stage of copying all the data from Drobo to Seagate (4 and a half TB), which took around 30 hours (Drobo connected via Thunderbolt and the Seagate via USB 3), each update will take only the amount of time it takes to add or delete any files that have changed on the source drive.

So I set up the data backup from the Drobo to the 8 TB Seagate using SuperDuper and hit Copy. All looked great and I went out to pick up my wife from work. But when I returned, I was greeted with a red light on the Drobo, which signals a drive has failed (remember that Drobo is where drives go to die). Lucky it was the 2 TB drive, but with only two 4 TB drives left working in the Drobo, but 4.5 TB of data, it meant that all my data was there, but if another drive failed, I would lose data. The backup to the Seagate drive was underway, but I could see that it would take more than 24 hours before it would be complete and my data would be safe. So I jumped in my car and headed to a couple of 24-hour supermarkets, but they only stocked drives in enclosures. I almost bought one of those with the intention of bursting the case open to get to the drive, but I decided against it because I had a couple of 1 TB drives in enclosures at home that I could burst open. But when I got home, I thought that these older drives might not even be SATA.
The next morning I was standing at the door of a tech store waiting for them to open. I bought a 4 TB Western Digital Red drive and went straight home. I pulled it out of the packaging and swapped it with the failed drive. Drobo did it’s thing and started to backup my data to the new drive, which took a good few hours. But then I would know my data was safe. I woke up on the couch at 2 am the next morning and all backups were complete.

While all this was going on, the new Seagate drive and the mSATA arrived from Amazon UK. After everything had settled down and all my data was backed up and even more secure than before, I decided to insert the mSATA into the Accelerator Bay on the Drobo. Having had previous disappointment in this department, I was ready to accept failure once more and give up hope of using this feature in the Drobo. I turned the Drobo over and opened the cover on the base. I inserted the mSATA very easily and closed up the bay, then powered up the Drobo and waited for the result. Hey presto! It worked. I moved through a selection of photos in Lightroom, checking to see how quickly they loaded. Then I went back and moved through them again to see the difference. I’m sure it’s the combination of more hard drive headroom and the mSATA, but my iMac has never been so slick. Lightroom previews open quickly and I can move rapidly from picture to picture.


Cloud Storage for Offsite Backup
Now that all this hard drive stuff has been solved and I'm really happy with the performance, I can get on with what my plan for the new year was in the first place. I have a spare 4 TB Western Digital My Book Studio desktop hard drive that I want to use to hold copies of all my exported/edited pictures in full resolution. This drive will then be backed up to a cloud service. I'm not sure which one yet, but I'm leaning toward Backblaze right now. This will be my offsite backup in case of fire or theft. I would rather lose my original RAW files than the finished JPEG's because I would never go back and re-edit 186,000 pictures. My finished JPEG's are my Digital negatives.
My Digital Workflow

**my Digital Workflow**
Finally. I thought it would be a good idea to show my digital workflow. It's not shown in the diagram above, but I use a Lexar Professional Hub to import my files into Lightroom.