
BLOG
Fujifilm Framing Outline Feature

As a music photographer I often have trouble seeing where the edge of the frame is inside my viewfinder while shooting in dark venues. I often have pictures where my subject’s head is just touching the top of the frame where I thought I had allowed headroom.
So I was delighted when I found (by accident) a feature that is in the X-T2, X-T3, X100F, X100V, and I’m sure all the latest cameras. It’s called ‘Framing Outline’ and it puts a grey outline around the frame on both the electronic viewfinder and the rear LCD screen. Here’s where to find it.
SET UP - SCREEN SET-UP - DISP. CUSTOM SETTING - 'FRAMING OUTLINE (usually the last on the 4th page). Just make sure that’s ticked and you will see an outline on your frame.
This is not just a great feature for those of us shooting in dark music venues, but for portraits against black or dark backgrounds or any kind of night shooting. Give it a try and leave a comment below if you find this useful.
Will Sports Finder Mode Turn A 16mm f2.8 into A 28mm?

I’ve had a recent comment on my review of the Fujifilm XF16mm f2.8 R WR from Kid Sodbrennen about using this lens with the Sports Finder Mode in the newer Fujifilm cameras. Kit reckoned it would crop in to match a 28mm. After doing a quick test, I replied that it was not as wide as a 28mm. But testing further for this post, I have come to change my mind. The problem was that I was basing my opinion on the 18mm f2, which is actually more like a 27mm.


The 16mm f2.8 is actually a bit wider than the 16mm f1.4. As you can see from the two example photos above, the f2.8 is more like a 15mm. 1mm doesn’t add or subtract to a longer lens, but on a wide Ange lens this can make a big difference.


As you can see from the image to the left, the 18mm with a 1.5x crop comes in at 27mm. The picture on the right shows the 16mm f2.8 using the X-T3’s Sports Finder Mode, which has a 1.25x crop. So assuming the 16mm f2.8 is actually a 15mm - 15 x 1.5 = 22.5. 22.5 x 1.25 = 28.1.

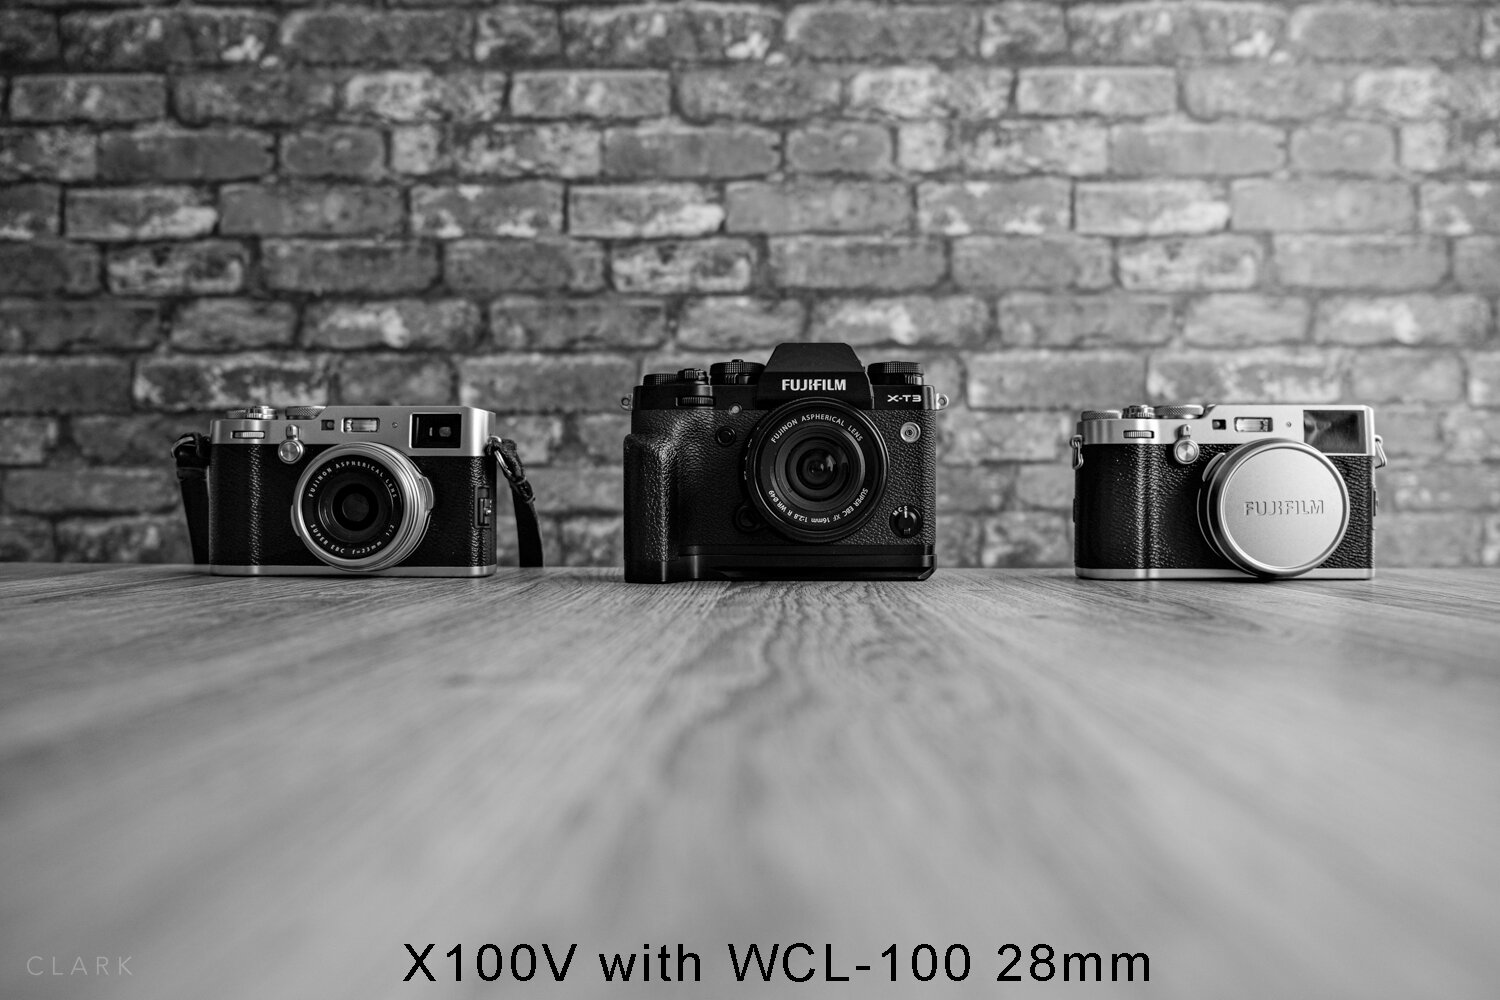
But if you compare the pictures above, one shot on the X70 and the other shot on the X100V with the 28mm WCL-X100 conversion lens, the 16mm f2.8 using Sports Finder Mode is indeed just like a 28mm.
The downside to this is that you are throwing away megapixels, but I’m still shooting street with my X70, which has a 16.3mp sensor, as opposed to the newer 26.1mp sensors in the latest cameras.
Apart from the X100V, my only camera with Sports Finder Mode is my X-T3, which I would never use for street photography. So I guess I won’t get the chance to make use of this setup. But I’m sure with the X70, X100V with the WCL, and the X-Pro2 with the 18mm, I’ll manage for now.
But imagine a new 18mm f2 mkII and an X-E4 with an X100V style flip-out screen (for shooting from the hip). That would be an awesome street camera!
UPDATE:
An X-E4 was indeed released with an X100V style flip-out screen. Unfortunately it has no front focus selector, no View Mode button, and of course, no D-Pad. Not only that, it has less Fn buttons that might have allowed to compensate for these short-comings. I really fear for the future of Fujifilm’s next generation of cameras. But at least it’s saving me money by forcing me to stick with older models :o)
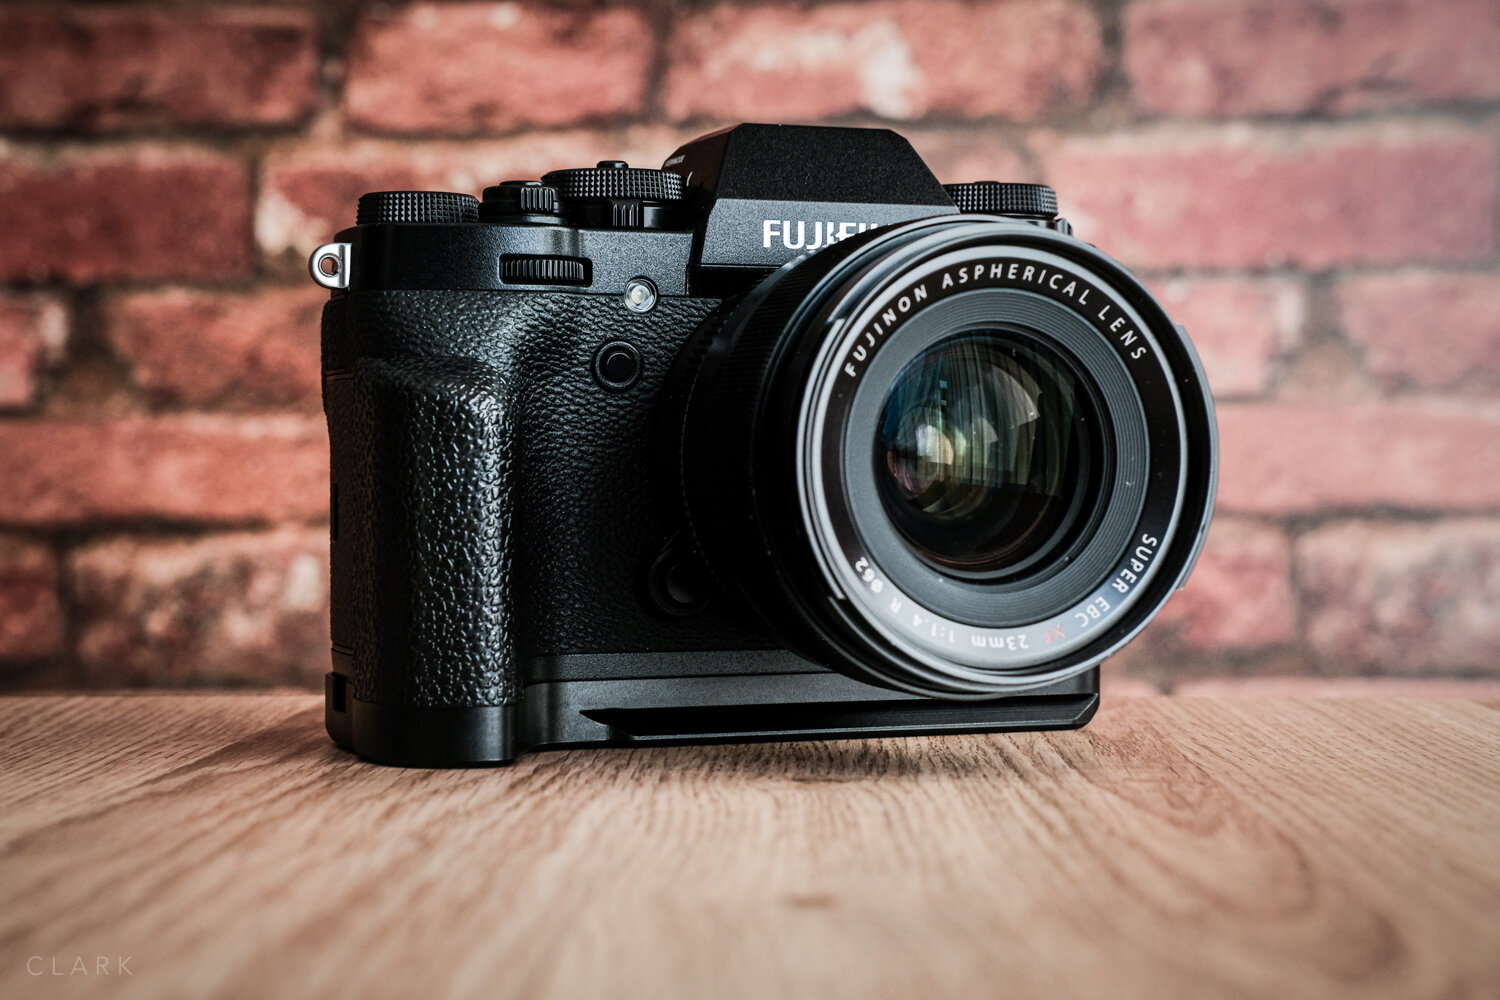
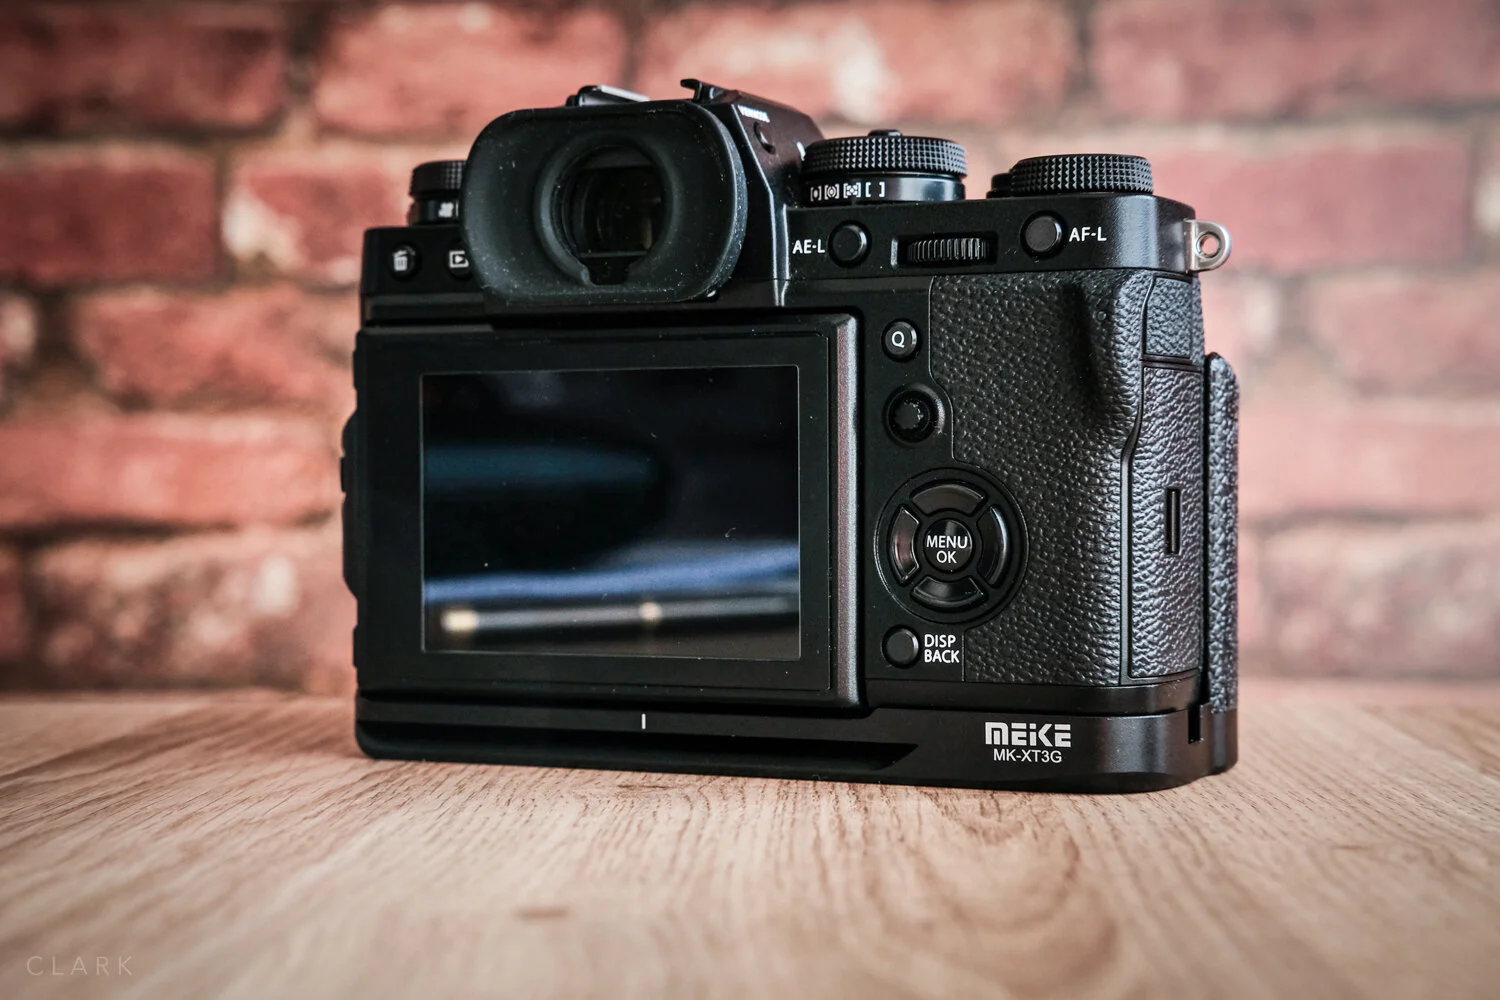
Meike MK-XT3G Fujifilm X-T3 Hand Grip
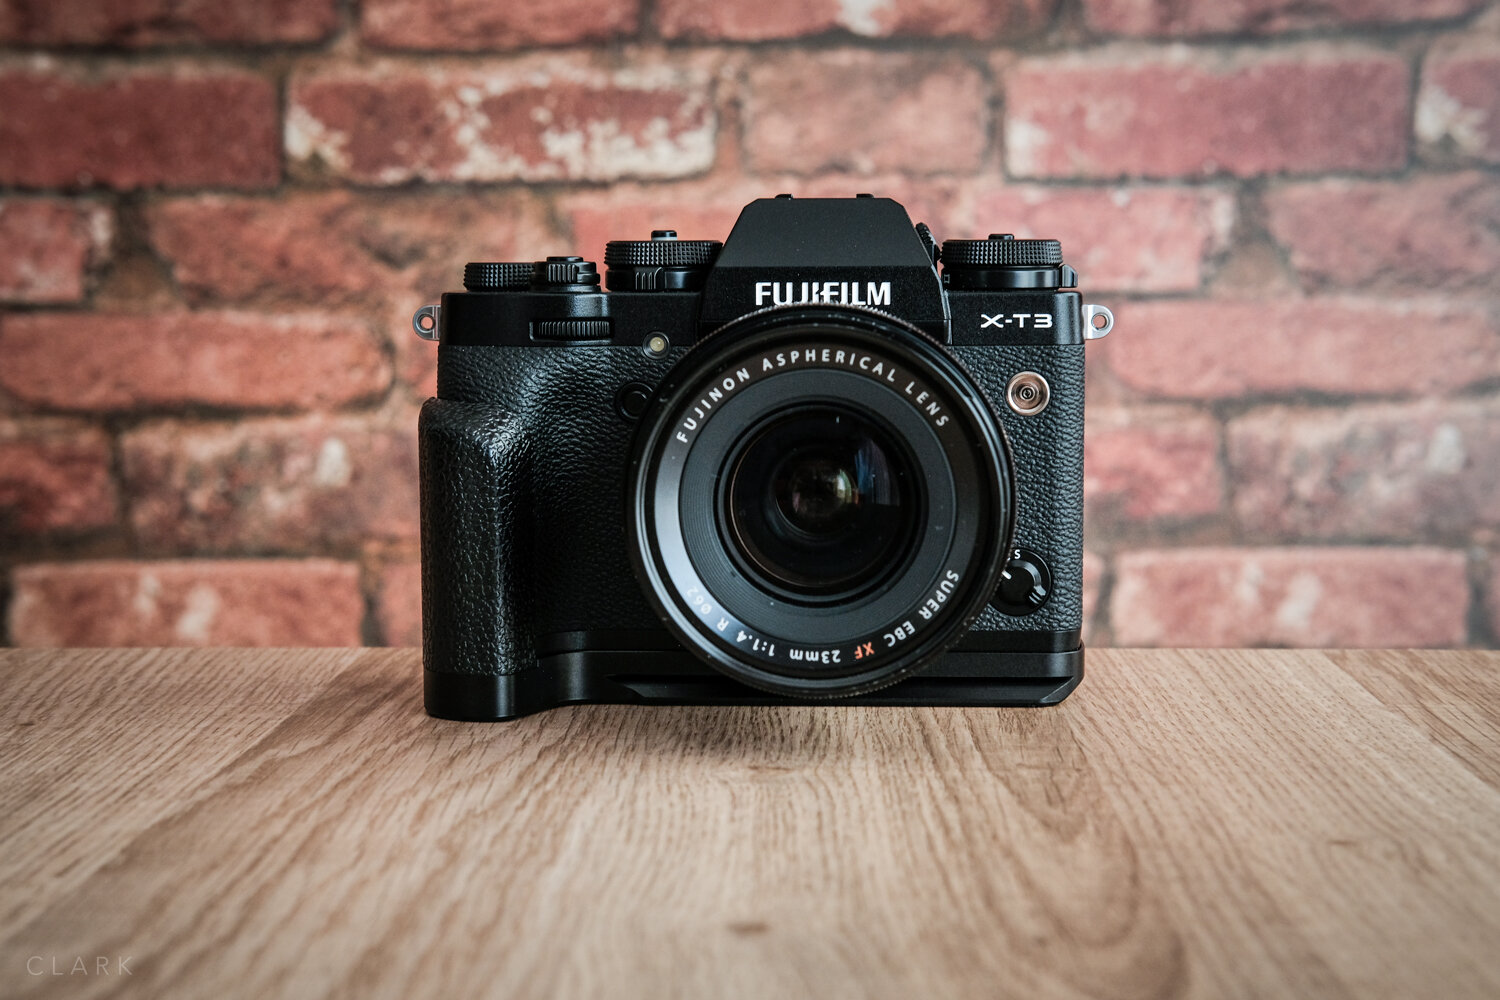
I’ve never been a fan of these metal grips for cameras, preferring a good old battery grip that has a more useful function of extra power. But I’ve been shooting a lot of video this year on a Zhiyun Weebill S gimbal and wanted to use a quick-release system rather than having to rebalance the gimbal every time I used it, each time I needed to change batteries. I started off using a Manfrotto quick release plate, but as I also shoot stills on the same gig, I didn’t like that square block attached to the bottom of my camera when not on the gimbal. Enter the Meike MK-XT3G hand grip for X-T3 (there’s an X-T2 version too).
Although Fujifilm makes there own version of this, like all Fujifilm accessories, it is a little overpriced. JJC produce a version of this grip too, but in the end, I opted for the Meike one as I preferred the design.

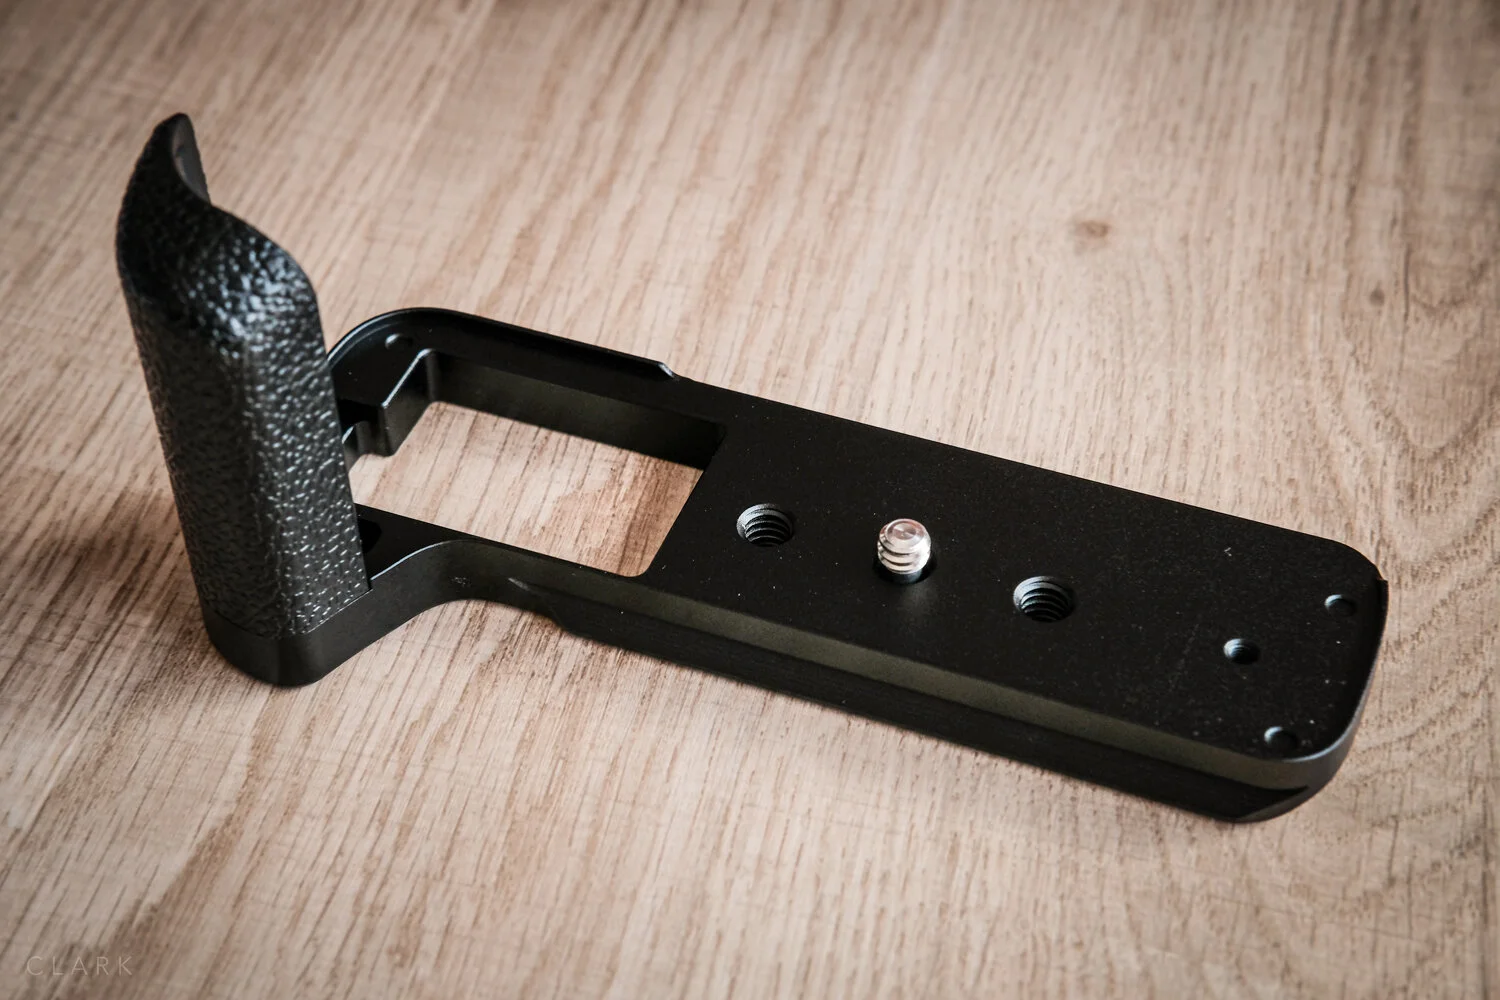
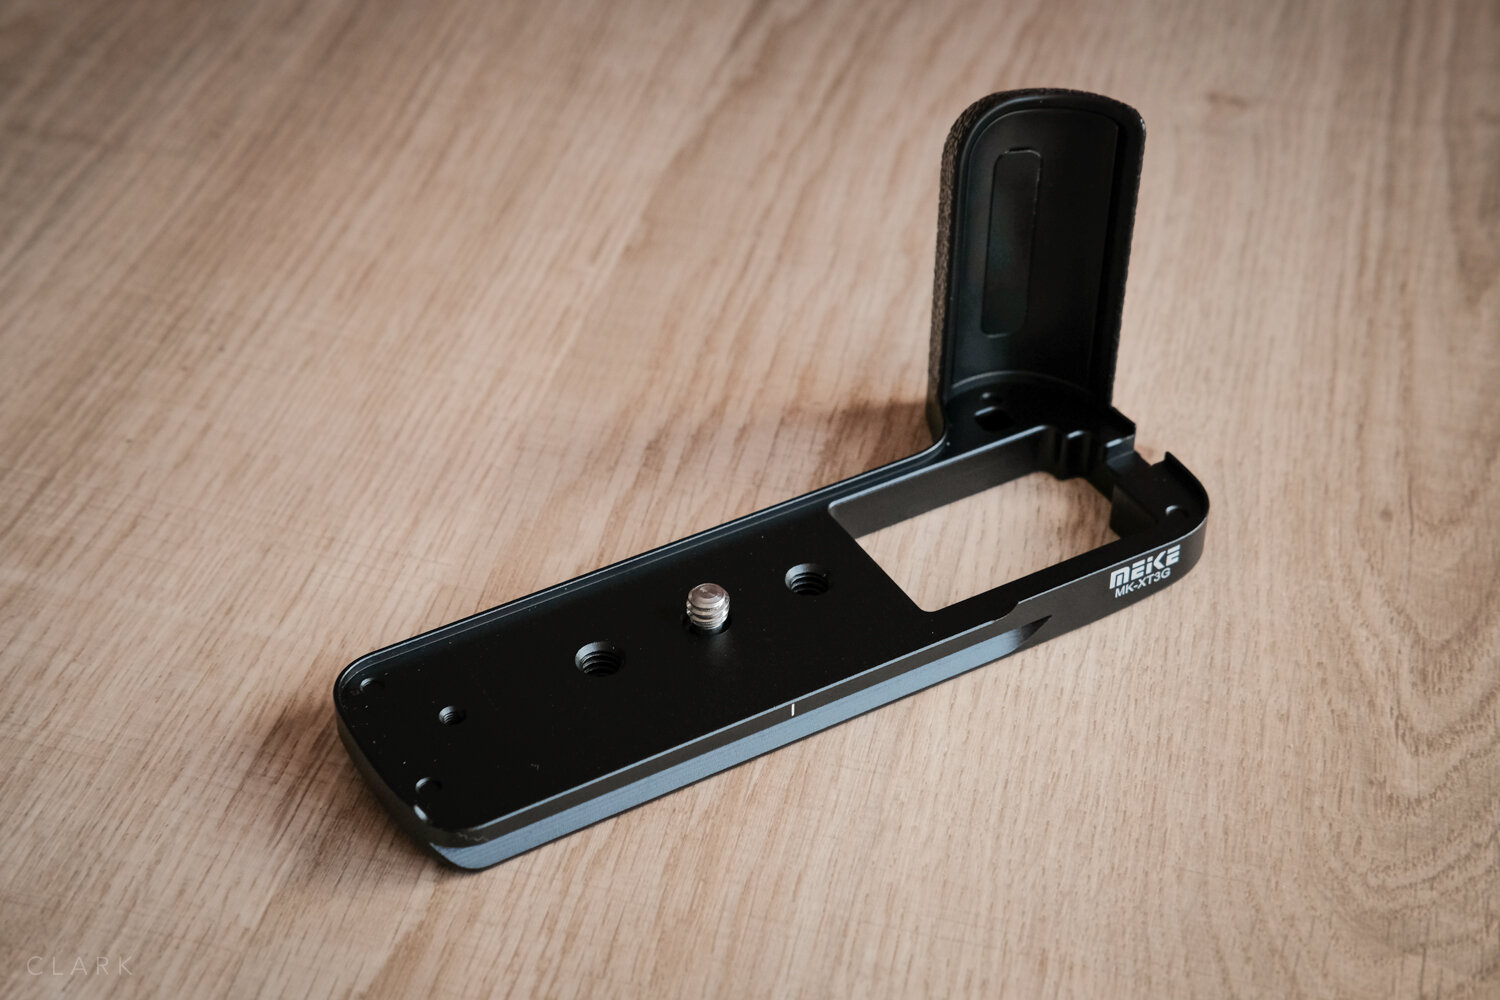
BUILD QUALITY
Built quality is first class. It is solid and made of metal. The vertical part of the grip is also made of metal but has a plastic grip at the front. This thing is built well and should last for years.

LOOKS
Although I find the vertical grip part (that sits in front of the camera’s grip) is a little too glossy for my liking, which looks a little cheap on close inspection, this is the only downside but will hopefully look better with a little wear. Its finish is not a match for the X-T3’s more rubber look.
The bottom of the grip (the important part) looks nice and is well styled to suit the camera. It might even add to the looks of the X-T3. Rather than just putting a brick on the bottom of the camera, Meike has added a few design curves that give it a more expensive look and feel.
The logo on the back is a little oversized, but I’m just being picky now. Put up with it or add a little bit of black tape if you don’t like it.
FUNCTION
Instead of having to screw a plate on to the bottom of the camera each time a tripod is required, the Meike grip just stays attached and simply locks into the quick release plate on the gimbal or tripod. It’s a functional grip when hand-held, or a tripod bracket when required. The front and rear of the grip has built-in rails Which allow the quick release plate to lock it in place on any Arca Swiss bracket. The simplest things can often be the best, and that little white line on the back of the grip that marks the centre position is great! I can use it to line-up with similar markings on the quick release plate to always lock my camera in the same spot, allowing my gimbal to be balanced each time.
On the bottom of the grip, there are two threaded holes that can be used to attach standard tripod screws or BlackRapid style straps. Each corner of the base is curved to make it more comfortable on the hands. The grip is also cut-away to allow the flip-out screen to move freely.


VALUE
At £39 on Amazon, this is outstanding value for money and a bit of a no-brainer if you need to use a tripod or gimbal with a quick-release Arca Swiss system. I paid a further £15 for the Arca plate to attach to the gimbal, so for a total of £59, this saves a lot of time having to re-balance the Weebill S each time I use it at a different location (which could be up to six times per day).


SHOULD YOU BUY ONE?
There are three good reasons to by the Meike MK-XT3G.
If you use a tripod regularly.
If you use a gimbal, but don’t want to have to constantly balance it.
If you find the camera a bit small in your hands.
If any of these reasons apply to you, it’s probably a no-brainer, especially at the price on Amazon. Time is money, so for me, this grip will more than pay for itself in very little time!
RELATED CONTENT
One Frame 010: 3 Red Dots
The vernacular railway trip up the mountains to reach the Benedictine Monk Retreat at Montserrat in Barcelona, Spain is a spectacular journey. The cable car is another option but I would recommend going up by vernacular and coming back on the cable car. After reaching the top, the air is clear and the views are spectacular. There is also a peaceful quiet only interrupted by the church bells every so often.
I noticed these three red dots on the window before heading downstairs to the exhibition and decided to wait to see if someone would walk into the frame. I had imagined a single person or possibly a couple but a few seconds later these three people walked past and I captured this picture. I shot 6 more after this one but there was no point, I already had the shot I needed. Time plays tricks on you and I had it in my mind that this was the last picture of the sequence rather than the first.
See more pictures of Montserrat HERE
SHOT WITH FUJIFILM X100T & WCL-X100 CONVERSION LENS (28MM FULL FRAME EQUIVALENT)
One Frame 009: Decisive Moment
We’ve all heard about Henri Cartier Bresson’s ‘The Decisive Moment’ I guess. The shot of the man leaping over the puddle (or into it) springs to mind. But HBC just meant that you have to press the button at the right moment. A lot of the time if you see the picture - you have already missed it. So you have to anticipate the moment. But to be honest, sometimes you just get lucky!
This frame was shot during the second month of the Covid-19 lockdown when exploring places off the beaten track was not only fun - it was essential if you wanted to avoid contact with fellow humans. While walking with my wife and kids we came across this burned-out car. I was flying a drone at the time so I grabbed 7 frames of the kids playing on and around the car as the drone hovered above. I only took a single shot of my son jumping off the wreck, and this is that frame. I used the drone footage for my Coronatime film, which I was asked to make for the Fact Not Fear series (below).
SHOT WITH FUJIFILM X100F
Fact Not Fear and CoronaTime

I was asked to make a ‘Day in the Life’ film to be included in the latest episode of Fact Not Fear. Now on Episode 4, Fact Not Fear is a series on the Coronavirus pandemic featuring mostly retired journalists from all over the world telling the real story of the place they are living.
I started off by recording the music. The ticking clock was actually the foundation of the project as so much of this lockdown period has been about how slow and how fast time can move, sometimes at the same time. I then built up the track and finally adding the tenor sax part.
At the same time as recording the music, I was shooting video on my X-T3, GoPro, and Drone. I then put the whole thing together in DaVinci Resolve. You can see the full episode of Fact Not Fear above, and my contribution below. Our newest member of Kage Collective, Neale James, does the links on this. Neale is a photographer, but was a BBC DJ many years ago. Phil Payne has a film in this episode too, but he also puts these programmes together.
One Frame 008: Boy In The Bubble
I like to set mini-projects when visiting other cities or countries, just to make me more focused when walking around. I decided before arriving in Paris that I would shoot a series of square pictures on my iPhone using the Hipstamatic app. At that time this app allowed you to choose a lens and film simulation and shoot pictures with a wide range of looks, from pinhole cameras to plastic cameras and everything in-between. But the reason I chose Hipstamatic was that (back then) the effect was backed into the picture and couldn’t be changed. My goal with this project was to make a book using the Blurb platform when I returned home. I also shot with my Fuji cameras while in Paris, this was just a side project.
This shot always prompts a few questions when people see it. The effect is not from Hipstamatic as I was using a simple colour film look on this one. What you see here is my son Teo in a plastic ball that is pumped full of air and pushed out onto a pool full of water. The kids then try to stand up, walk, or run inside the ball, but always end up falling over. The plastic ball has a constant covering of water running down it and provides this painterly look to the picture.
I designed the book and sent it off to Blurb the day after I returned from Paris. I strongly recommend printing your pictures in one form or another. I have a folder called Prints on the desktop of my Mac that I drag a copy of any interesting photos that I make. Then every so often I send these to Loxley Colour and have prints made. I also make books using Blurb often and add them to my bookcase.
The 7”x7” book of iPhone pictures shot in Paris in 2005
SHOT WITH iPHONE 6 AND HIPSTAMATIC APP
One Frame 007: Man Down
Each year in the stifling heat of Italy, runners set off from Venice on The Moonlit Marathon, pounding the streets through Jesolo. During the 2012 event, one of the runners suffering exhaustion and possibly dehydration collapsed outside Hotel D’Annunzio. Spectators tried to help the runner by placing his feet on a chair and the hotel owner brought glasses of water, with most of that water being poured over the runner. An ambulance was called and the man was treated on the ground by paramedics before being taken away on a stretcher.
I picked up the Professional Photographer of the Year Award in the news category in 2013 for this picture. It’s still one of my favourites to this day. Although the composition is technically flawed. as the main subject is in the centre of the frame and there is a lot of dead space. at the bottom, I think it adds to the. drama, especially with the extremely crooked verticals. I shot frames before and after this one but everything just came together in this one shot, the water on the ground, the number on his chest blowing down and the man leaning over him with his hands on the runner’s chest. It’s a shot made for black and white.
SHOT WITH FUJIFILM X100
One Frame 006: Accidental Vintage
The vintage-looking portrait you see above of jazz trumpeter Tom MacNiven was the result of a happy accident. Back in 2016, I was shooting with two black X-T1 cameras that looked identical. I had been asked to shoot a set of promotional pictures of Tom for an upcoming set of concerts. After setting up my background, lights, and modifiers, I asked Tom to stand in position so I could set the power of my lights. I grabbed an X-T1 from my bag and attached the 56mm f1.2 lens, raised it to my eye and took a test shot. The picture was overexposed, but I noticed that the colours were way oversaturated and looked strange. Then I realised I had picked up the camera that I had used the day before with Fujifilm’s miniature effect engaged. I had forgotten to follow my own advice and reset the camera so it was ready to shoot straight out of the bag. I quickly switched out of miniature mode and carried on with the shoot.
It wasn’t until I imported the pictures into Lightroom that night that I realised there was potential in this picture. It was way overexposed, but to my amazement, I was able to pull the exposure down and retain detail in the highlights. I played around with the colours, but the miniature effect jacks the colours up to give that toy look. So I converted it to black and white using my homemade LR preset with the catchy title of ‘ Contrasty B&W Split Tone +V’ (my presets tend to do what they say in the title). The +V just means a vignette is included. I then made a few other tweaks to clarity and sharpness and the results are what you see above. I used Nik Silver Efex Pro2 to add the frame.
SHOT WITH FUJIFILM X-T1 AND 56/1.2
One Frame 005: Eiffel Tower
I couldn’t help but notice kids trying to drop things off the Eiffel Tower, sticking their grubby little mittens through the railing with a mischievous look on their faces. I thought about the damage even a small coin would do to someone’s head if it fell from such a hight. That got me wondering if there was any sort of netting used to prevent things from being thrown to the street below.
I couldn’t get my head through the railing, but I did manage to carefully get my X100T with the WCL-X100 wide-angle conversion lens attached to fit through. With the strap around my neck, I pointed the camera down toward the street and captured a single frame. The picture was just supposed to let me see what was over there, otherwise, I would have taken more than one.
If you look closely you will see all sort of things that have been dropped over the side by mischievous or clumsy humans. The worst of which are coins and metal keyrings in the shape of the Eiffel Tower.