Blog

Nikon SB700 Review

20110725-070103.jpgThe arrival of the SB700 brings my Nikon Speedlight arsenal up to a total of five. I also have an SB900 and three SB800's. But before I get to the new kid on the block, I need to talk about the SB900.

The SB900 is Nikon's flagship flash, but it's also their iPhone 4. Just like when Apple made the perfect smartphone with an antenna that didn't work (or was it because millions of us were holding it wrong...yeh right!), Nikon gave us the perfect flash, except that it overheats and shuts down doing the same job as the SB800 does standing on it's (flash) head. My SB900 has shut down on a few portrait sessions and it has shut down on almost every wedding that I have shot in the past year. When it shut's down, it stays down, until it cools down. The annoying thing is that the interface on the SB900 was a huge leap forward, it's brilliant! The SB800 is a more reliable flash, but it's not the most user friendly. It's buttons are not very intuitive and it can be slow to switch functions when you have to press and hold a button for a few seconds, but at least none of my three SB800's have ever shut down on me. So I've put-up with the SB900 and swap it for an SB800 when it shuts down. I shoot weddings with two cameras, so I either move to the camera with the SB800 on it, or I switch the flash's around to suit the body/lens combination that I need. But a flash that won't fire is as much use as a phone that can't make calls!

The SB700 is an iPhone 4 with an antenna that works. Although it's billed as the replacement for the SB600, it's more like an SB800 with a great interface. It has more in common with the 800. Size and weight are similar and it can be used as both a remote (slave) and a master for your CLS wireless set-up. What it doesn't have though, is a power socket and a sync cord socket. None of these missing features are a deal breaker for me as I never use external power on my flash guns and my TTL cord is the hot shoe type. But if you need these functions, you might want to go for the SB900 or a secondhand SB800. Its great to see that the infrared eye on the side of the flash has been moved up and is less likely to be covered up by a VAL (Voice Activated Light-stand).

The interface is probably even better than the SB900's as it has the addition of two switches. The one on the left selects TTL, Manual and GN (the guide number position also acts as an A/B selector). The AB selector is a nice feature that works in Master (commander) mode, and allows you to change the ratios of flash A and B buy simply pressing Select to highlight A/B and then spinning the selector dial in either direction. One flash goes up in power and the other goes down in power. This is a fast and easy way to set-up your flash ratios in a small shoot where you're time is limited. The switch on the left selects the Illumination Pattern to either Standard, Centre Weighted (narrow beam of light) or Even (wide beam of light).

The head on the SB700 feels solid and takes maybe even more effort to press in the button and tilt than it's big brother does. A lot of people I talk to don't know that the heads on Speedlights are in the normal position when they are one click up. That extra click down is for macro shots. Another good feature over the SB800 is that the head rotates 180 degrees in both directions. The SB700's zoom goes from 24mm - 140mm, which is not as good as the SB900's 24mm - 200mm. The battery cover has changed too, and you now have to press a centre button on the door before sliding it open.

Supplied accessories are a square soft case with compartments for the very useful foot/stand and the Soft Diffuser Dome, together with two correction filters. The later are hard plastic CTO and Florissant filters that are similar in shape to the SB900's Filter Holder, but are already tinted orange and green (no need for gels). The Soft Diffuser Dome can also be fitted on over the filters. My one and only negative with the SB700 is that the Diffuser Dome can be awkward to get on and sometimes you think it's on and it falls back off. But when you finally get that big click, it's a solid fit and can stay on forever. My flash guns have a compartment each in my camera bag and the Diffuser stays on, so unless I need to use the filters, I'm not that bothered.

Another plus point with the SB700 is that it feels more solidly built than the flagship model. The first thing I noticed when I unboxed the SB900, was that it felt cheaper and less solid than my SB800's. The new model also has the fastest recycle times, so this one will go on the camera I use most at weddings.

So which flash should you buy? If you need enough power to frazzle your subjects eyeballs, zoom in to 200mm, or need to use external power or a PC Sync cord, then the SB900 is the one to buy, but make sure you have a back-up! If however, you need a solid and reliable workhorse that is fast, easy to use and quick to recycle, then the SB700 is the one to go for. If you shoot weddings or events, then you defiantly need an SB700 or a second-hand SB800...the SB900 will let you down! The Nikon SB700 is available from Warehouse Express in the UK or B&H in the US

Lightroom & Photoshop Workflow Wizard

20110702-090529.jpg My ears prick up the minute I hear the word workflow. It's the one area of photography that can be a bit of a drag. The digital age has brought many great things, like being able to take lots of photos for free. The digital age has also brought us a few bad things though, like being able to take lots of photos for free (yeh you read that right). If you shoot weddings, you're taking photos for hours and they stack up fast. My editing sessions always start enthusiastically and then take a dive after the first three or four hours, so I'm always looking for ways to speed up my workflow and always curious about how other photographers work in post.

The Logitech G13 arrived at my door last Friday and I spent most of the day configuring it. It's set-up is very similar to a Wacom tablet and it doesn't take long to get the hang of it.  It's easy to set-up Photoshop and assign keys on the G13 to just about anything. Lightroom is a different story though, as it doesn't have keyboard short cuts assigned to the sliders. The answer to our dreams comes in the form of a fantastic plugin called Paddy which is available to download HERE for free. Paddy is a little time consuming to set-up, but is well worth it. It's best to use the computer F keys as they don't have any shortcuts assigned to them in Lightroom. You can map the F keys to any of the G13's 21 keys using the Logitech software. The keyboard can then be configured in Paddy to control the Lightroom Sliders.

Paddy handles Lightroom sliders by assigning keys to move sliders by a fixed amount. I set my keys up so that for example the F4 key is assigned to Exposure +5. Every time I hit the key on the G13 that's assigned to F4, it increases the exposure by 5. F3+Shift is set to increments of 1 and F3+Alt is set to increments of 10. This might sound a bit complicated, but once you get the hang of it, it's very easy.

I have only edited using the G13 for a couple of hours, but I can see a big jump in the speed of my workflow. The keys are marked G1 to G22 so you need to memorize which key does what, but the shape of the keyboard really helps your brain to take it in a lot faster. I find I'm already reaching for keys on the G13 rather than the computer keyboard. The G13 also detects when you switch programs and applies your presets automatically, again like the Wacom tablets. You can even have three pages of presets for each software program and have each page set to a different colour (screen and keys are lit) so you always know where you are. I use a page for the Library module (blue) and a page for the Develop module (orange) in Lightroom. The G13 is available from Amazon in the UK for £62 or in the US for $62.

FilterStorm:: The Best App For Photographers?

20110704-094044.jpg There's a lot of great photography apps out there, but most of them are geared toward one or two features. Some lean toward shooting and uploading straight toTwitter, Facebook etc, some do tilt/shift and some only do black & white. Thanks to Apples camera connection kit, I can now take the SD card from my Fujifilm X100 and import the photos straight onto the iPad 2. I needed an app that could then resize the files to my blog sizes. I tried PhotoResizer, which did the job, but was a little sluggish and again a one trick pony.

FilterStorm is what the Photoshop app should have been like. It does a huge amount of different things and it does them really well. Apart from Settings, Load Photo Star Rating and Automations, The app is split into 4 sections, which are in the form of tabs - Export, Metadata, Filters and Canvas. Export does what you would expect, like saving back to your photos folder of sending by email, Flickr, FTP or Dropbox. You can also choose size and quality options here too. The Metadata tab is set for viewing meta and renaming photos by default, but click on Settings and you get whopping great 31 switches that let you turn on features like Keywords, Captions, Subject, Category, Location, Copyright, Usage, Contact Details...etc. The meta section really is a wolf in sheep's clothing. Canvas is where you can crop, scale, rotate, flip,straighten, Scale and add borders. This is another huge section. Filters is the place where we pixel pushers all like to be. It has Brightnes/Contrast, Curves, Hue/Saturation, White Balance, Sharpening, Blur, Black & White, Clone, Tone Mapping, Text, Noice Reduction, Noise, Redeye Brush, Colour, Vignette, Posterize and Add Exposure. The great thing is that it does them all really well.

This is the best i photo editing app that I have ever used, and I've tried plenty. The thing is, I've just checked on the Apple App Store so I could wright the price (2.39 UK) and saw that there is a pro version (8.99 UK) with even more features. My one gripe would be that if you have already bought the standard version, you shouldn't have to pay the full price for the pro version. That goes for apps that are different on the iPhone & iPad, if you buy it on your iPhone and the iPad is a more expensive & more powerful app, then you should only have to pay the difference and not the full cost. But all that aside, Filterstorm is the best app for photographers I have came across to date. It was made with photojournalists in mind (although photojournalists shouldn't need a clone tool). I'm going to buy the Pro version now, as there are a few features that I quite fancy (batch editing being but one). Filtersorm (iPod, iPhone & iPad) & Filterstorm Pro (iPad only) are available on the App Store. The photo above is from the Pro version.

Fujifilm Finepix X100 Size

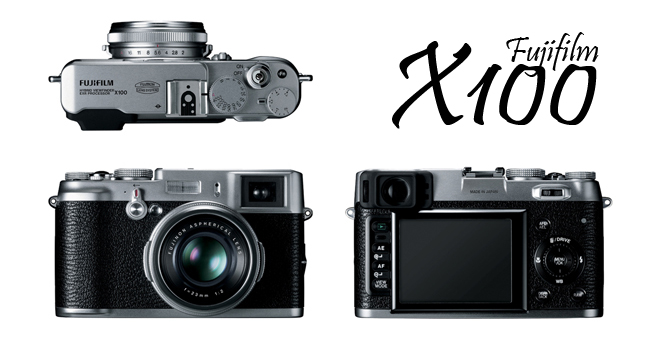
I picked-up my long awaited Fujifilm X100 camera today which I will be reviewing here soon. Until then, here are some size comparisons with other cameras. Click on each photo to see the full image. Click HERE for more of the same.

Back To The Future

I've been on the lookout for a walkaround camera to replace my Canon G9 and although I like a lot of the micro four thirds cameras out there, like the Lumix GF2, Olympus Pen series and the Sony NEX-5, there is one big problem with all of them...no viewfinder. In my opinion, a camera should be held up to your eye and not at arms length and I also think that the micro four thirds manufactures have made a huge mistake in leaving out one of the most important parts of a camera.

The Fujifilm X100 looks like being a compact(ish) camera that has been designed with the serious photographer in mind. Fuji has listened to what people have been asking for. The X100 has an APS-C CMOS sensor, which is the same size you would find in most DSLR's. The Lens is a 23mm (35mm in the real world)  f2 that is fixed to the body and can't be changed. This has been the biggest criticism on the web and a lot of people say that it should have been an interchangeable system. I would have been nice to have had two or three prime lens's to swap around on this body, but Fuji's main objective with this camera has been picture quality above all else. By going for the fixed lens approach, they have been able to match the lens, sensor and the new EXR processor to get rid of fall off on the edges of the frame and get a sharp high resolution image.

The viewfinder is probably the most hyped part of this camera. It's a hybrid affair (The worlds first I think), which can be changed from optical to a 1,440,000 dot LCD electronic viewfinder by flicking the lever at the right index finger position. The LCD option has shooting information and can be used to preview images you have already shot.

One of my first camera experiences was using my dad's Rollei 35 (that I blagged off him and I still have 30 years on), which has that same silver and leather effect finish and is a solid and well made piece of kit. Although the X100 is hi-tech under the hood, it defiantly has that retro look from the 60's and 70's and Fuji has gone back to the craftsmanship of that era by using beautifully machined metal parts. Just take a look at the tiny pyramids on the side of the shutter speed and compensation dials.

This camera looks like a great piece of kit for those of us that fancy the Leica M8 or M9, but don't want to sell a kidney to be able to buy one. I personally don't mind the fixed lens if the trade of is to have great quality. I really hope Fuji have also paid attention to getting low noise at hight ISO. Who knows, this might lead the way to bring back the viewfinder in a lot more compact cameras. TO BE CONTINUED...

Getting Your White Balance Right

Getting the white balance right in your camera at the time of the shoot is a huge part of a quicker workflow. Auto white balance does a pretty good job, but doesn't get it right all the time. If you shoot weddings it's hard to get your white balance consistent throughout the day, due to the different locations and light sources and it's easy to forget to switch between white balance settings when you move from inside to outside and vice versa. But if you are at a single location that has a fixed type of light, it will save so much time in post production that it's crazy not to take the 20 or 30 seconds to sort it at the time of the shoot.

There are two ways I would suggest. The first would be to buy an ExpoDisc, which is a white filter that you either screw or hold in front of your lens. You then use your camera custom white balance feature to take a shot and make the right WB settings. ExpoDiscs  are quite expensive though and would set you back £79 at Warehouse Express or $99 at B&H Photo. I would recommend getting a larger size (77mm) and holding it over the front of your lens.

The second way ( and the one I use for portrait sessions) is to use a white balance card like the Lastolite Xpobalance (see photo). The Xpobalance pops out in a flash and folds with a quick twist and can be clipped to your camera bag or belt loop. You simply get your subject to hold the card in the first shot, and as long as your light source is constant and your camera is locked to a setting other than auto WB, you're set. You then use the WB eyedropper In Lightroom (or Aperture, Photoshop...) to click on the 18% grey part of the card to set the correct WB. Then you need to sync the rest of the photos. I'll explain how to do it in Lightroom as that's what I use.

After you click the eyedropper tool on the grey part of the card and you will probably see the photo WB changing. press Ctrl + A (PC) or Comand + A (MAC) to select all the photos and click on Sync (to the right and above the thumbnail display). Choose Uncheck All and then tick the WB box and confirm the sync. All photos selected will have the WB copied from the original photo that was highlighted. This saves a huge amount of time in post production, and anything that speeds up your workflow has to be a good thing.

Wacom Intous4 Wireless Pen Tablet

I've been using the Wacom Intous4 Wireless pen tablet for about two weeks now and I'm probably just getting to the point that it's becoming second nature. It's not as thoughtless as using a mouse yet, but it's getting there. The wireless model is very similar to the regular Intous4, but it it does have some slight differences in its design. The tablet is slimmer than it's wired brother and has two lights on the top surface that let you know when it's on (orange) and when bluetooth is connected (blue). There's also a plate to one side of the base that can be removed and replaced by the supplied pen holder loop, which is a handy accessory and essential if you plan to use your tablet outside of your studio, office or home. As soon as you start to unbox the Intous4, you know that it's a quality product just by the packaging. I was a bit disappointed that Wacom don't supply the mouse with this model.

The pen has a nice feel, both in grip and the smoothness of the nib on the surface of the tablet. It has a rocker switch that is configurable to your own way of working. I find that for Photoshop, the forward button is well suited to the hand tool, so that you can press it and drag your image across the screen when you're zoomed in. The back button of the rocker is handy when it's mapped to the Alt key. This is especially useful with the Clone Brush, as you simply press the button and tap the tablet to select your source, then release it to start cloning. I always preferred Paint Shop Pro's right click on the mouse to select the clone source, rather than than the two handed Photoshop way. One thing I would have liked on the pen is a scroll wheel. The Pen Holder is weighted and can be used for either placing the pen in vertically or sitting it across horizontally. Twist the pen holder and it opens up to reveal the 10 replacement nibs and a pen removal tool.

The Controls at the side of the tablet can be used right or left handed by simply rotating the tablet and making a quick adjustment in the software. There are 8 Express Keys which can be mapped to anything you like and have a fantastic LED display beside each one that lets you know what that key is set for. As the set-up can be customized for each piece of software individually, the display changes every time you switch programs. The Touch Ring is a sensor, rather than an actual wheel, so it has a nice smooth feel. The button in the centre of the wheel lets you switch between the four different applications that you set it for in the software, such as zooming, brush size, brush softness and so on.

The software is very easy to use and I quickly set-up all the buttons, switches and wheel without the need to read the manual. I did loose all of my set-ups after using the tablet for a few days and have no idea why. It might have been pilot error, but you can bet that when I set it up again, I used the back-up software to save my settings... just in case! Although I bought the Intous4 to use with Photoshop and Lightroom, I have it set-up for Safari too, and I'm reaching for the pen as often as the mouse when surfing the web.

Conclusion: As you've probaly figured out by now, I like the Intous4. I bought the wireless version because I do a rough edit and slideshow at weddings and I have a laptop with bluetooth built in. Another plus point is that I'll no longer need to plug in my travel mouse either. Although I have a bluetooth adapter on my desktop computer, wireless doesn't bother me too much, but it might come in handy sometimes. I also bought this tablet because I was curious too see if it would be a more natural way of editing and to see if it could speed up my workflow. It has worked on both counts, although I'm hoping that it speeds up my workflow even more in the weeks to come. Wacom have done a fantastic job on this product and I think that this is the perfect time to give a pen tablet a go if you have never used one, or if you have used one in the past, but it didn't perform the way it should...I still wish they included the mouse though! One more thing - Check out the price on software bundles with this product. There are great deals to be had with Lightroom 3 included.

All New Website for DCP

The brand new and improved  Derek Clark Photography website is now live here. The website and the blog are now on the same .com address, which is much better for lots of reasons, including easier to find things and better SEO ranking on Google and Yahoo. The site should have gone live on the 1st of January, but things went a bit off track and took 2 days to get back on line. There are still a few tweaks to be made, but it's almost there.

New for 2011 is the Project 365 section, which is one picture per day for 365 days of the year. Please check in every day for the latest photo. DSLR, point and shoot or iPhone. Black and white or colour, it doesn't matter as long as a fresh pic gets uploaded every day.

The blog is now split into two parts. The Image blog is for posting frequent photos without text. The regular blog is for posts with text or text and photos featuring photography news, reviews, tips and basically anything photography related. You can expect at least three posts per week on the regular blog. Watch out for a post on how to shoot the water droplet pictures from Project 365 - 3rd of January shoot.

Please post a comment using the link above if you like the new design, or have any suggestions for the site.

3rd Annual Scott Kelby World Wide Photo Walk

The 3rd annual Scott Kelby World Wide Photo Walk took place on Saturday (24th July) in over 1000 cities around the world and it looks like it's been another record breaking year.
I attended the Glasgow event of around 50 photographers and walked around a section of the River Clyde, which included The Science Centre and Imax Cinema, Squinty Bridge, Finnieston Crane, The BBC and The SECC and  The Clyde Auditorium (Armadillo).
The weather was cloudy, but dry and although the light was a bit flat at the start, it got better in the second half of the walk and gave us all a bit of variety. Being Glasgow, it was a miracle it didn't rain.
It's amazing when you look at the photos from all the photographers and see how different they look and how we all look at subjects in a different way. I'm sure everybody there made an effort to try to not take the same shots as the person standing next to them.
A big thank you to the walk leader, Alex Saunders, for his time and effort that he put in and to everyone that showed up on the day. You can see more of my photographs on my Flickr Set and the photographs for the full walk can be found on the walks Flickr Group . I didn't get to do much talking during the event, but enjoyed my conversation with Bill Lunney after the walk. Roll on World Wide Photo Walk 2011.

Lexar Dual Slot Card Reader

I have used the same 8 in 1 card reader for a couple of years and never gave any thought that readers varied much in download speed. But after hearing an interview with Lexar's Director of Marketing, Jeff Cable, I thought I'd give a UDMA reader a try.
If I'm shooting a wedding, I like to download and edit a selection of about 20 photos while the guests are having dinner. I then display them on my laptop as a Lightroom slideshow at the evening reception. The couple and the guests are happy and I leave a pile of cards on the table and generate more business.
There is limited time though for downloading, choosing the photos and editing them. It was taking around an hour with my old card reader, but the Lexar dual slot reader took under 15 minutes (including card swaps) to download almost 900 photos from both of my cameras 300x cards.
The unit is small and accepts both CF and SD memory cards. It folds into its own base when not in use, which makes it even smaller and also keeps dust from getting into the card slots. At £18.35/$33.63 from Amazon UK or Amazon US, this is the best money I've spent in years.