
BLOG
The Fuji X Series With Flash :: Part 3

In this third and final part of The Fuji X Series With Flash (Part 1 is HERE and Part 2 is HERE) I'll be looking at using multiple flash guns and radio triggers with the X Series cameras. You can use any make of flash for this as the radio triggers are only telling the flash to fire. There's no information about exposure or anything else, it simple triggers the flash.
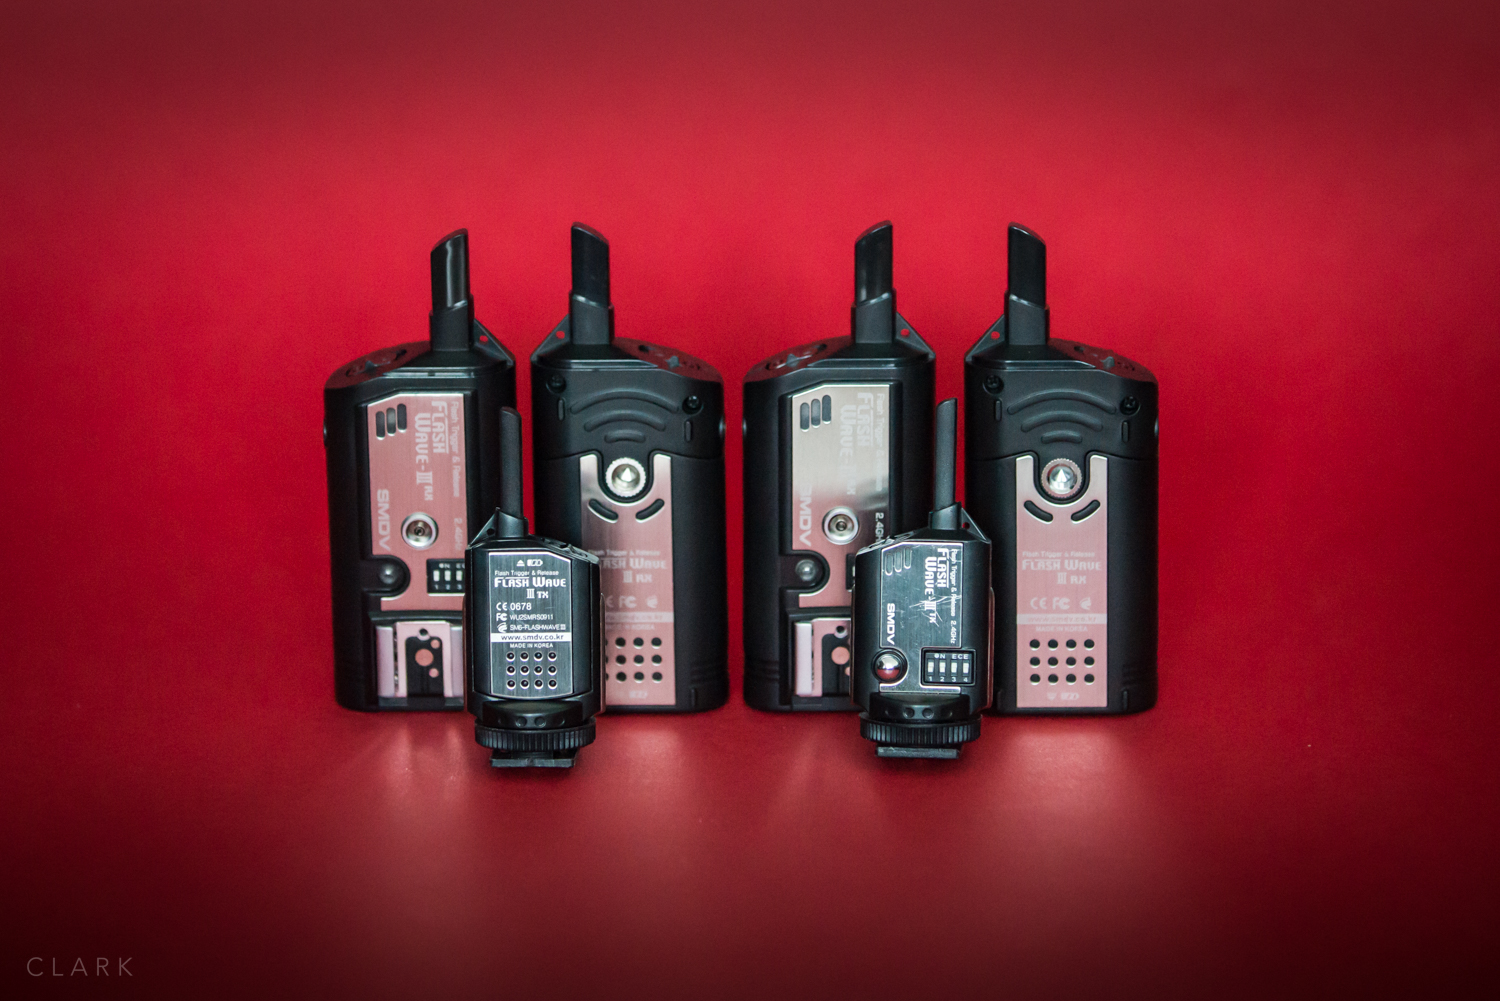
There are many different radio triggers available, but by far the most popular are the Pocket Wizards. I came from a Nikon flash setup and worked with the SU800 Commander unit, and because of this I never owned any radio triggers. But after buying into the Fuji X System I realized that my trusty SU800 would not be usable. The Pocket Wizard Plus III's had just came out, but were expensive for a multiple flash setup. Pocket Wizard's also don't have hotshoes for mounting the guns directly on to them. Instead the work with cables. My older SB800's have sync ports, but my newer SB700's don't (I replaced my SB900's with SB700's due to the overheating problem and so glad I did). In the end I decided to go for the Flashwave III system because they were reasonably priced, had both sync and Pocket Wizard size ports and most importantly the receivers have hotshoes. They come with a great verity of cables and adaptors that so far have coped with everything. The receivers have a tripod mount on the bottom, but also come with adaptors to change them into hotshoe mountable. So the flash mounts on top of the receiver and the receiver to the shoe on the light stand.
The transmitter's are tiny and even look small on the X-M1. They include a test fire button and have a choice of 16 channels via small dip switches on both transmitters and receivers. An X-E1 or X-E2 can also be fired remotely by attaching a Flashwave III receiver to the microphone input on the side of the camera and triggering it using the test button on the transmitter. I've used this setup when doing long exposures instead of a cable release.


Lighting doesn't come any more basic than a radio trigger setup. Lights are all set to manual and you adjust power settings on each one individually. I use anything from one light to six lights, but I only have four receivers. If I need more than four lights I set the extra guns to slave mode. The radio triggers fire one set and the extra guns are triggered by the flashes.
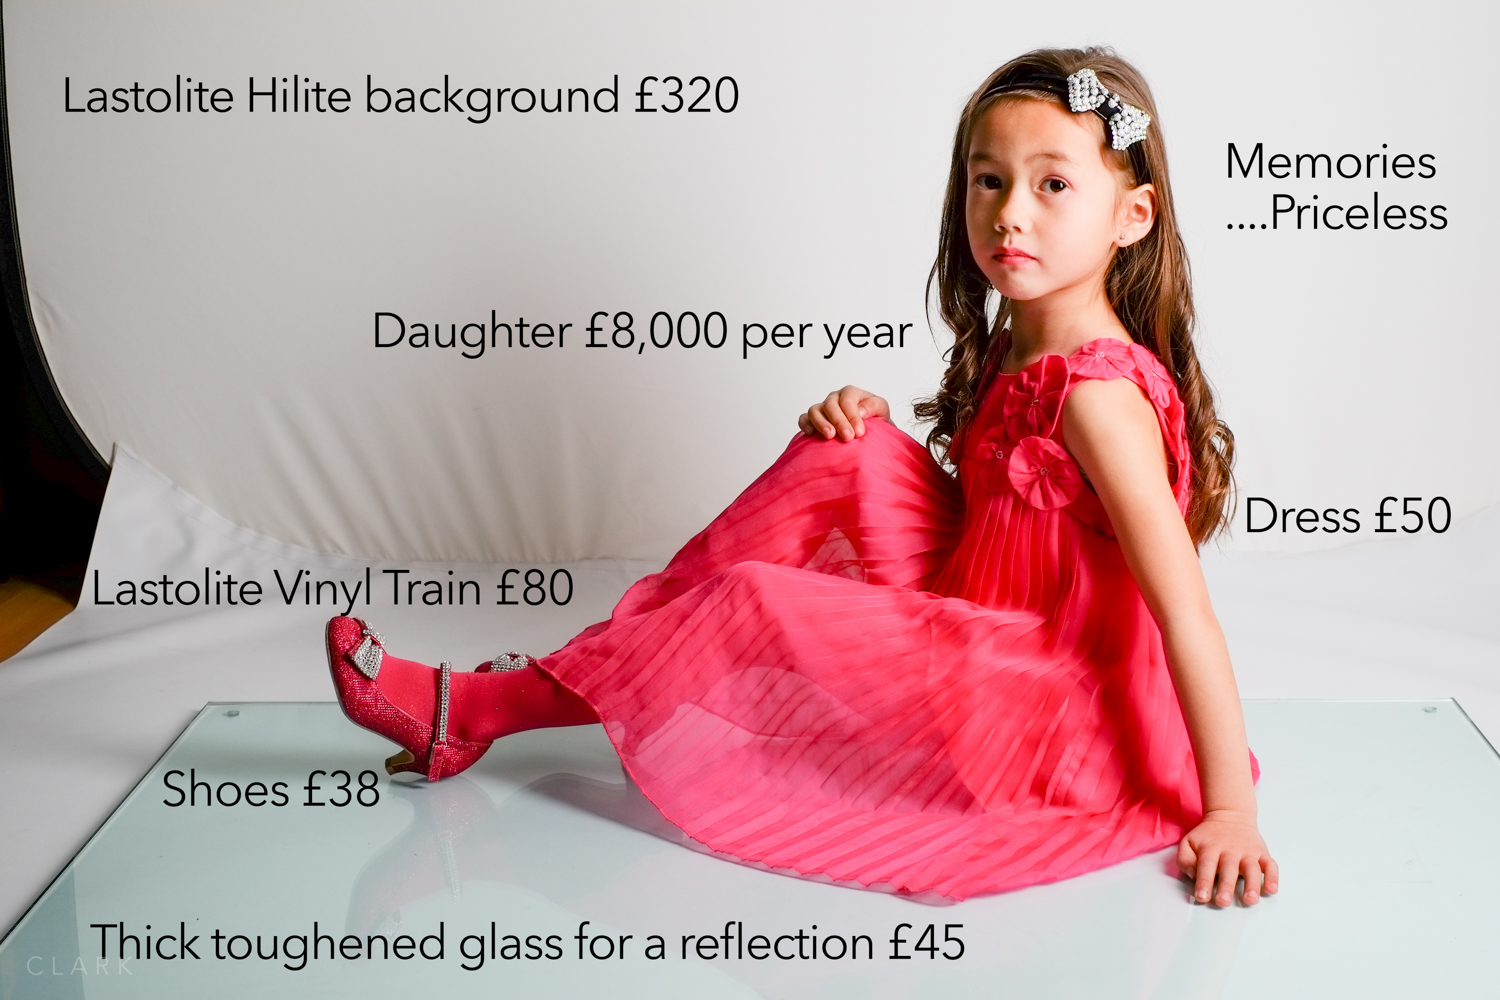
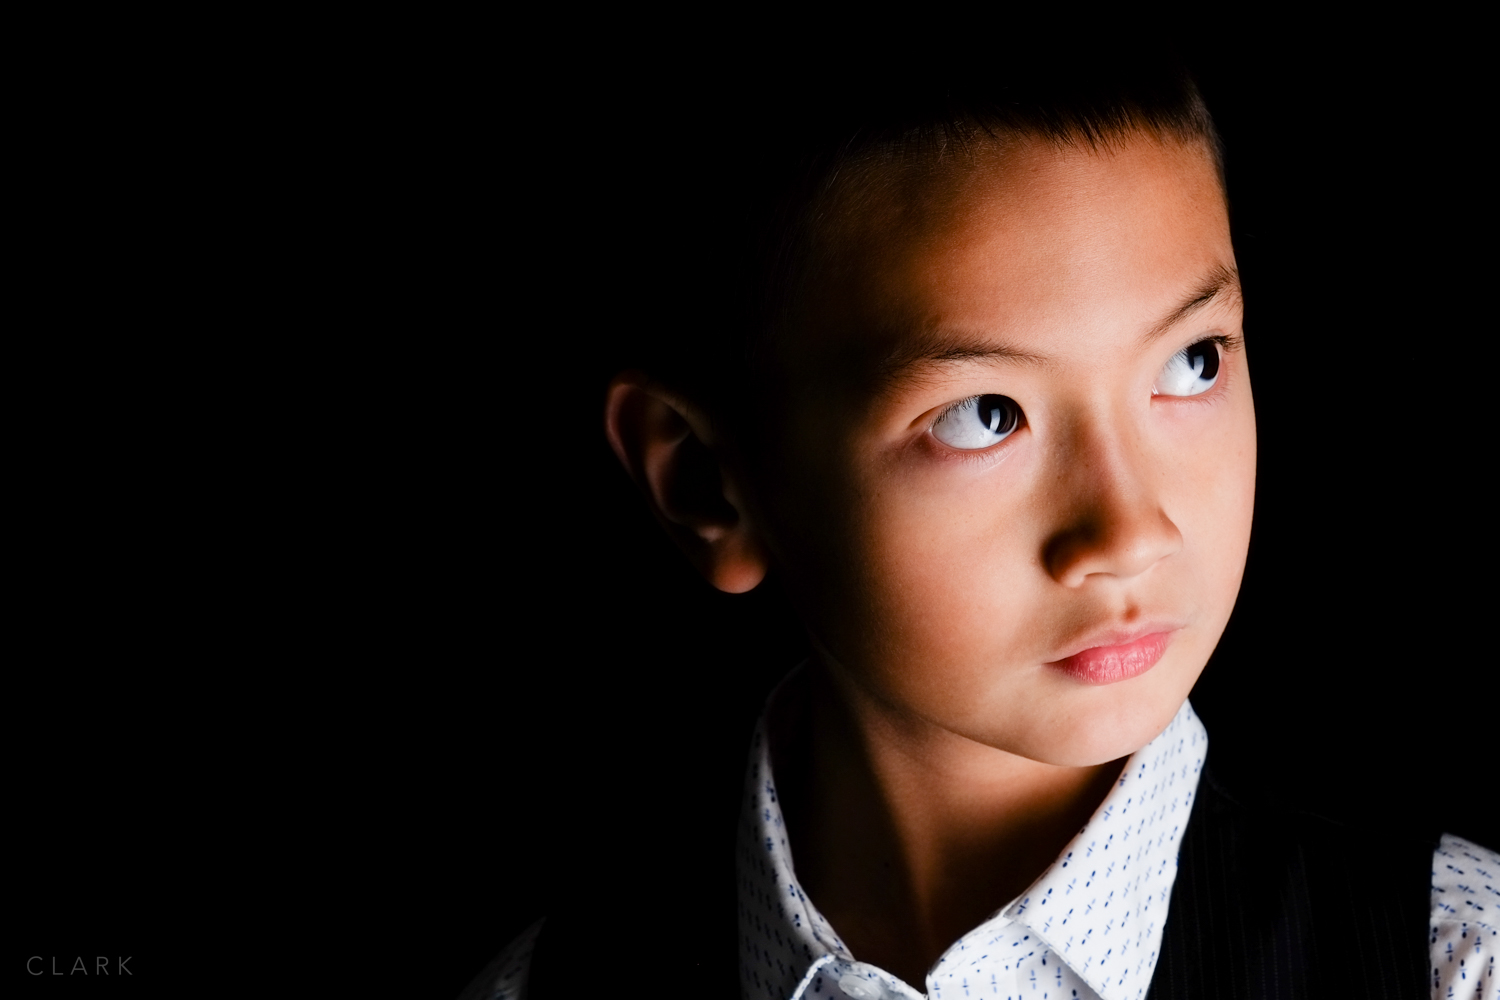
I wanted to shoot some fresh portraits for this post and I've been meaning to do some up to date shots of my kids. So excuse the self indulgence, but if you're from a modeling agency...they are available:o). I shot these using Nikon Flashguns and Flashwave III radio Triggers. As you can see from the photo above, I used a Lastolite Hilite background. The Hilite works well with two flash guns inside, tilting upward and back to blow the background to pure white. I also use the Lastolite Superwhite Vinyl Train and a piece of thick toughened glass for a reflection. For this shoot I used a Lastolite Hotrod Strip Softbox which is a fantastic modifier for the money. Some of these shots were with one light, some are with three. I used the X-Pro1 and the X-E1 with the 35mm f1.4 and the 60mm f2.4.


Thank you for reading this series and I really hope you found it useful. Flash with the X cameras seems to be a mystery to a lot of people that are moving over from DSLR's, so I thought this series of posts would help to clear up a few of the common questions. Click on the links below if you haven't read part 1 or part 2.
The Fuji X Series With Flash :: Part 1 :: The Fujifilm EF-42 TTL FlashgunThe Fuji X Series With Flash :: Part 2 :: Off Camera TTL
The Fuji X Series With Flash :: Part 2
What Is TTL?
I'll start part 2 (part 1 is HERE) by describing what TTL actually is. Feel free to skip this part if you already know this.
Back in the good old film days a lot of flash guns had a small calculator in the form of a chart or a small disk that rotated. These things basically calculated what setting worked for the Guide Number of the flash you were using. I had a Vivitar 283 back in the early 80's, which was one of the most popular and reliable guns of it's time. It had a dial built into the hinge of the bounce head (photo left). You set the dial to whatever ASA/Din number your film was (now called ISO) and the dial told you what distance you would cover with the varies apertures. The coloured sections corresponded to a dial on the front of the camera. It all goes a bit hazy after that...it was a long time ago. But I do remember having a cable that plugged into the front of the gun to use it off the camera.
Fast forward to today and we have much more sophisticated flashes that talk to the camera and vice versa. The camera takes it's exposure reading through the lens (TTL) and tells the flash the information it needs to know. The flash then works out how much power it needs to put out to achieve a good exposure. The flash gun can also let you know via it's display if the right exposure was obtained.

What TTL Cable Works With The X Series If you want to do off camera TTL photography with your X Series camera, you will need an EF-42, EF-20 or an EF-X20 and a TTL suitable for a Canon (usually called ETTL in Canon speak). The Canon hotshoe pins match the Fuji ones and allow TTL flash with a Fuji X camera. Nikon has a different pin arrangement and definitely won't work in TTL. Remember to turn off both camera and flash when attaching a TTL cord as the contacts are sliding into position and could short out. I've never been a Canon shooter so I don't have access to their flash guns and I can't say if an X camera and Canon flash can speak to each other and work in TTL harmony. Nikon guns do not work in TTL. Nikon flashguns will work on an X series camera in Manual or Automatic, but not in TTL. If used on an X camera's hotshoe or with a TTL cord, A Nikon flash is only being told by the camera to fire - exposure settings are up to you the photographer. The flash must be set to Manual (not TTL) or it won't fire.

The Pixel FC-311/S TTL Flashgun CableCanon's own ETTL cords will be great for the job, but they do tend to be a bit spendy. I bought the Pixel FC-311/S 1.8m cable (for Canon) from Amazon UK for £17 and it works fine. A really nice feature with this cable is that it has both a tripod mount and a cold shoe for attaching it to a light stand. This could come in really handy (although a longer cable might be better for using on a light stand). I'm using an SB700 soft case to hold the Fuji EF-42 and the TTL cable and there's even space for a plastic foot too.
Hand Holding For Off Camera Flash Obviously if you are doing off camera flash without the use of a stand or tripod, you have to be careful of camera shake as you'll be holding the camera with one hand. Thankfully X cameras are great for hand holding due to their size, weight and the lack of a mirror popping up and down. But having a good solid grip and steadying technique is very important. In the photo below you will see the grip I use. By holding the flash in the left hand and crossing it over to the right, you can rest the camera on the left shoulder, the flash can be stretched out as far to the right as you like, as long as it's pointing in the right direction a bit of shake won't make any difference. If your TTL cord has a hotshoe or tripod mount at the flash end (Like the Pixel cord), you could easily use a handle. Lastolite do an extending Handle and a Brolly Bracket.

So that's off camera TTL, what you do with it after that is up to you. There are some interesting accessories available like the Rogue Flashbenders to spread or direct the light, or Rogue Gridto focus it exactly where you want without light spilling all over the place, which is a must if you have a coloured gel on the background. The possibilities are vast and a lot of fun.
The Fuji X Series With Flash :: Part 1 :: The Fujifilm EF-42 TTL FlashgunThe Fuji X Series With Flash :: Part 3 :: Using Multiple Flashes With Radio Triggers
The Fuji X Series With Flash :: Part 1

This is part one of a three part series on using flash the Fuji X Series. This part is a review of the EF-42 flash and this will be followed by Part 2 : TTL Off Camera TTL and then ending with Part 3 : Using Multiple Flashes With Radio Triggers.
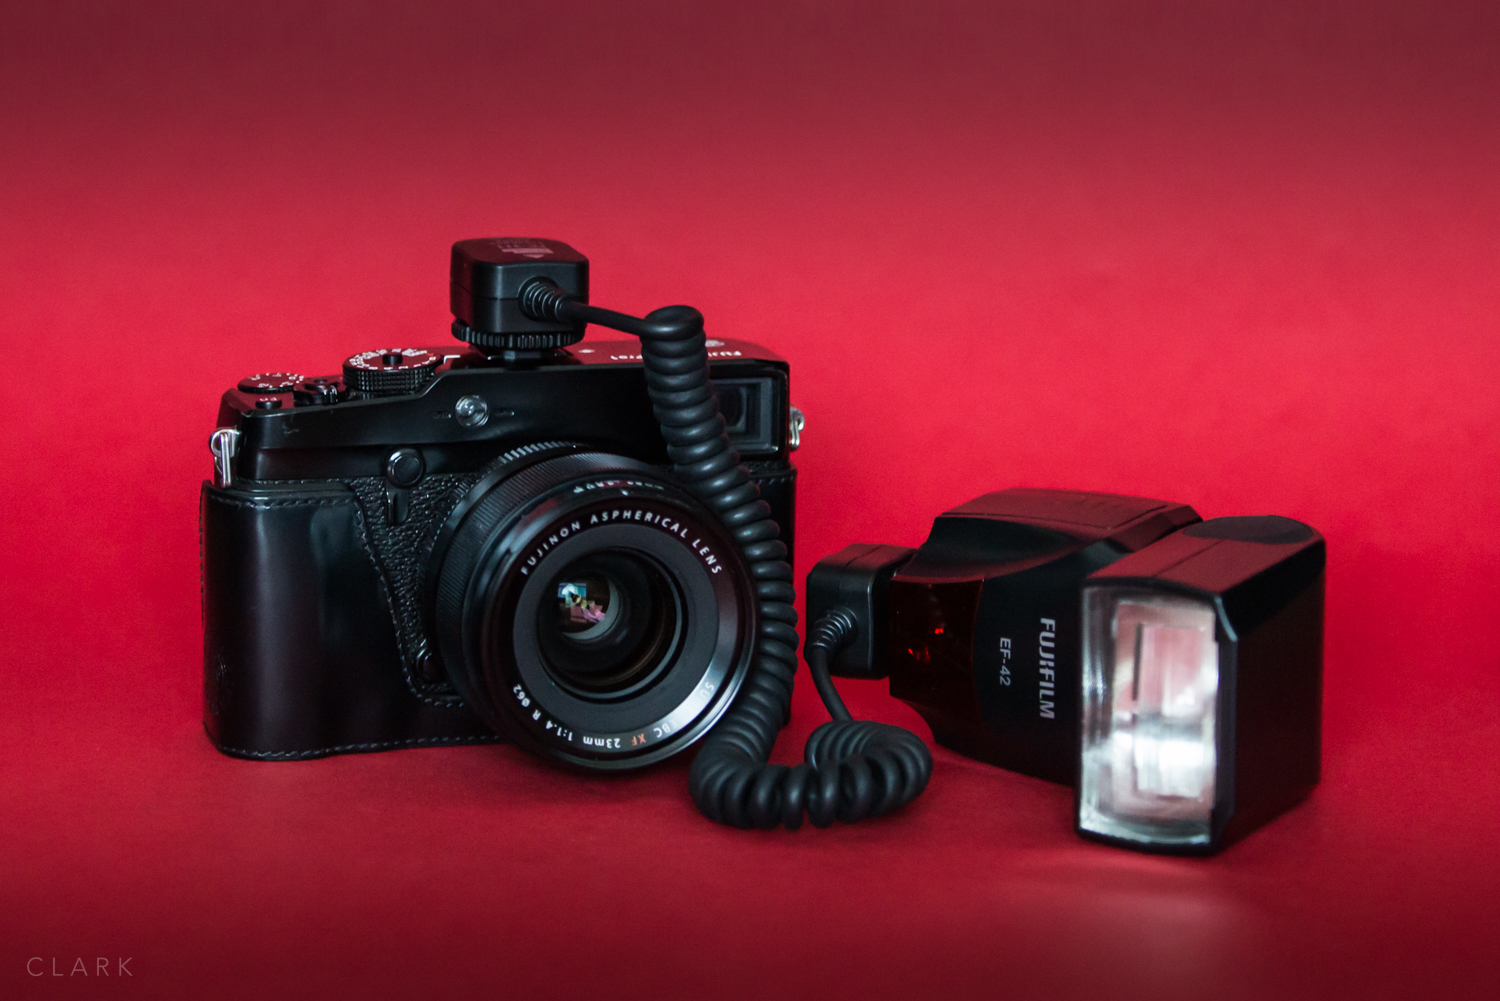
I often get emails asking about using Flash with the Fuji X Series. Mostly the questions are about using TTL, Nikon or Canon Flashguns or the Nikon SU800 Commander with the X series. Another big question is - Can an off camera TTL cord be used and if so, which one? So I thought I'd take a fresh look at using Fuji X cameras with flash. My friend John a commercial photographer and he's really tempted by the X-Pro1, but he uses flash most of the time and isn't sure if the X system is up for it. I have a job at the end of this week that might need flash due to the time of day in January and a dark venue. There won't be time to use one of my Nikon guns in manual mode with a radio trigger, so TTL will be a must. This all added up to a good excuse to pick up a Fuji EF-42 TTL Flash and give it a blast.
FUJIFILM EF-42 TTL FLASH The EF-42 is basically a Sunpak PZ42X with a jacket on (the EF-20 is also a Sunpak model). It's not as well made as a Nikon or Canon flash gun, but at half the price, it's good enough. When you mount the flash on the camera and switch it on, autofocus won't work until the flash charges and the Test/Charge light is iluminated and like a kettle boiling, it seems to take a long time when you're watching it. But when it's lit there's no problem and everything works as it should after that. But I would rather take a shot without the flash firing than miss the shot as it could maybe be recovered in Lightroom with a bit of exposure and a possible conversion to black and white.

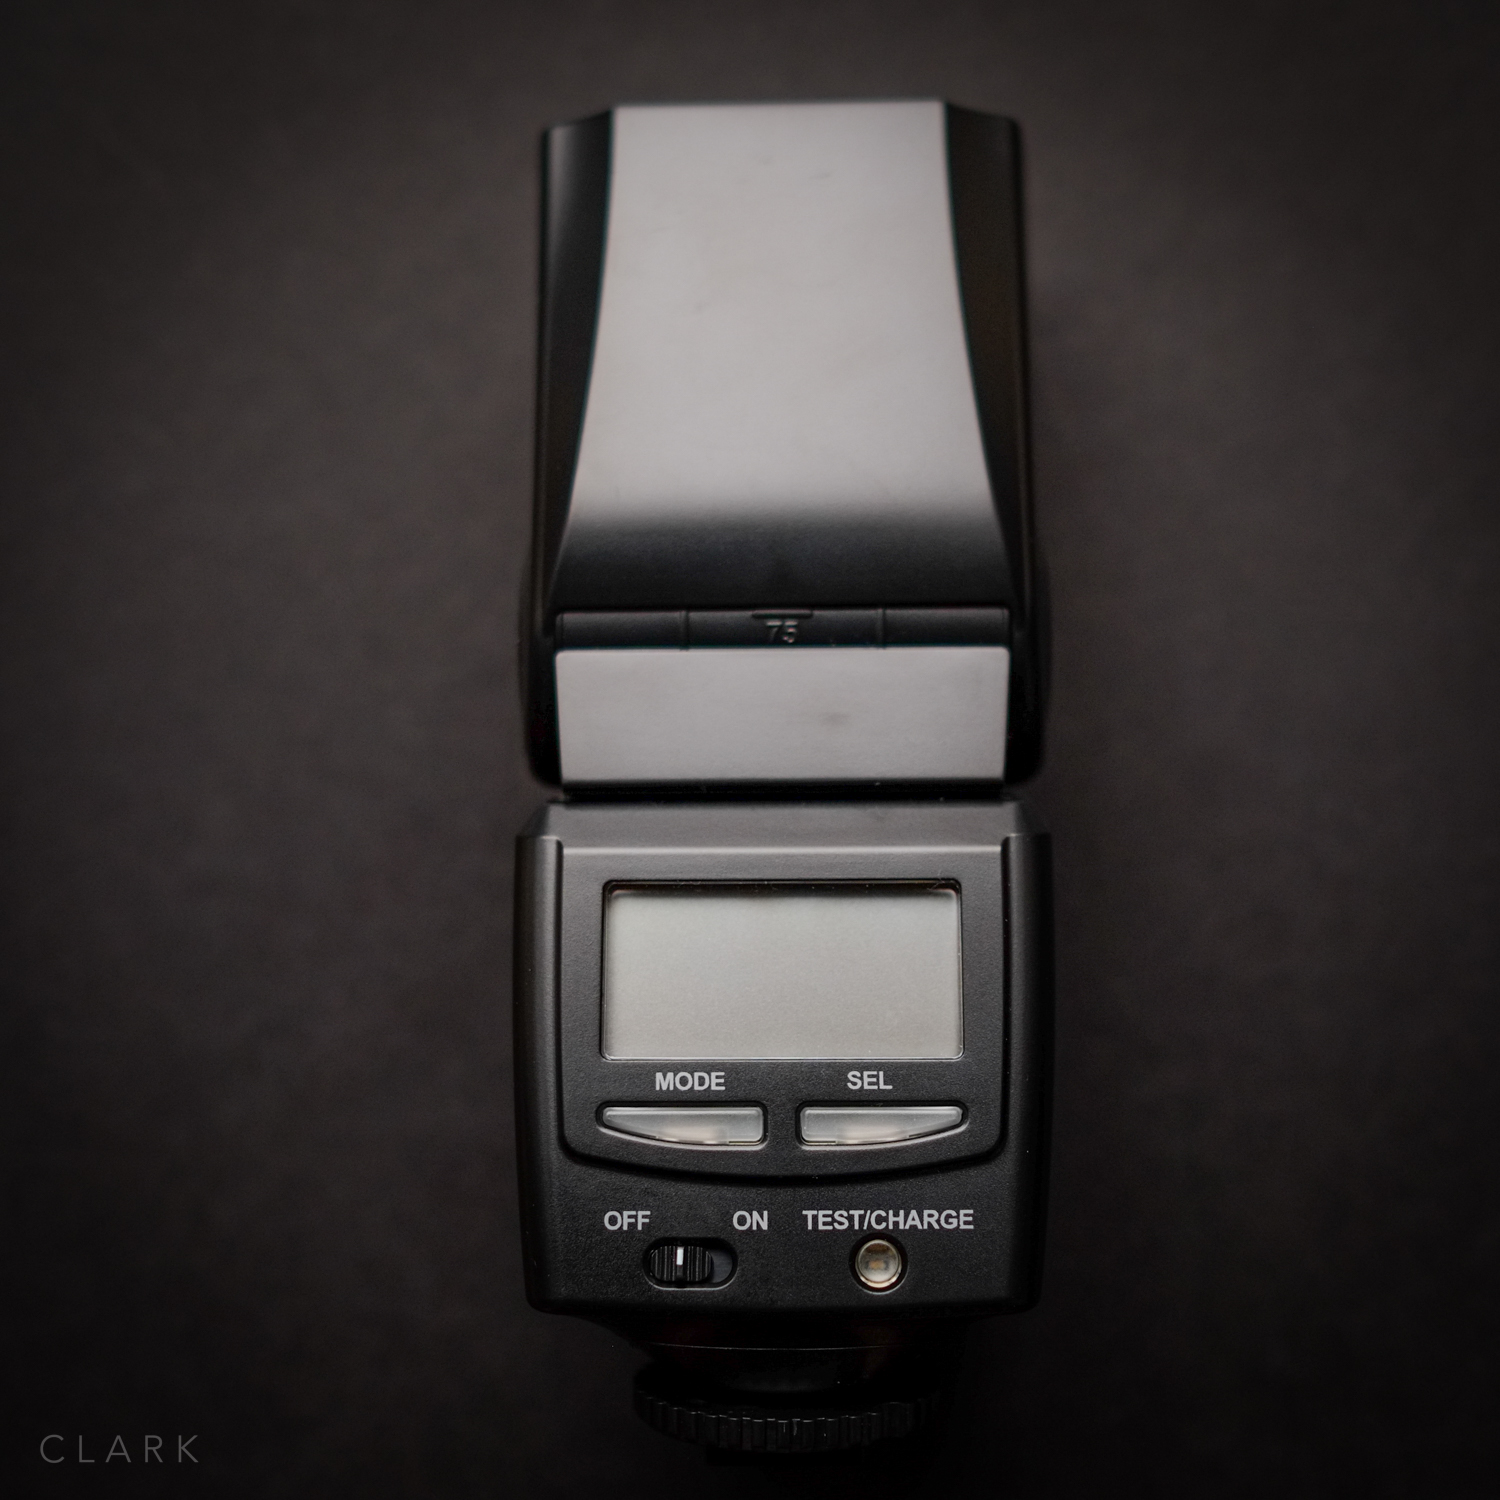
The back panel on the EF-42 is minimalist compared to a Nikon or Canon unit, with buttons for Mode, Select, On/Off and Test. It’s certinly easy to understand how the controls work, which is a breath of fresh air if you have ever used an SB800 at any point. But it would be nice to have dedicated a couple of buttons for -EV & +EV, as there's too many button presses to move up and then down EV. TTL works well and the handy pop-out wide angle lens is usefull. I think it's a bit mean not to include a dome diffuser or a foot/stand, but I picked up a diffuser from eBay and I had a spare Nikon foot. A Nikon SB600 Dome Diffuser will fit, but it's very tight and once attached it would be a good idea to leave it in place. A soft case would also have been a welcome addition, but I have a solution for that in Part 2. The hotshoe mount at the bottom of the flash is plastic and looks cheap, plus a switch style lock would have been preferred over a screw down plate.


I would recommend buying a Dome diffuser as the bare flash can be a bit harsh. With the diffuser attached and the flash head tilted up you will get great soft and even light that can fill a small room without any problem. You can find a suitable diffuser on Ebay for very little money. There are even packs of three available (one white and two coloured) that allow balancing the colour of the light from the flash with the room (I prefer gels).
In conclusion, the EF-42 does the job well, but could be a bit better on the built quality front. I think if Fujifilm had made this flash from the ground up, it would have been a much higher quality unit. Now that the X Series lenses are plentiful (almost), it would be nice if Fuji could dedicate a little time to develop a flash system on a par with Nikon's CLS system, but with built in radio instead of infrared and a dedicated commander unit that allows the user to set the power on multiple flashes without moving from camera position. A dedicated flash system is about the only thing the X Series is lacking now.
So that's the EF-42. Stick it on the camera, set it to TTL and you'll get a pretty decent job. But a flash on a camera hot shoe is not the best look for your pictures. The shots look flat, lifeless and can make ugly shadows in the background. So in Part 2 we will look at getting the flash off the camera using a TTL cord and what cord will work with the Fuji X range.
The EF-42 is available on Amazon UK for £155
The Fuji X Series With Flash :: Part 2 :: Off Camera TTL The Fuji X Series With Flash :: Part 3 :: Using Multiple Flashes With Radio Triggers
Aperture Blade Runner
 This is a cross post with my street photography blog at 35mmStreet where you can see the black and white version of the above photo. Click HERE to see both colour & B&W together and let me know in the comments what you think looks best?
I was out today, having coffee and talking shop with a couple of photographer friends John McPake and John Summers. After a few cups of tea and coffee and covering all things from sensors to lenses, books to editing, Santa Claus to Filipino Xmas parties and everything in between, we decided that we should be shooting pictures instead of talking about them. We made plans to go out for a days photography to a derelict building that's been on our photographic horizons for a while. But we made the arrangement that we would go out and shoot as long as the weather was ok, but if it was raining we would probably just get together indoors and talk or play around with radio triggers or light modifiers.
When I left the two John’s, I headed into town to have a look at the photography books in Waterstones. It was raining pretty hard and it was dark, but I pulled the Fuji X-E1 out of my bag and kept it up high, under my umbrella. I shot a few photos on the way to the bookstore and then a few afterwards on the way back to the car (with a really nice Time Life book having been purchased :o). But the main point of this blog post is just to point out that we shouldn't just go out in ideal conditions, or even fair weather. Sometimes it's the things you think you should avoid that give you something a little bit different or a little bit special. So although the golden hour is desirable, don't avoid the rain or the midday sun. Instead, we need to embrace them and use the qualities they have. The rain provides fantastic reflections and the midday sun gives us harsh contrasts shadows that can be amazing in black and white!
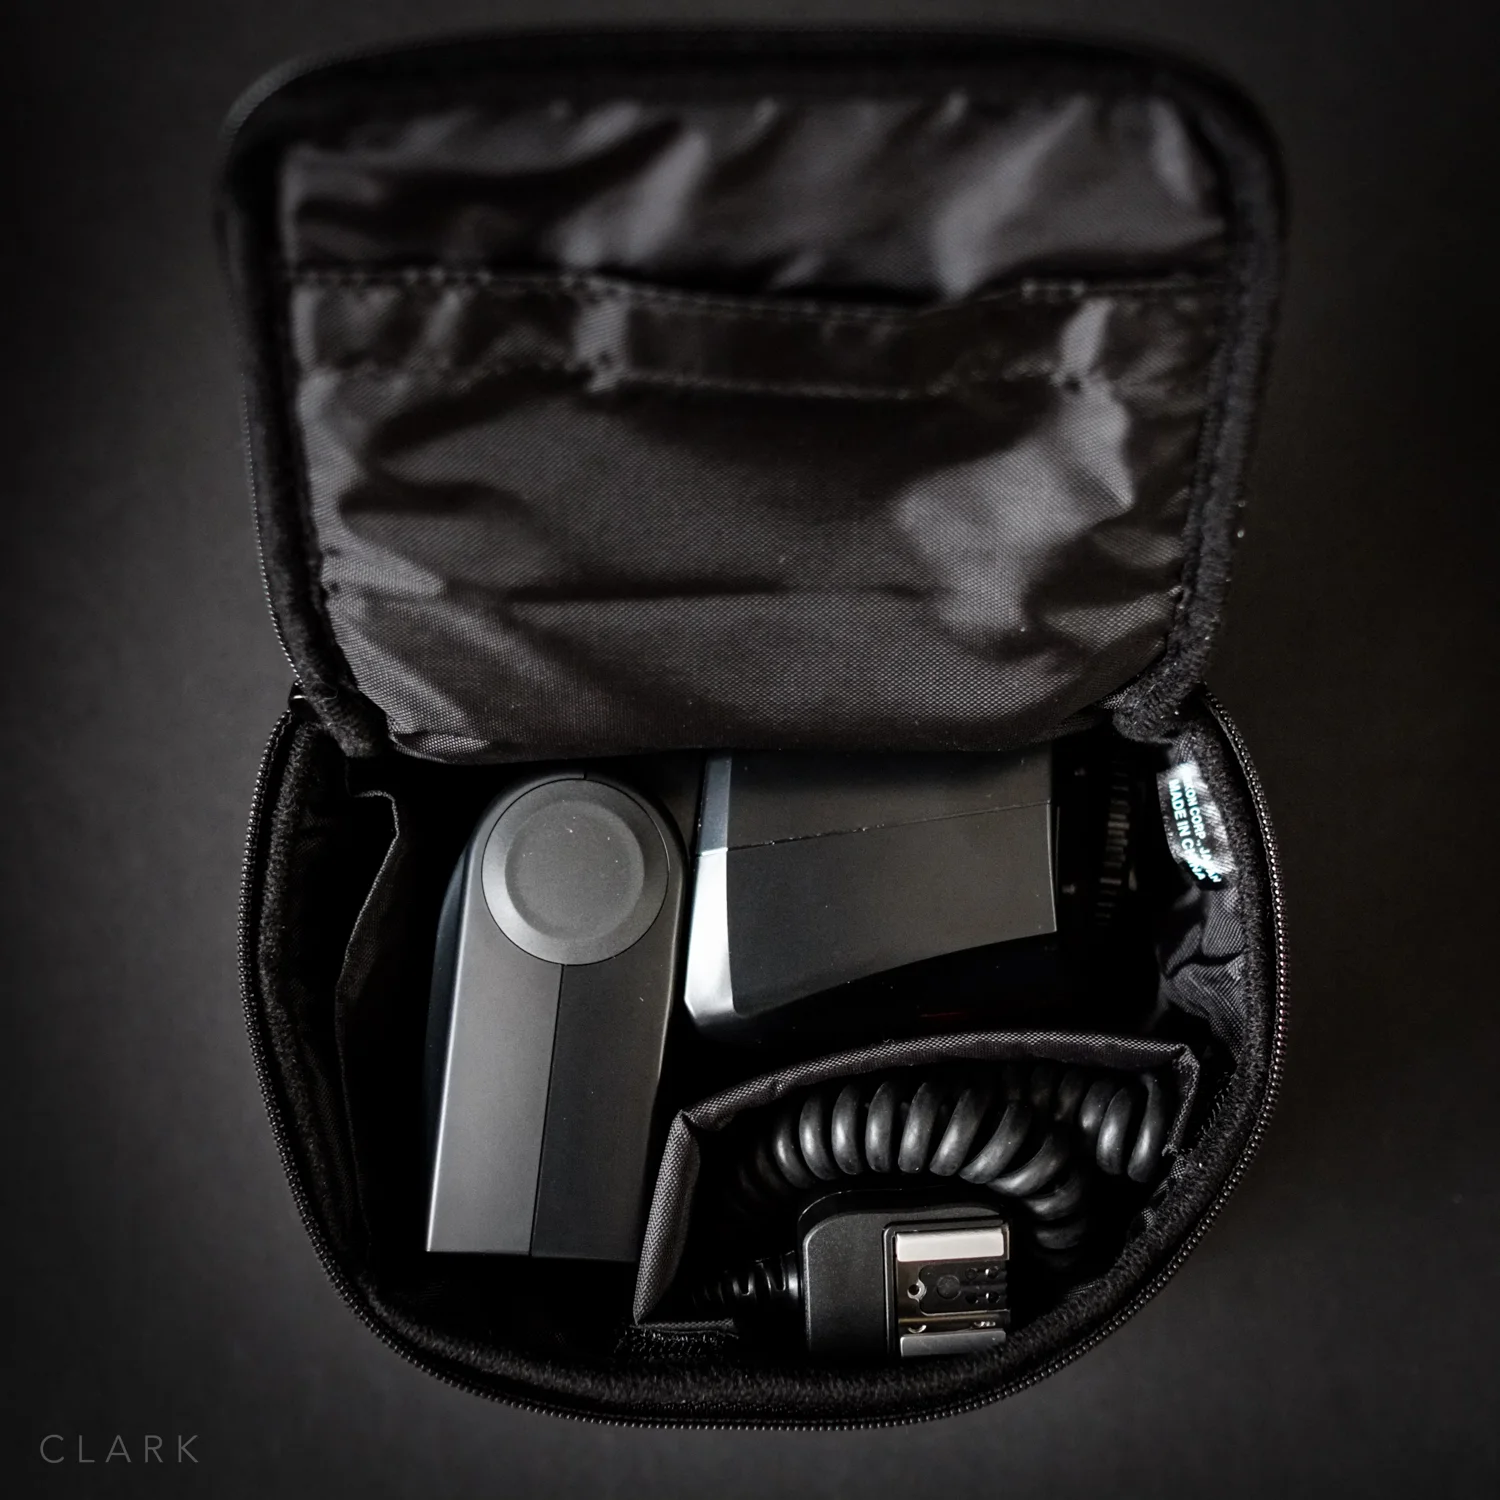
Trigger Happy :: Flashwave III Radio Triggers
 I've been a heavy user of Nikon's Creative Lighting System for the past few years and it has worked well for me...if I'm shooting Nikon. But these days I need a radio system that would work equally well on the Nikon and the Fuji X-Pro1, X100 and now the X-E1. The latest pocket wizard plus iii's were looking like the direction I was going to go, but the system was a bit messy as the transceivers needed to be hung from the lights by lanyards. The Pocket wizards were also working out pretty expensive as I would have needed six units.
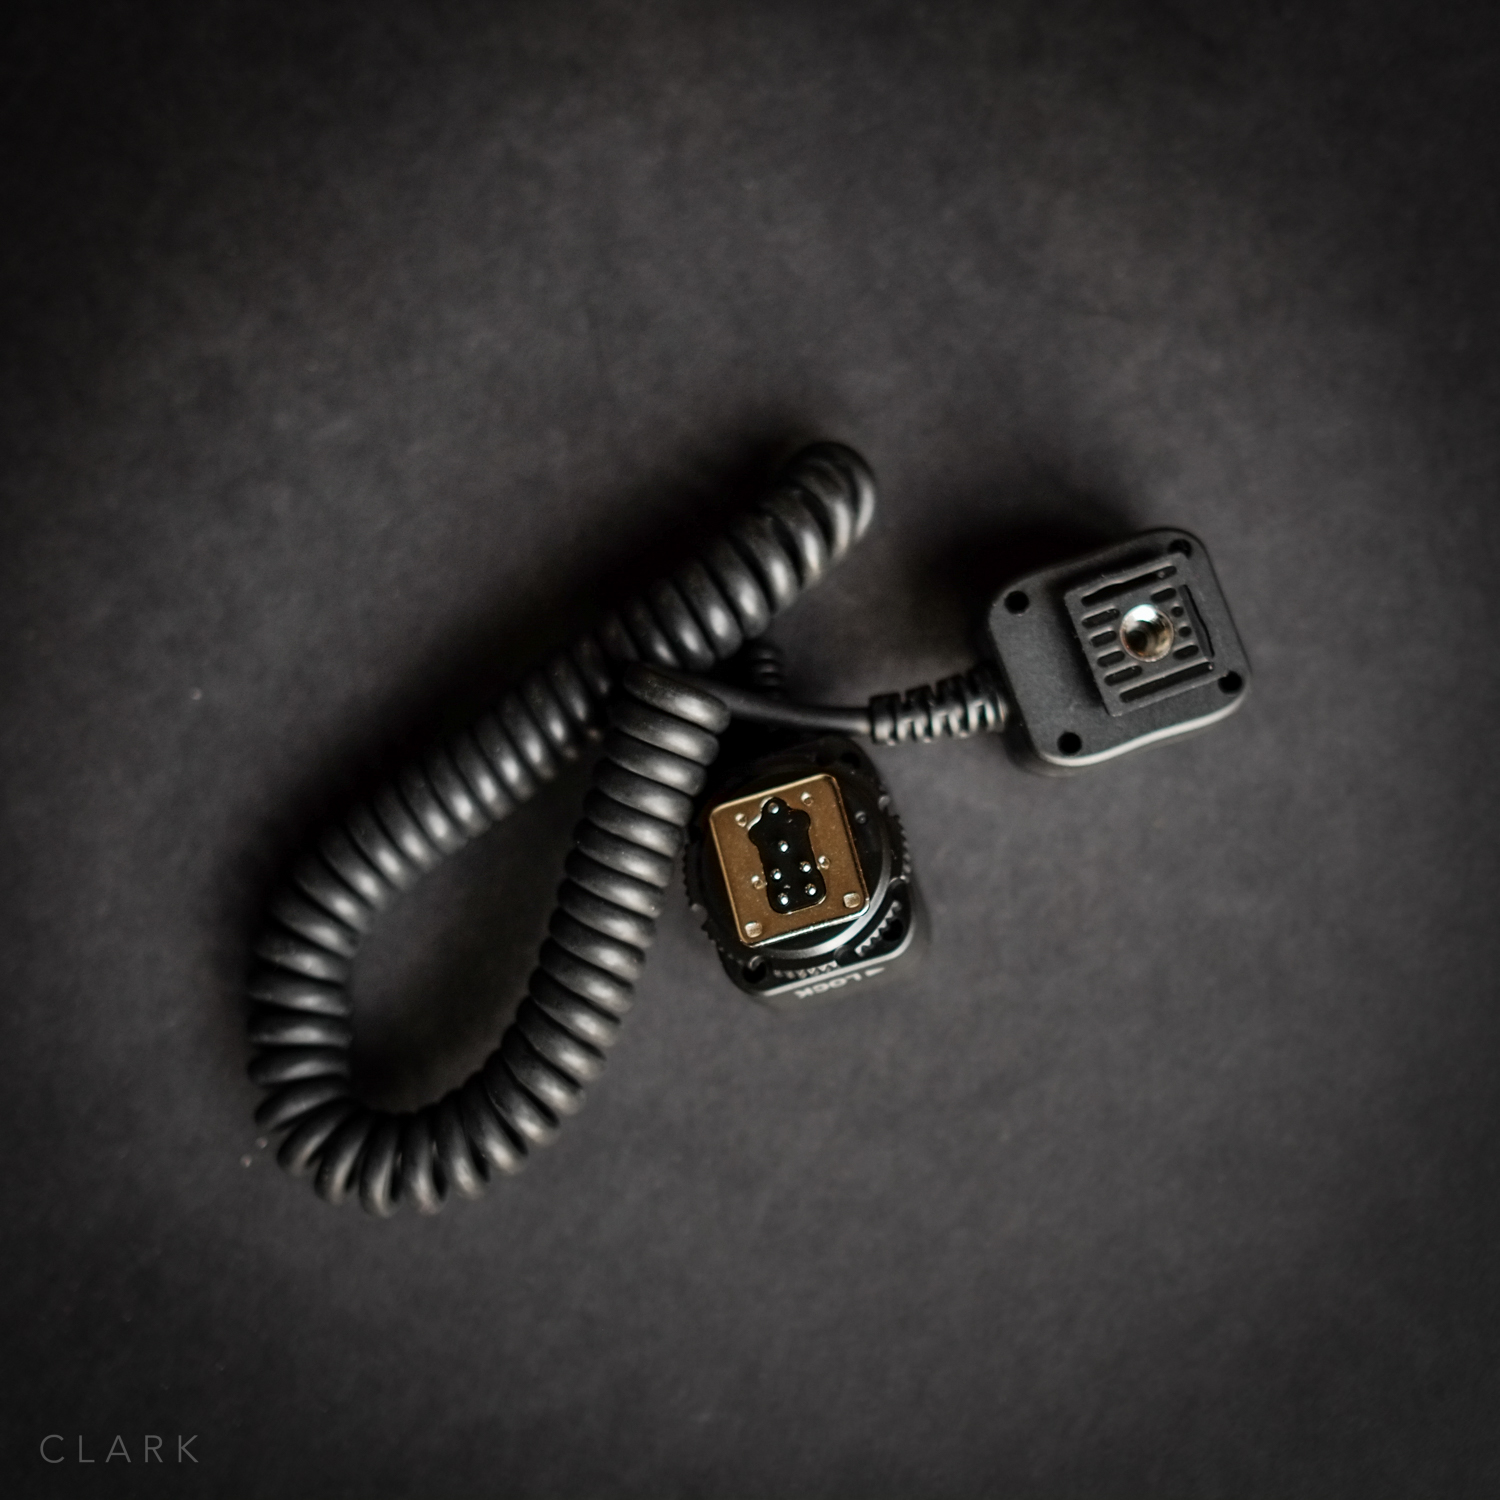
I was turned on to the Flashwave III system after reading that Billy 'the Fuji Guy' used these units and recommended them for the X cameras. I ordered two sets from Warehouse Express to try before buying the rest of the receivers that I required. A set consists of one very small transmitter for the camera hotshoe and one receiver to trigger a flash. One of the plus sides of the Flashwave system is that the receiver has it's own hotshoe that a strobe can be mounted on, plus because it has a flat base, the receiver also doubles as a Speedlight stand. These units can also be mounted on light stands via a threaded socket on the base. A set of Flashwave III's also come with an impressive array of cables and adapters that most companies would charge as extras.

Built quality is pretty good and although the units are plastic, they have stainless steel plates on the flat areas that give them a quality feel. I get quite a few miss-fires with the Nikon SU800 commander unit (probably due to it being infrared line of sight), but the Flashwave's fire every time. Channels are controlled by 4 dip switches on all units, which gives a total of 16 channels. So if you do events with other photographers, both of you can select a different Channel and avoid firing each others lights.
It's great to use two cameras with a Flashwave transmitter on each! With a 50mm on one and an 85mm on the other, I can get through a full portrait session without having to change a lens. I used to either switch lenses or switch off cameras and move the SU800 from one to another.

The downside of using generic radio triggers is that you can't change power from the transmitters, they simply trigger and nothing more. But on the up side, I find that my lighting is more consistent when I come to editing a shoot, as I'm less likely to try to micro adjust power settings. Which of course means that photos can be adjusted in batches as the exposures are all the same.
Fujifilm X-Pro1 In The Studio
 The X-Pro1 is an awesome camera for natural light portraits, but how about portraits with strobes? I ordered the camera back in January, when it was first announced, but the thought of it being a studio camera never crossed my mind. But I quickly became curious when I saw the results of portraits I had taken on the streets. I know that my photog buddy Patrick La Roque is also waiting with interest to see how the X-Pro1 does in a studio environment. Maybe this will be the final nail in his wallet's coffin? Check out Patrick's blog for loads of great X100 & X-Pro1 stuff.

THE SET-UP & EQUIPMENT I went old school for this test by using a PC sync cable (long one) and a light meter. I do loads of stuff with Nikon Speedlights, so I was really interested to see how or if they would work with the X-Pro1. My background was a collapsible Lastolite Black Velvet 6' x 5' and I also used a Lastolite Easybox Hotshoe softbox and stand. I placed an SB800 in the softbox and connected it to the camera via the PC sync cord. My second flash, an SB900, was set as an optical trigger (SU4 mode) and lay on it's back on the floor tilted up at 45 degrees to light the background and give separation between it and the subject. I set the front light to 1/8th power, the X-Pro1 to 250th of a second and ISO to 200. I should have read the manual as the maximum sync speed is actually 1/180th sec (see CONS). I sat in position and took a meter reading (taking the PC sync cable from the camera and plugging it into my Sekonic light meter) from in front of my face which gave me f4 which was fine. I usually shoot strobe stuff about F8, but I wanted a shallower depth of field for these shots.

THE MODELS The most difficult models to shoot are my own kids. With other peoples kids, I'm the stranger with the camera and they tend to sit still and behave. When you shoot your own kids, they don't sit still and they don't want to spend time being photographed when they could be outside playing with their friends. My son Teo can't sit still for more than 5 seconds, so the best way to keep him in front of a background is to let him do what he loves, tell stories. His actions become very animated and can look like poses (like the photo at the top of this post). My daughter Janel walks away everytime the flash fires and announces "that's us done". So this is a good test for the X-Pro1's auto focus.

THE CONS (or my stupidity) The SB800 would go into sleep mode if there was a gap between shots and would not fire when the shutter was pressed, but would be back on for the next. I'm pretty sure this is just a matter of switching off the sleep mode in the Speedlights.

The main con is that you get the odd shot where half the frame is black (see left) due to the flash firing when the curtain is half way across. I shot all these photos at 1/250th of a second, but the maximum flash sync speed for the X-Pro1 is 1/180th of a sec. So rather than this being a con, I'm amazed that only a few of my shots have the dreaded black line across them.
EVF is not very good for this type of shoot as the camera ups the brightness of the viewfinder to the point where it's mostly blown out. This could turn into a plus if your scene was just too dark to see.
THE PROS The OVF is actually really good for studio shooting and I was really surprised at just how few shots I got out of focus. In fact almost all of them were because the kids were moving so much. Another great thing that I hadn't thought about, was how little you have to chimp due to the viewfinder display giving a 2 second view of the shot. This really is a big deal, as you can easily lose the rap-ore with a subject if you're constantly looking at the back of the camera.

IF YOU'RE WONDERING HOW SHARP THESE PHOTOS ARE, HERE IS A CROP ON THE EYE OF THE PHOTO ABOVE

I was shooting with the 35mm f1.4 and it is absolutely, positively, one of the best lenses I have ever used. It is razor sharp and renders colours perfectly (the colours in these photos are untouched). Just look at the red Chinese dress below. I don't know how much is down to the sensor and how much is down to the lens, but there's something magical that happens with skin tones from the X-Pro1...It's beautiful!

CONCLUSION The X-Pro1 is without doubt a fantastic studio camera and I'm going to be torn as to what I use for portraits, my Nikon gear or the X-Pro1. If I'm using Nikon Speedlights for a location portrait shoot, the SU800 Commander Unit is really great as you can set each light individually from above your camera. Maybe it's time to think about the new Pocket Wizard Plus III's? Or maybe a set of Elinchrom lights with Skyport transmitters?

So one of the questions that I see on the web a lot is "Can the X-Pro1 replace a Canon 5DmkII, mkIII or a Nikon D4? Absolutely! It's not great for shooting fast moving subjects (especially sport), but for everything else, the X-Pro1 is proving to be a very capable camera and in some cases it out performs DSLR's. Fuji made a great move by releasing 3 prime lenses at launch, which shows the stunning image quality. I won't be buying any zooms when they're released as I love primes and would rather zoom with my feet to get the sharpest images. I thought I knew what the X-Pro1 was going to be like before it even arrived...it's an X100 with a jacket on, right? But the X-Pro1 surprises me almost on a daily basis. I'm looking forward to getting more creative with this camera.

Workflow Wizard 2:: The ExpoDisc
 Back on the workflow challenge again, trying to speed things up. After watching the excellent course by Zack & Jody Gray on Creative Live last week, I was amazed at how little time they spend on post production. Start to finish, from importing the images to album design takes them just five and a half hours. Now that's fast, really fast!
So what's the secret? Zach & Jody say it's all down to getting white balance and exposure consistent and accurate in the camera using an ExpoDisc. So I thought I'd give it a go and happily handed over my cash to the nice man at Warehouse Express. So two days later and £79+p&p lighter, I received a 77mm ExpoDisc in the mail. The first thing I noticed was that it didn't have any threads to let you screw it on to a lens. It just stuck on the front of my 85mm 1.4 as if by magic (it might actually be magnets). Buy the size for your largest lens and then just hold it over the front of your Smaller ones. It even works on the tiny X100 lens.
 The ExpoDisc works by using your camera Custom White Balance function. Canon users get the short end of the stick here, as there are more steps involved in setting a custom white balance and you need to either put the camera on manual focus, or get used to using back button focus. But as I don't own a Canon DSLR, I can't go into detail about how to go about it here (please check your manual). I'll be using a Nikon D300s for this test, but you can apply it to the method your camera uses.
You need to have your camera set to Manual Mode and Custom White Balance. For most Nikon cameras, you would press and hold the WB button on the top left of the camera, then turn the thumb dial until the display reads 'Pre' (right hand side).
Now before I go any further; getting the correct exposure is not an exact science with the Expodisc, and even more so with a Nikon. To get an exposure reading and set custom WB, stand where your subject is and either point the lens back to your shooting position, or toward the light source (as you would with a light meter). Which one you choose will depend on the lighting conditions, but mostly it will be back toward your shooting position.
 Please note that the exposure reading you get from a Nikon differs by 1 stop when the camera is set to grab a custom WB (flashing 'Pre').
1a. Camera pointing back toward shooting position, and exposure set before entering into custom WB capture mode (flashing 'Pre').
1b. Camera pointing back toward shooting position, and exposure set after entering into custom WB capture mode (flashing 'Pre').
1c. Camera pointing toward light source, and exposure set before entering into custom WB capture mode (flashing 'Pre').
1d. Camera pointing toward light source, and exposure set after entering into custom WB capture mode (flashing 'Pre').
Please note that the exposure reading you get from a Nikon differs by 1 stop when the camera is set to grab a custom WB (flashing 'Pre').
1a. Camera pointing back toward shooting position, and exposure set before entering into custom WB capture mode (flashing 'Pre').
1b. Camera pointing back toward shooting position, and exposure set after entering into custom WB capture mode (flashing 'Pre').
1c. Camera pointing toward light source, and exposure set before entering into custom WB capture mode (flashing 'Pre').
1d. Camera pointing toward light source, and exposure set after entering into custom WB capture mode (flashing 'Pre').
NIKON D300s: Setting custom WB.
- 1. Place the ExpoDisc on the front of your lens with the white side facing the lens.
- 2. Hold the camera in front of your subject and point it back toward your shooting position (see above).
- 3. Adjust your ISO to suit the lighting conditions.
- 4. Set the aperture to what you want to use.
- 5. Set your shutter speed making sure it's at least one over focal length (50mm = 1/60).
- 6. Make sure your meter readout is centre (correct exposure).
- 7. Press and hold the WB button until 'Pre' flashes.
- 8. Press the shutter button to fire a shot (it won't show up on your memory card).
- 9. The camera display should be flashing 'good' to confirm success.
- 10. Remove the Expodisc and shoot. Adjust shutter speed if you need to adjust exposure.
*
The steps above look a lot, but it actually only takes a few seconds to do.
The following examples of different light types are shot as follows. Left image. Aperture Priority and Auto WB. Centre image. Manual mode with exp/WB taken toward shooting position. Right image. Manual mode with exp/WB taken toward light source.
 DAYLIGHT (from window on a cloudy day)
'
DAYLIGHT (from window on a cloudy day)
'
 INCANDESCENT
'
INCANDESCENT
'
 FLUORESCENT
'
FLUORESCENT
'
 The shot on the left is auto WB and the shot on the right is using the ExpoDisc (cloudy windo light).
***
The shot on the left is auto WB and the shot on the right is using the ExpoDisc (cloudy windo light).
***
I'm pleased with the ExpoDisc and I'm looking forward to trying it out on a proper job with different lighting conditions. If it can save a lot of time in post it will be worth the money. If your exposure and white balance are consistent and correct, a preset in Lightroom or Aperture could be applied at import to add a bit of contrast. That should de-flatten RAW images and give you files that are spot on.
ADDENDUM-----------------------------------------------------------------------------------------------------------------------------------------------
My friend Patrick LaRoque asked in the comments, if there was much difference between the ExpoDisc and a regular grey card? So I tested a few options and to be honest there isn't a lot of difference. I think the ExpoDisc is a little more user friendly when it comes to shooting on the go. Even the Colour Checker Passport has a small grey card which is handy, but doesn't fill the frame. Being able to use the ExpoDisc to set exposure is a bonus to. Have a look at the results below or click here for a larger version.

Nikon SB700 Review
 The arrival of the SB700 brings my Nikon Speedlight arsenal up to a total of five. I also have an SB900 and three SB800's. But before I get to the new kid on the block, I need to talk about the SB900.
The SB900 is Nikon's flagship flash, but it's also their iPhone 4. Just like when Apple made the perfect smartphone with an antenna that didn't work (or was it because millions of us were holding it wrong...yeh right!), Nikon gave us the perfect flash, except that it overheats and shuts down doing the same job as the SB800 does standing on it's (flash) head. My SB900 has shut down on a few portrait sessions and it has shut down on almost every wedding that I have shot in the past year. When it shut's down, it stays down, until it cools down. The annoying thing is that the interface on the SB900 was a huge leap forward, it's brilliant! The SB800 is a more reliable flash, but it's not the most user friendly. It's buttons are not very intuitive and it can be slow to switch functions when you have to press and hold a button for a few seconds, but at least none of my three SB800's have ever shut down on me. So I've put-up with the SB900 and swap it for an SB800 when it shuts down. I shoot weddings with two cameras, so I either move to the camera with the SB800 on it, or I switch the flash's around to suit the body/lens combination that I need. But a flash that won't fire is as much use as a phone that can't make calls!
The SB700 is an iPhone 4 with an antenna that works. Although it's billed as the replacement for the SB600, it's more like an SB800 with a great interface. It has more in common with the 800. Size and weight are similar and it can be used as both a remote (slave) and a master for your CLS wireless set-up. What it doesn't have though, is a power socket and a sync cord socket. None of these missing features are a deal breaker for me as I never use external power on my flash guns and my TTL cord is the hot shoe type. But if you need these functions, you might want to go for the SB900 or a secondhand SB800. Its great to see that the infrared eye on the side of the flash has been moved up and is less likely to be covered up by a VAL (Voice Activated Light-stand).
The interface is probably even better than the SB900's as it has the addition of two switches. The one on the left selects TTL, Manual and GN (the guide number position also acts as an A/B selector). The AB selector is a nice feature that works in Master (commander) mode, and allows you to change the ratios of flash A and B buy simply pressing Select to highlight A/B and then spinning the selector dial in either direction. One flash goes up in power and the other goes down in power. This is a fast and easy way to set-up your flash ratios in a small shoot where you're time is limited. The switch on the left selects the Illumination Pattern to either Standard, Centre Weighted (narrow beam of light) or Even (wide beam of light).
The head on the SB700 feels solid and takes maybe even more effort to press in the button and tilt than it's big brother does. A lot of people I talk to don't know that the heads on Speedlights are in the normal position when they are one click up. That extra click down is for macro shots. Another good feature over the SB800 is that the head rotates 180 degrees in both directions. The SB700's zoom goes from 24mm - 140mm, which is not as good as the SB900's 24mm - 200mm. The battery cover has changed too, and you now have to press a centre button on the door before sliding it open.
Supplied accessories are a square soft case with compartments for the very useful foot/stand and the Soft Diffuser Dome, together with two correction filters. The later are hard plastic CTO and Florissant filters that are similar in shape to the SB900's Filter Holder, but are already tinted orange and green (no need for gels). The Soft Diffuser Dome can also be fitted on over the filters. My one and only negative with the SB700 is that the Diffuser Dome can be awkward to get on and sometimes you think it's on and it falls back off. But when you finally get that big click, it's a solid fit and can stay on forever. My flash guns have a compartment each in my camera bag and the Diffuser stays on, so unless I need to use the filters, I'm not that bothered.
Another plus point with the SB700 is that it feels more solidly built than the flagship model. The first thing I noticed when I unboxed the SB900, was that it felt cheaper and less solid than my SB800's. The new model also has the fastest recycle times, so this one will go on the camera I use most at weddings.
So which flash should you buy? If you need enough power to frazzle your subjects eyeballs, zoom in to 200mm, or need to use external power or a PC Sync cord, then the SB900 is the one to buy, but make sure you have a back-up! If however, you need a solid and reliable workhorse that is fast, easy to use and quick to recycle, then the SB700 is the one to go for. If you shoot weddings or events, then you defiantly need an SB700 or a second-hand SB800...the SB900 will let you down! The Nikon SB700 is available from Warehouse Express in the UK or B&H in the US