
 The Fuji X-Pro1 has been officially announced the and it's pretty much the same specs as the leaked info at the weekend. It's pretty much the same size as the Leica M9 The main feature with this camera is a brand new sensor technology that lets the low-pass filter be removed and allow image quality like a full sized sensor. The Fuji Guys will fill you in on the rest.
Nikon D4
The Nikon D4 has finally been announced and it looks as though Nikon have delivered the goods again. The D800 will be next, but I'm a bit disappointed that it will have a 36mp sensor and not a 16mp like the D4. Also announced with the D4, the new Nikon 85mm f1.8G.
Fujifilm X-Pro1 Mirrorless System Camera
 This is a cross post with 35mmStreet.com
News of the new Fujifilm X-Pro1 mirrorless system camera was leaked today ahead of it's January 10th announcement. It looks like the exposure compensation dial will be in the same place as the X100's but recessed down into the top plate . I have also seen photos of a pre-production unit, and it looked just like this, except it was in it's bare metal state. Notice how far to the edge of the camera the viewfinder is? That should mean you don't see as much of the lens hood that you do in the X100.
The Specs for this unit will be 16mp APS-CMOS sensor with 6 photo sites instead of the usual 4. It will also have Fuji's excellent EXR processor. The lens options will be an 18mm (27mm equivelent) f2.0, 35mm (53mm) f1.4 and a 60mm (90mm) f2.4. Looks like Fuji have left out a 35mm equivalent so not to offend it's little X100 brother. It will have a 2nd generation hybrid viewfinder that according to the French page below, will zoom. Ship date is said to be March, but I think there may be even more demand for this than the X100. I'm looking at doing quite a bit of documentary photography this year, and this camera is a dream come true. it won't replace my X100, but complement it.

Happy New Year 2012
 Happy new year. I hope you all have a great 2012.
Nikon SB910 Speedlight
 Nikon have released the follow-up to the SB900. The new more expensive SB910 is supposed to solve the problem of the SB900 overheating and shutting down, by slowing the re-cycle time when the flash head starts to heat-up. It's an improvement, but to me, it still means missing shots. So it's time to sell my SB900, but not to buy an SB910. I'll be buying another SB700.
Nikon SB700 Review
 The arrival of the SB700 brings my Nikon Speedlight arsenal up to a total of five. I also have an SB900 and three SB800's. But before I get to the new kid on the block, I need to talk about the SB900.
The SB900 is Nikon's flagship flash, but it's also their iPhone 4. Just like when Apple made the perfect smartphone with an antenna that didn't work (or was it because millions of us were holding it wrong...yeh right!), Nikon gave us the perfect flash, except that it overheats and shuts down doing the same job as the SB800 does standing on it's (flash) head. My SB900 has shut down on a few portrait sessions and it has shut down on almost every wedding that I have shot in the past year. When it shut's down, it stays down, until it cools down. The annoying thing is that the interface on the SB900 was a huge leap forward, it's brilliant! The SB800 is a more reliable flash, but it's not the most user friendly. It's buttons are not very intuitive and it can be slow to switch functions when you have to press and hold a button for a few seconds, but at least none of my three SB800's have ever shut down on me. So I've put-up with the SB900 and swap it for an SB800 when it shuts down. I shoot weddings with two cameras, so I either move to the camera with the SB800 on it, or I switch the flash's around to suit the body/lens combination that I need. But a flash that won't fire is as much use as a phone that can't make calls!
The SB700 is an iPhone 4 with an antenna that works. Although it's billed as the replacement for the SB600, it's more like an SB800 with a great interface. It has more in common with the 800. Size and weight are similar and it can be used as both a remote (slave) and a master for your CLS wireless set-up. What it doesn't have though, is a power socket and a sync cord socket. None of these missing features are a deal breaker for me as I never use external power on my flash guns and my TTL cord is the hot shoe type. But if you need these functions, you might want to go for the SB900 or a secondhand SB800. Its great to see that the infrared eye on the side of the flash has been moved up and is less likely to be covered up by a VAL (Voice Activated Light-stand).
The interface is probably even better than the SB900's as it has the addition of two switches. The one on the left selects TTL, Manual and GN (the guide number position also acts as an A/B selector). The AB selector is a nice feature that works in Master (commander) mode, and allows you to change the ratios of flash A and B buy simply pressing Select to highlight A/B and then spinning the selector dial in either direction. One flash goes up in power and the other goes down in power. This is a fast and easy way to set-up your flash ratios in a small shoot where you're time is limited. The switch on the left selects the Illumination Pattern to either Standard, Centre Weighted (narrow beam of light) or Even (wide beam of light).
The head on the SB700 feels solid and takes maybe even more effort to press in the button and tilt than it's big brother does. A lot of people I talk to don't know that the heads on Speedlights are in the normal position when they are one click up. That extra click down is for macro shots. Another good feature over the SB800 is that the head rotates 180 degrees in both directions. The SB700's zoom goes from 24mm - 140mm, which is not as good as the SB900's 24mm - 200mm. The battery cover has changed too, and you now have to press a centre button on the door before sliding it open.
Supplied accessories are a square soft case with compartments for the very useful foot/stand and the Soft Diffuser Dome, together with two correction filters. The later are hard plastic CTO and Florissant filters that are similar in shape to the SB900's Filter Holder, but are already tinted orange and green (no need for gels). The Soft Diffuser Dome can also be fitted on over the filters. My one and only negative with the SB700 is that the Diffuser Dome can be awkward to get on and sometimes you think it's on and it falls back off. But when you finally get that big click, it's a solid fit and can stay on forever. My flash guns have a compartment each in my camera bag and the Diffuser stays on, so unless I need to use the filters, I'm not that bothered.
Another plus point with the SB700 is that it feels more solidly built than the flagship model. The first thing I noticed when I unboxed the SB900, was that it felt cheaper and less solid than my SB800's. The new model also has the fastest recycle times, so this one will go on the camera I use most at weddings.
So which flash should you buy? If you need enough power to frazzle your subjects eyeballs, zoom in to 200mm, or need to use external power or a PC Sync cord, then the SB900 is the one to buy, but make sure you have a back-up! If however, you need a solid and reliable workhorse that is fast, easy to use and quick to recycle, then the SB700 is the one to go for. If you shoot weddings or events, then you defiantly need an SB700 or a second-hand SB800...the SB900 will let you down! The Nikon SB700 is available from Warehouse Express in the UK or B&H in the US
Lightroom & Photoshop Workflow Wizard
 My ears prick up the minute I hear the word workflow. It's the one area of photography that can be a bit of a drag. The digital age has brought many great things, like being able to take lots of photos for free. The digital age has also brought us a few bad things though, like being able to take lots of photos for free (yeh you read that right). If you shoot weddings, you're taking photos for hours and they stack up fast. My editing sessions always start enthusiastically and then take a dive after the first three or four hours, so I'm always looking for ways to speed up my workflow and always curious about how other photographers work in post.
The Logitech G13 arrived at my door last Friday and I spent most of the day configuring it. It's set-up is very similar to a Wacom tablet and it doesn't take long to get the hang of it. It's easy to set-up Photoshop and assign keys on the G13 to just about anything. Lightroom is a different story though, as it doesn't have keyboard short cuts assigned to the sliders. The answer to our dreams comes in the form of a fantastic plugin called Paddy which is available to download HERE for free. Paddy is a little time consuming to set-up, but is well worth it. It's best to use the computer F keys as they don't have any shortcuts assigned to them in Lightroom. You can map the F keys to any of the G13's 21 keys using the Logitech software. The keyboard can then be configured in Paddy to control the Lightroom Sliders.
Paddy handles Lightroom sliders by assigning keys to move sliders by a fixed amount. I set my keys up so that for example the F4 key is assigned to Exposure +5. Every time I hit the key on the G13 that's assigned to F4, it increases the exposure by 5. F3+Shift is set to increments of 1 and F3+Alt is set to increments of 10. This might sound a bit complicated, but once you get the hang of it, it's very easy.
I have only edited using the G13 for a couple of hours, but I can see a big jump in the speed of my workflow. The keys are marked G1 to G22 so you need to memorize which key does what, but the shape of the keyboard really helps your brain to take it in a lot faster. I find I'm already reaching for keys on the G13 rather than the computer keyboard. The G13 also detects when you switch programs and applies your presets automatically, again like the Wacom tablets. You can even have three pages of presets for each software program and have each page set to a different colour (screen and keys are lit) so you always know where you are. I use a page for the Library module (blue) and a page for the Develop module (orange) in Lightroom. The G13 is available from Amazon in the UK for £62 or in the US for $62.
FilterStorm:: The Best App For Photographers?
 There's a lot of great photography apps out there, but most of them are geared toward one or two features. Some lean toward shooting and uploading straight toTwitter, Facebook etc, some do tilt/shift and some only do black & white. Thanks to Apples camera connection kit, I can now take the SD card from my Fujifilm X100 and import the photos straight onto the iPad 2. I needed an app that could then resize the files to my blog sizes. I tried PhotoResizer, which did the job, but was a little sluggish and again a one trick pony.
FilterStorm is what the Photoshop app should have been like. It does a huge amount of different things and it does them really well. Apart from Settings, Load Photo Star Rating and Automations, The app is split into 4 sections, which are in the form of tabs - Export, Metadata, Filters and Canvas. Export does what you would expect, like saving back to your photos folder of sending by email, Flickr, FTP or Dropbox. You can also choose size and quality options here too. The Metadata tab is set for viewing meta and renaming photos by default, but click on Settings and you get whopping great 31 switches that let you turn on features like Keywords, Captions, Subject, Category, Location, Copyright, Usage, Contact Details...etc. The meta section really is a wolf in sheep's clothing. Canvas is where you can crop, scale, rotate, flip,straighten, Scale and add borders. This is another huge section. Filters is the place where we pixel pushers all like to be. It has Brightnes/Contrast, Curves, Hue/Saturation, White Balance, Sharpening, Blur, Black & White, Clone, Tone Mapping, Text, Noice Reduction, Noise, Redeye Brush, Colour, Vignette, Posterize and Add Exposure. The great thing is that it does them all really well.
This is the best i photo editing app that I have ever used, and I've tried plenty. The thing is, I've just checked on the Apple App Store so I could wright the price (2.39 UK) and saw that there is a pro version (8.99 UK) with even more features. My one gripe would be that if you have already bought the standard version, you shouldn't have to pay the full price for the pro version. That goes for apps that are different on the iPhone & iPad, if you buy it on your iPhone and the iPad is a more expensive & more powerful app, then you should only have to pay the difference and not the full cost. But all that aside, Filterstorm is the best app for photographers I have came across to date. It was made with photojournalists in mind (although photojournalists shouldn't need a clone tool). I'm going to buy the Pro version now, as there are a few features that I quite fancy (batch editing being but one). Filtersorm (iPod, iPhone & iPad) & Filterstorm Pro (iPad only) are available on the App Store. The photo above is from the Pro version.
Fujifilm Finepix X100 Size


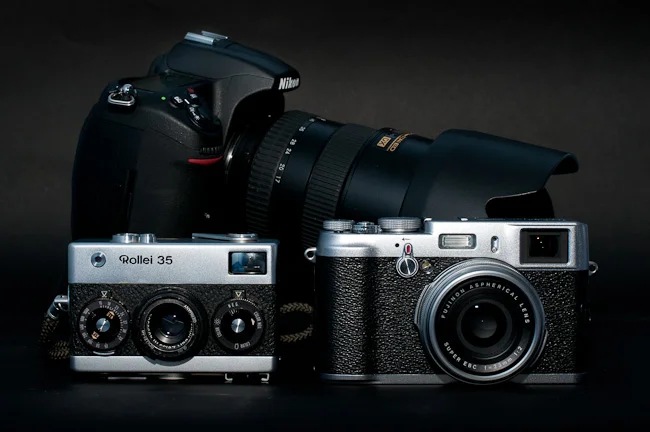
I picked-up my long awaited Fujifilm X100 camera today which I will be reviewing here soon. Until then, here are some size comparisons with other cameras. Click on each photo to see the full image. Click HERE for more of the same.
Back To The Future

I've been on the lookout for a walkaround camera to replace my Canon G9 and although I like a lot of the micro four thirds cameras out there, like the Lumix GF2, Olympus Pen series and the Sony NEX-5, there is one big problem with all of them...no viewfinder. In my opinion, a camera should be held up to your eye and not at arms length and I also think that the micro four thirds manufactures have made a huge mistake in leaving out one of the most important parts of a camera.
The Fujifilm X100 looks like being a compact(ish) camera that has been designed with the serious photographer in mind. Fuji has listened to what people have been asking for. The X100 has an APS-C CMOS sensor, which is the same size you would find in most DSLR's. The Lens is a 23mm (35mm in the real world) f2 that is fixed to the body and can't be changed. This has been the biggest criticism on the web and a lot of people say that it should have been an interchangeable system. I would have been nice to have had two or three prime lens's to swap around on this body, but Fuji's main objective with this camera has been picture quality above all else. By going for the fixed lens approach, they have been able to match the lens, sensor and the new EXR processor to get rid of fall off on the edges of the frame and get a sharp high resolution image.
The viewfinder is probably the most hyped part of this camera. It's a hybrid affair (The worlds first I think), which can be changed from optical to a 1,440,000 dot LCD electronic viewfinder by flicking the lever at the right index finger position. The LCD option has shooting information and can be used to preview images you have already shot.
One of my first camera experiences was using my dad's Rollei 35 (that I blagged off him and I still have 30 years on), which has that same silver and leather effect finish and is a solid and well made piece of kit. Although the X100 is hi-tech under the hood, it defiantly has that retro look from the 60's and 70's and Fuji has gone back to the craftsmanship of that era by using beautifully machined metal parts. Just take a look at the tiny pyramids on the side of the shutter speed and compensation dials.
This camera looks like a great piece of kit for those of us that fancy the Leica M8 or M9, but don't want to sell a kidney to be able to buy one. I personally don't mind the fixed lens if the trade of is to have great quality. I really hope Fuji have also paid attention to getting low noise at hight ISO. Who knows, this might lead the way to bring back the viewfinder in a lot more compact cameras. TO BE CONTINUED...