
BLOG
The Digital Contact Sheet :: Episode 8
X100F 23mm f2 - 1/150, f2, ISO 200
This Digital Contact Sheet and the next one will be from the same documentary shoot, but with very different pictures. The theme is life-changing surgery and it’s from a project back in 2019. I won’t rehash the details of the story here but you can read all about it by clicking HERE

I tend to shoot with two (sometimes three) cameras for documentary work. For this shoot, I had the Fujifilm X100F and the X-Pro2. The X100F has a fixed 23/2 lens and I was using a 35/2 and 50/2 on the X-Pro2. With the 1.5x crop of the APS-C Fuji’s, that was giving me a 35mm, 50mm, and 75mm. I also had the WCL-X100 for the X100F in my bag, which would give me a 28/2, but I didn’t use that till the next day. These f2 lenses are not the fastest, but as I would be shooting in a hospital, I knew that it wouldn’t be too dark and nothing would be moving that fast.
As you can see from the digital contact sheet, I was trying to get wide shots, mid shots and close-up shots to tell the story. At one point I was drawn to Mai’s bag. Other than a holiday, when does someone take a bag with a change of clothes etc to cover the unknown? Although she was with her husband, it was obvious that she was very alone and scared; this was a journey that only she would be making.
[My X100F file numbers might look as though it was brand new, but it had actually been round the clock.]
I shot frame 100F0016 and the frame after with lots of headroom; I wanted to have Mai small in the frame as I imagined that’s how she must have been feeling. This is my favourite shot of this sequence as I think it conveys exactly what I was trying to achieve. It also has all sorts of leading lines that pull the eye toward the subjects.
Frame XPR20937 (below) is pretty much the same shot using the X-Pro2 with the 50/2 lens for a close-up, but it’s not as visually compelling as the wide shot, although still a get storytelling shot.
X-Pro2 & 50mm f2 - 1/125, f2, ISO 250
Frame XPR20937 (above) is pretty much the same shot using the X-Pro2 with the 50/2 lens for a close-up, but it’s not as visually compelling as the wide shot, although still a good storytelling shot. The 50/2 lens is such a terrific little lens that gets very little attention in my opinion. Although not as dreamy as my 56.1.2, the 50/2 is the lens that I carry with me pretty much all the time.
X100F 23mm f2 - 1/125, f2, ISO 250
100F0020 (above) is also a favourite from this set. Again, it shows the loneliness and fear; possibly more so because Mai is sitting by herself with an empty chair on either side.
The next Digital Contact Sheet will be based on the following day, post-op, and more dramatic; where fear is swapped for pain and discomfort.
The Digital Contact Sheet :: Episode 7


I shot a series of pictures for an NGO in the Philippines in 2013 that involved visiting orphanages in Cebu and Davao. The organisation is called SOS Children's Villages and you can find out more from their website HERE. The shot above was taken in the Davao City village the day before I flew back to Hong Kong. I was looking for a dramatic picture when I came across this scene. I had already shot some pictures of this boy earlier that that day, but after making my way around the village, I came back as the kids were doing their chores. The smell of the smoke caught my attention first and then I saw it creep out between the houses. I walked toward the smoke and saw the two boys from earlier. The smoke was thick and I wasn't sure I would be able to get a usable shot, but I fired off a few frames and hoped for the odd clear spot.

The first three frames on this contact sheet are from the end of another sequence which was a good crop of pictures of a girl studying on a porch. I wanted to show this sequence of twenty-five because it demonstrates how the photographer has the ability, or the power if you like, to show a scene in a way that leads the viewers emotions and thereby the way he or she interprets a scene. My friend Patrick La Roque wrote a post on our Kage Collective website about this very thing and I would urge you to read it HERE.

I like this shot of the two boys away from the smoke. Although I didn't pose this one, the boys saw the camera and looked into the lens. But I like the composition with the boys off to the right and the wall producing strong leading lines. The Fuji sensor always produces great colours too. I actually have this one printed and hanging on my office wall in a plain black frame with white mount.
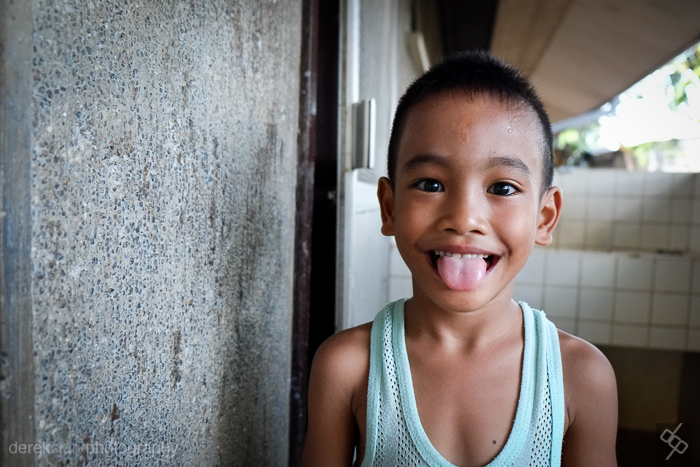
The picture above shows the exact opposite of the featured shot. We see a boy full of fun who doesn't seem to have a care in the world, a far cry from the one below, that sees him working in the yard cleaning up and burning leaves with a home made shovel.
This is the one I used from this sequence. This for me, is a great story telling image that makes the viewer read into it and hopefully ask questions. It's a natural moment that brings out empathy for the subject. The fact that he is using a homemade broom only enhances this feeling and draws us deeper into the story behind this young orphan boy.
The Digital Contact Sheet :: Episode 6

I recently uploaded a video to YouTube featuring a selection of my street photography during the 2014 Commonwealth Games in Glasgow (Scotland). It's kind of a video contact sheet in a way, as there are a few shots in there that are obviously short sequences. There is one picture in the video that seems to stand out for some people and as I remembered it was a lengthy sequence, I thought it would make a great Digital Contact Sheet. Feel free to check out the video mentioned above by clicking HERE. Click on the images below for a 1500px wide version.

I came across this guy feeding pigeons at George Square during the 2014 Commonwealth Games. I shot a few frames leading up to what you see above using the 10-24mm lens that Fuji had sent me to try out, but it was a bit wide so I switched to the 56mm f1.2. As you will see from the contact sheet, I started off at the subjects right hand side, but the background was messy and I moved from a low POV to standing. I still wasn't getting what I was looking for and I knew there was a good shoot here. I don't often spend as much time on a single scene when shooting street photography, but I felt it was worth sticking with and besides, neither the subject or the pigeons were bothered by me being there. I was using the Fuji X-T1. The X100S would typically be my weapon of choice, but I was testing lenses for Fuji too.

I moved around the scene in a clockwise direction, taking more shots than I normally would have, but the birds were changing constantly and I knew it would be a tiny move either way that could make the shot. I started off at f4, but as I moved to the subjects left side, I switched to f1.2 to blur the background and loose the distractions. Sometimes you can see all the elements of a photo and you just need to wait or keep shooting until those elements come together to make that single frame that works in all the right ways. Sometimes you wait and the scene falls apart and you get nothing.
 The image above is the straight out of camera JPEG. These last couple of years I've started to wear glasses, but I look over the top of them when looking through the viewfinder, tipping my head forward to try to get in as close as possible. This is not the best way to get level horizons, so as you can see from above and the final image below, I had to straighten the picture in post. But the point of showing the SOOC version is to let you see how nice the Fuji JPEG's are. The X-Series are the first digital cameras that I feel could have useable files without the need for computer work. If fact, adding Contrast and Clarity in Lightroom is all you might need for a great shot.
 This is the finished shot (above). 1/4000th of a second at f1.2 & ISO 200. After straightening the horizon as much as I could without chopping off part of the guys feet and hat, I sent it out the Nik's Silver Efex Pro 2 to get converted to B&W. This is my own preset for street photography, but it's mostly just a good mixture of Contrast and Structure. As long as my picture is exposed properly, it's a one click process in SEP2 and then save back in to Lightroom ready for export. As you saw from the contact sheet, there were many usable shots (maybe as many as 15), but on this occasion I felt that there was a possibility of something better. I was waiting on a gesture from the subject or something interesting from the birds. As I pressed the shutter and the image was displayed in the EVF, I knew I had got what I hoped for. In that single gesture of the hand, I knew I had what to me looked almost biblical. That was the last frame I shot of the scene with the X-T1 and the 56mm. Although I shot six more with the X100S and the TCL-X100, I knew it was pointless as I had the one I was looking for.
P.S. I have a new story published on the Kage Collective site today called Fashion Consciousness
The Digital Contact Sheet :: Episode 5
 I know I'm a week late with this, but I've had a lot going on recently and I wanted to give the previous post a bit of time at the top. I've selected a sequence of 25 shots that mostly aren't that amazing, but it shows that not every frame needs to be a great shot. But as I've said before, it can be more important to tell the story, and that can often mean choosing a lesser photo that's part of the overall story. Remember that some of these shots will reveal larger versions when clicked on.
 The digital contact sheet above, shows the photos straight out of camera (OOC). I have all my X Series cameras set to +1 Sharpness and the files are actually usable OOC. Add a bit of Contrast and a small amount of Clarity in Lightroom and the files really pop. Check out my buddy Patrick La Roque,'s test photos from the X100s HERE for some amazing examples of OOC files from Fuji's latest X-Trans sensor. Make sure you read his X100s review HERE
 This is my favorite frame, but straight OOC it's as flat as a witches tit and a bit overexposed. The composition is a little bit too centred for my liking, but it'll be too tight if I crop it at the same aspect ratio. I don't want it looking like a 10x8, so I'll have to live with it. I love that I shot this so close with the 35mm f1.4 and the guy had no idea I was even there!
 This is the edited colour version and to get to this point I did the following. I added my home grown Lightroom Preset '1:02. 20 Contrast & 15 Clarity' which does what it says on the tin. If you shoot with an X-Trans sensor Fuji and use LR4, it's a good idea to have a couple of presets that add about +20 contrast and a few variables of Clarity (+5, +10, +15 works well). I tend to apply these after import, but not on import, or you're stuck with them. I then added a Graduated Filter from the left with -1.82 Exposure to darken the uniform. I added a -30 Vignette (preset) and then boosted the Contrast up to +36 to make it pop a little more.
 It still wasn't reaching it's full potential, the main reason being that the colour wasn't doing anything to enhance it. So if the colour doesn't do it justice, it has to go. I made a virtual copy and applied my own Contrasty B&W preset and reduced the Highlight Slider a bit. The preset had re-set the Vignette slider to zero, but had darkened the shadows via the Tone Curve. I then applied a -20 Vignette to bring the edges that little bit darker. So this is the finished edit and was included in my essay 'A Mute Reminder' on The Kage Collective website.
 And finally, here are the other four picks from the contact sheet. The two colour shots at the top only have contrast and clarity added. They were actually usable straight out of camera. The shot at the bottom right was converted using my Contrasty B&W preset in LR4 and the one on the left was converted to B&W using my own custom preset for street photography in Nik's Silver Efex Pro 2.
So that's it for Episode 5. I hope this has been interesting and shown that a photo straight out of camera might only be half way there. Remember that everything I've done to these photos is the equivalent to what would be done in a darkroom. There's no Photoshop trickery involved, just film-like editing.
If you found this post useful, you might like Shooting Street Photography With The Fujifilm X100. My settings and method for shooting street.
The Digital Contact Sheet :: Episode 4
 Welcome to Episode 4. This time round we'll be looking at some shots of a comedian at last years Belladrum Festival in Scotland. I was there as a musician and had a lot of time to kill as we were the last act of the day. Festivals are great places to photograph as you get a huge amount of things going on in a relatively small space. There's live bands, comedians, fire eaters, vendors and some of the craziest humans on the planet! Click HERE to see a blogpost I did at that time for more shots from Belladrum Festival.
I could hear laughter coming from the tent and wandered in to see what was happening. I got the impression most of the audience were waiting for their favourite band to come on, rather than letting themselves enjoy this comedian's act. I didn't catch his name, but he was pretty good. Maybe someone will recognize him and let me know? Remember to click on any of the photos for larger versions!
Welcome to Episode 4. This time round we'll be looking at some shots of a comedian at last years Belladrum Festival in Scotland. I was there as a musician and had a lot of time to kill as we were the last act of the day. Festivals are great places to photograph as you get a huge amount of things going on in a relatively small space. There's live bands, comedians, fire eaters, vendors and some of the craziest humans on the planet! Click HERE to see a blogpost I did at that time for more shots from Belladrum Festival.
I could hear laughter coming from the tent and wandered in to see what was happening. I got the impression most of the audience were waiting for their favourite band to come on, rather than letting themselves enjoy this comedian's act. I didn't catch his name, but he was pretty good. Maybe someone will recognize him and let me know? Remember to click on any of the photos for larger versions!

So here's the contact sheet, shot in colour as always. All taken with the X-Pro1 with the 35mm f1.4 at 3200 ISO. There's nothong interesting in the colours here and certenly nothing that adds to any of the photographs, so it's black and white time (reaches under the desk for the one prepared earlier).

You can see from the black and white contact sheet that it's much easier to spot which ones work and which ones don't. Colour has the ability to make things more complicated, but black & white cuts it down to the basics.
The ones with the red X's are all missed focus. It's nothing against the X-Pro1 as it was very dark in that tent. The ones with the red outline are my picks and I could use any of them. Although I haven't outlined DSCF7362 (second one up on the left hand side), I actually quite like the amount of negative space in that shot. I chose the second last shot as my favorite because it's more af an action shot. He lunges forward to hammer home the punch-line. The rim light on his back is quite nice too!

This is it straight out of the camera, but rotated slightly to fix a tilt to one side. I'm sure you'll agree that the colours (what little there are), don't really do much to enhance the photo. The open door revealing the night sky is also a distraction.

I think this shot works well in black and white, which also brings out that rim light on his back. I decided to crop it down slightly to remove the second bank of stage lights that were creeping in on the upper left hand side. I found they were a distraction and could take your eyes on a little detour. The conversion to b&w was done in Nik's Silver Efex Pro 2, where I started off by using the Wet Rock preset (you've gotta start somewhere!). It took care of the open doorway enough to no longer be a distraction. I then added slightly more contrast, a bit more grain and I was done.
So that's it for this installment. I'm aiming to do a new Digital Contact Sheet on the first Tuesday of each month, which should be easy to remember. As usual, if you have any comments or suggestions, stick them in the box below.
The Digital Contact Sheet :: Episode 3
 It's only episode 3, but it's time to change the format of this feature. When I first thought about doing The Digital Contact Sheet, I imagined it with...well you know, contact sheets. But rather than sit on the idea for a while and get it right in my head and then transfer it into a blog post, I went ahead and jumped in before I really thought it through. That's not always a bad thing as ideas come thick and fast and most of them never see the light of day. So I kind of went with the "ship anyway" mentality, but now I'm changing it into what it should be, with proper contact sheets and all. I hope this is a welcome change.

This sequence of images were shot in Italy last year at The Moonlight Marathon near Venice. The Contact sheet, above, shows the photos straight out of camera, which in this case was the Fujifilm X100. This ended up being called Running Into Darkness and was my first story on the Kage Collective website.

I usually know while I'm shooting a project if it will be in black & white, Colour or a mixture of both. This shoot was always going to be black and white, so I've converted the contact sheet in Photoshop and used +70 of Contrast and +10 of Brightness. This also helps to show the markings in red. As this is The Digital Contact Sheet my markings were done with a Wacom tablet, rather than a wax pencil.

The red boxes are the frames I would use and the ones with the red X's are the rejects. The others are OK, but more than I need. The three with the stars are the ones that tell the story. It's interesting to see a sequence of images in contact sheet form. One of the things that stands out right away, is whither I have worked the scene enough. I know by looking at this sheet, that I would have liked to have moved around a bit more and got some different points of view. Remember to click on the contact sheet above to see a larger version.
 I was shooting with the X100 which has a full frame equivalent of a 35mm lens, so I'm pretty close here. It's a tense situation and I don't want to come accross as too mercenary, so the shots of the guy on the ground are all shot from the hip. I would have framed it differently if the camera had been up to my eye, but I think this wonky composition adds a bit of tension to the shot and works well.

I chose the frame above as my favorite, because it asks more questions than it answers. Is he alive? Is he dead? What happened to him? Is that blood on the ground or water? Is the man standing over him a stranger or a friend? is he performing CPR? The number on his shirt is turned up and not that noticeable at first. The guy standing over him is obscuring his running shoes (which would tell all). As part of the story, you already know what's going on here, but I think this frame stands up well on it's own and in some ways more powerful when taken out of context. I converted these three shots to black and white using Nik Software Silver Efex Pro 2. I used my homemade preset for street photography.

This is not the sharpest photo ever made, but the content is more important than the technical and this shot is really important from a storytelling point of view. It also reveals the running shoes which gives enough information to know what's going on.

This is the last shot of this sequence, although not the end of the story. I continued to shoot the runners until the last one had gone. I then turned my lens on the aftermath of hundreds of plastic bottles.
I believe a photographer can learn as much by going through a contact sheet as he can from actually shooting the photos. It's good to ask yourself questions. Did I get everything I could have? Did I work the scene and get all the angles? Did I get enough tight, medium and wide shots?
As always, I hope you've got something out of this post and maybe some of you will try printing a contact sheet and studying your photos more. The contact sheets in this post were made in the Lightroom 4 print module. I used Print To File to save the sheet as a jpeg.
The Digital Contact Sheet :: Episode 2
 I thought it would be a good idea to use Episode 2 to look at white seamless portraits. I met Ryan at my brothers 50th birthday party, where he was booked to provide the nights entertainment with his one man magic show. He's a very talented and highly entertaining performer and it's definitely worth seeking out one of his shows! I was shooting candids with the X100 and Ryan had asked if I would email him some of the photos. When I did email some photos to Ryan, I planted the seed for a portrait shoot and a couple of weeks later we got together to do this shoot. I used the Lastolite 6' x 7' HiLite background with the optional vinyl train. I shot with both umbrella and softbox that day. I use a large piece of plexiglass on the floor to give me a nice reflection under the subject, which looks great on both black or white white set-ups. I'll put some links at the end of the post to examples.

Above : This is one of the many frames that I used from this shoot, it's definitely not the best, but I wanted to choose something with a lot of negative space so that you could see how a shot can look so big, but actually be done in a small space. I really like negative space and I hate it when I hear a lot of photographers on the web giving advice like 'fill the frame'.

Above (left) : I decided to use a chair half way through the shoot, so that we could change it up a little. I started with the chair turned backwards and Ryan leaning on the back. I was pretty sure I wasn't going to use these shots, but I just needed to start somewhere and let it evolve.
Above (right) : We then re-introduced the cards (I had already shot some with a black background). Ryan started messing around with the deck, but it looked a bit stiff, due to the straight-on position of the chair. It's very easy to loose contrast with the HiLite as the lights inside the background are blowing it to pure white and coming straight into the lens.
The Lastolite HiLite : For those of you that are not familiar with the HiLite series of backgrounds - They basically come in a circular bag and pop out to their full size (in this case 6' x 7') just like a reflector. Then, with the HiLite lying flat on the floor, you lift each corner of the front section and place one of the rods to hold the front and rear apart. Stand the HiLite up and insert one or two lights inside and close the zips.
There's a two stop rule to white seamless, where the background should be two stops brighter than the main light. I would say a stop and a half works better with the highlight, to avoid loosing contrast. I always use a light meter when shooting with the HiLite these days and would definitely recommend you do to. I like to shoot at f8 with the HiLite. I aim to get my main light at f8 and the background light at f11.5. I then add a fill light to whatever looks good (if needed). I have also used another two lights recently, on the floor, outside of the vinyl train and blowing the floor behind the subject to white.
Below (top) : I moved the chair to an angle it made for a much more interesting photo. Ryan just ran through a series of shuffles and tricks. This was before I had the 60" umbrella, so I'm using two smaller ones as a main and a fill.

Above (bottom) : I move in closer so that I'm not throwing away pixels and I'm also getting Ryan at a higher resolution. At this point I started to realize that being a magician is similar to being a writer or a musician. You spend a lot of time on your own, practicing and perfecting your craft and it's even more lonely than editing photographs on a computer. This thought obviously came from Ryan's isolated look. I knew at that point that I wanted to put him in a big white room, isolated to one corner.
Below : This is the shot I wanted to use. I checked that the background was blowing to pure white and used a mixture of the Gradient Tool and Brush tool in Lightroom to get rid of all the things outside of the background. I then converted it to black and white. Ryan is a bit too central in this shot, but sometime you don't have the option when using such a small background.
I then moved over to Photoshop and as I knew everything was pure white, I selected the crop tool and set my background swatch to white. I then dragged the crop tool out to the full size of the photo and grabbed any of the four corners to pull the photo out to the desired amount of negative space (hold down shift to keep the aspect ratio the same), then hit enter and everything is filled with white. The result is the photo at the top of the post.

It's great to look back at photos that you shot in the past and see that you're getting better all the time. If I was shooting this now, I would work on my lights more to prevent losing so much contrast. Click here for an example of a recent shoot with great contrast.
You can see more of the Ryan Davidson shoot by clicking on these links White Background or Black Background
For more information on shooting and editing white seamless I would suggest reading Zack Arias's feature on his blog starting of course with Part 1. Better still, buy his Studio Lighting course on Creative Live. It's well worth the money and probably THE best thing to come from Creative live!
That's it for this episode of The Digital Contact Sheet. Leave me a comment if you get anything out of this or if you have any suggestions on how the feature could be better. I would also appreciate it if you could spread the word to anyone who you think would find this feature useful.
The Digital Contact Sheet :: Episode 1
 Welcome to episode 1 of The Digital Contact Sheet. I explained yesterday what the aim of this series was, but if you missed it, click here. I posted this photo (below) on my street photography blog 35mmStreet last summer and I thought it would be a good example to get started. All these shots were taken with the Fujifilm X-Pro1 and a 35mm f1.4, 125th sec, f3.6. ISO was set to auto and moved between 400 and 640. I don't recommend using Auto ISO with the X-Pro1 or X-E1 at the moment, due to the lack of a minimum shutter speed in Aperture Priority and the lack of Exposure Compensation in Manual Mode. But on this overcast day, the lighting was flat and Auto ISO done a good job.

- Image 1 (below, top left) I spotted this Chinese man from quite a distance away. I was hoping this wasn't going to be the only shot I'd get, but it's important to fire one off as soon as you can, just in case! But if this had been the only frame I'd got, it might still have been usable in black and white.
- Image 2 (below, top right) The woman walks into my frame and the man's eyes are half shut. This one is a reject and will never be used, but I'm now in position. My focus point was already set to the left of my frame as I am walking on the left side of the street beside the kerb (road side), so everyone is passing or coming toward me on the left.

- Image 3 (above, bottom left) I took this shot and thought it was the one I was after, but as he hadn't even noticed me (thanks to the black X-Pro1 and my invisibility cloak :o), I kept the camera to my eye and went for another.
- Image 4 (above, bottom right) Click, and number 4 is even better, but I'll go for another.

Image 5 (above) The 35mm f1.4 has a lag when focusing (18mm f2 is much faster), but in this case the delay between me pressing the shutter and the camera grabbing the shot, actually helped and got me something very unexpected. I knew I had got the best shot as soon as I heard the click, but when the LCD popped into the viewfinder for the preview, I knew I was done and walked on. Five frames taken and the subject still hadn't even noticed me.
Post Processing (top of this post) All shots from this days shoot were imported into Lightroom 4 and I applied my Fuji preset to all of them, which sets Contrast to +25 and Clarity to +15. That's always my starting point with the X cameras. I hit P for pick on shot 4 & 5 and then sent them over to Silver Efex Pro 2. As with all my street photography shots, it's one click and I'm done! I have made three versions of my own preset, one under-exposed by a stop, one over-exposed by a stop and one in the middle. I can see by the previews in the left side of Silver Efex Pro 2 which one is right for the photo and I click it and hit save to send it back into Lightroom. Job done! I only wish all my post processing was as quick as my street photography shots.
So thats it for episode one! I hope it's been of interest to at least a few of you? I'd really appreciate a bit of feedback on this series so I can tell if I'm on the right track. If you have the time, please leave a comment down below with your thoughts on The Digital Contact Sheet?
The Digital Contact Sheet :: A New Series

EPISODE 1 COMING TOMORROW
The idea behind The Digital Contact Sheet is to show a sequence of photos and explain why one was chosen over another or why one works and another doesn't. It could be a street shot, a portrait, documentary, wedding, landscape, basically anything under the sun. The point is to show what comes before or after the money shot! I'll also show the difference between shots that are straight out of camera and ones that are edited in Lightroom, Photoshop or Silver Efex Pro. It's a warts and all type of thing and I hope it will help or inspire anyone out there that doubts their abilities as a photographer or think that their photos aren't good enough. Maybe you need to take more, maybe you need to slow down and wait for the right shot and therefore take less photos? Hopefully there will be something in this series that will help another photographer in some way.
I'm not sure how this feature is going to work out! I might run it a few times, or maybe it will be an ongoing thing, I really don't know.... it's up to you. I'll post the first Digital Contact Sheet tomorrow. I just hope I'll have the words to describe what I need to, and make this a worthwhile feature for the readers of this blog. But I'll give it a try and hopefully some of you will get something out of it???